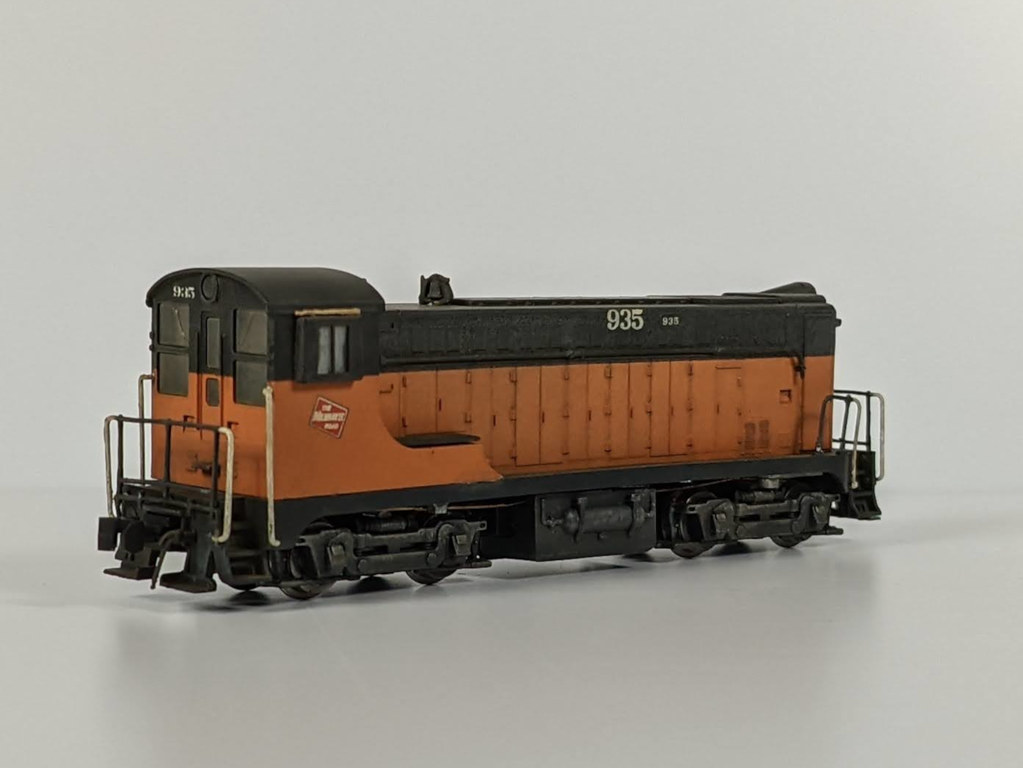
Recently I've finished my first successful locomotive weathering project, Milwaukee Road VO-1000 #935 in N scale.
This started as a collaborative project between
@Bryn and myself during lock down, as we both found we had the same unit, but separated by the Atlantic, and agreed that it'd be a fun little project.


A little background:
935 was the second number for Baldwin VO1000 1687. I could find no known images of this locomotive (it allegedly blew a crankshaft in 1965 and was scrapped early), but sister 933 is documented on page 41 of J. Micheal Gruber's
Diesels of the Milwaukee Road Volume 1. Given the quirks of Baldwins, different orders of the same model have different features (but not quite as official as EMD 'phases'). 933 and 935 were part of the third order by the railroad for these locomotives in 1944, so they
should be similar. But until images surface I can't be proven wrong

One major spotting feature is the sill step. The Atlas orange/black
Milwaukee models from 2002 have squared sill steps, regardless of road number. These are appropriate for the locomotives of the fourth and final order locomotives 936-939 (and these units also had 4 exhaust stacks instead of one). 935, being earlier, should have the stylish rounded "fillet" step, which Atlas has used on more recent VO releases.
So fixing the cab: the initial attempt was an etched fillet but it was deemed unsatisfactory. Undercoated filleted cabs were then ordered from Atlas, and the hood of my unit and the new cabs were mailed overseas to be paint matched and decaled by Bryn, of master-modeler caliber.
After the cab, details required for the unit per sister-933 were GMM all-weather windows (I struggled with these, Bryn graciously bent one with his fancy parallel action pliers), a Miniatures by Eric steam bell, BLMA airline hoses, canvas radiator covers and canvas shade covers over the cab windows (Bigelow black tea bags with a bit of .008 wire and Vallejo Iraqui Sand paint worked well for this). A benefit of the cross-seas nature of the project is that I was able to source detail parts not commonly found in the UK for Bryn. And given that I'm not handy with an airbrush, it's a task I was happy to do!
Next was weathering, ending up as a mixture of techniques, under Bryn experienced guidance and his recommended youtube tutorials (links at the bottom). Oils were the start over a clear satin coat, light cadmium yellow was used to fade the orange, Paynes grey on the black. A burnt umber and black wash add oily grunge to the walkways and steps. A burnt umber pinwash wash was then applied to the doors and louvers.
The fuel tanks and trucks are brushed Vallejo Model acrylics, Black Grey as a base, Neutral Grey, Burnt Umber and Iraqi Sand as drybrushes, using a black wash to tie it back together.
This was followed by a matte coat, more detailing and matching, the an application of burnt umber, black and grey Pan Pastels. Then final detailing, a final matte coat, and a heavy application of Pan Pastels, mostly burnt umber.
In simple terms, oils, acrylics, matte, powders.
The goal was that of a model of an everyday workingman locomotive and I feel quite happy with the results. There a few noticeable beginners mistakes of my own infliction, wayward glue, paint issues, flat coat orange peel on one side and I'm having a hell of a time with the short handrails on the front end- but I've accepted these as experiences to learn from.
It has been an incredibly satisfying project and one I'm glad we took up. Bryn's guidance kept me at it and on the straight an narrow, and was the push for me to keep at it. Without his experience and abilities this project would have never made it far- and I'm already eyeballing the next two locomotives on the weathering queue

More images will follow, including in progress shots and some working ones. Thanks for looking,
Lucas
Oil weathering tutorials:
https://www.youtube.com/watch?v=B11mAJGwt7Ihttps://www.youtube.com/watch?v=pl4kZW-e2dM