Author Topic: Removing graphic on Kato Amfleet Cars  (Read 1465 times)

0 Members and 1 Guest are viewing this topic.

eja

  • Crew
  • *
  • Posts: 1404
  • Gender: Male
  • Respect: +212
Removing graphic on Kato Amfleet Cars
« on: June 24, 2020, 12:59:35 AM »
0
Has anyone successfully remover the Amtrak logo from an Phase Vi Amfleet car without removing the blue paint beneath it?  How did you do it?

I would like to replace the current logo with the white AMTRAK used in the Phase IV paint scheme.

ed

spookshow

  • Crew
  • *
  • Posts: 1892
  • Gender: Male
  • Respect: +1987
    • Model Railroading Projects & Resources
Re: Removing graphic on Kato Amfleet Cars
« Reply #1 on: June 24, 2020, 06:47:28 PM »
0
I've been able to remove numbers from Kato locomotives by using a bit of 91% alcohol on a Q-tip. The base layer of paint is very tough and basically just ignores the alcohol. However, I've never tried it on a passenger car.

-Mark

Wutter

  • Crew
  • *
  • Posts: 392
  • Gender: Male
  • Respect: +247
    • Wutter Vehicles and Details
Re: Removing graphic on Kato Amfleet Cars
« Reply #2 on: June 24, 2020, 07:40:33 PM »
0
I think you should avoid doing this unless you are prepared to replace the striping as well. I used Solvaset to remove lettering on a Superliner Transition sleeper and the stripes are also printed on with ink, removing the lettering will also damage the stripe colors. The dark blue ink is more resilient than the thin white stripes but you will definitely see discoloration.
Alvin
Wutter Vehicles and Details
https://www.shapeways.com/shops/wuttervehicles

tehachapi highlight reel:

mcjaco

  • Crew
  • *
  • Posts: 1714
  • Respect: +110
Re: Removing graphic on Kato Amfleet Cars
« Reply #3 on: June 25, 2020, 09:25:35 AM »
0
I used 90% ISO to get the numbers off an F40, and the stripes stayed.  I just didn't let it sit very long, and rubbed very gently with a Q-tip. 


On the flip side, letting ISO sit too long, and it'll take the stripes of super easy.  It's kind of a fine line.


~ Matt

nickelplate759

  • Crew
  • *
  • Posts: 3336
  • Respect: +1039
Re: Removing graphic on Kato Amfleet Cars
« Reply #4 on: June 25, 2020, 12:23:52 PM »
0
If you do happen to ruin the stripes Microscale has decals for them that are easy to use.  Put them on right over the windows and carefully trim them after the decals are completely set and dry.
George
NKPH&TS #3628

I'm sorry Dave, I'm afraid I can't do that.

Wutter

  • Crew
  • *
  • Posts: 392
  • Gender: Male
  • Respect: +247
    • Wutter Vehicles and Details
Re: Removing graphic on Kato Amfleet Cars
« Reply #5 on: June 25, 2020, 12:47:34 PM »
+1
I used 90% ISO to get the numbers off an F40, and the stripes stayed.  I just didn't let it sit very long, and rubbed very gently with a Q-tip. 


On the flip side, letting ISO sit too long, and it'll take the stripes of super easy.  It's kind of a fine line.


I think the type of stripe printing is different on the Amfleets, I damaged my solid blue Phase IV striping just with a finger wet with IPA and no rubbing which is why I'm cautioning the logo removal. But yeah, as others said the Microscale stripe decals would be a good replacement if you have to go down that route.
Alvin
Wutter Vehicles and Details
https://www.shapeways.com/shops/wuttervehicles

tehachapi highlight reel:

peteski

  • Crew
  • *
  • Posts: 32966
  • Gender: Male
  • Honorary Resident Curmudgeon
  • Respect: +5345
    • Coming (not so) soon...
Re: Removing graphic on Kato Amfleet Cars
« Reply #6 on: June 25, 2020, 12:54:43 PM »
+1
Some stripes on certain newer Kato cars are printed on an ink-jet printed (not Tampo). That ink is probably more sensitive to alcohol that the Tampo ink.


If you look at the model under magnification the ink-jet printed stripe is fuzzy and shiny (right), where Tampo printed stripe has a sharp edge (left).
. . . 42 . . .

kscessandriver

  • Crew
  • *
  • Posts: 253
  • Respect: +55
Re: Removing graphic on Kato Amfleet Cars
« Reply #7 on: June 25, 2020, 10:18:16 PM »
0
I've been kicking around the idea of making an Operation Lifesaver Metra Pullman Bi-level (7883, if you're inclined to look it up). I actually happened to ride the car a few weeks back, so I had been looking to see how people re-decaled Kato cars. Well timed thread, thanks.

Now to find the OLS decals I need...

u18b

  • Crew
  • *
  • Posts: 3709
  • Respect: +1955
    • My website
Re: Removing graphic on Kato Amfleet Cars
« Reply #8 on: June 25, 2020, 11:58:02 PM »
+1
I guess I'm the odd man out here...

I use a fresh #11 Xacto knife and scratch stuff off.  It can usually be done well if done very carefully.

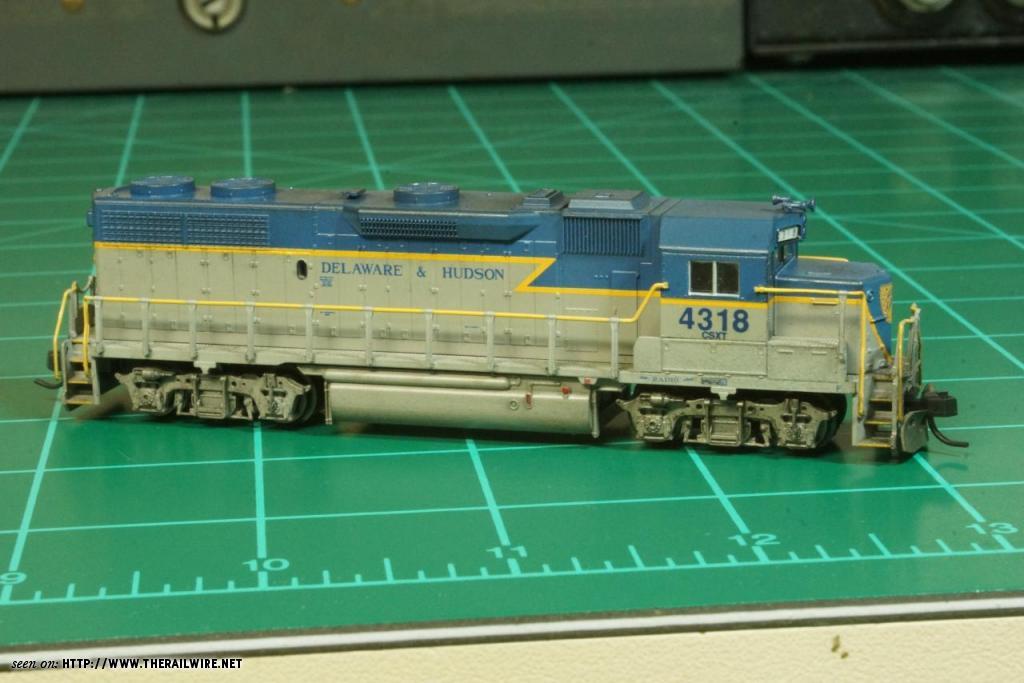
Here is a stock Atlas GP39-2.


To patch this for CSX, I scratched off the road number under the dynamic brake section (pretty easy).
And I scratched off the yellow shield from the cab and the battery box (a bit harder).

And this is the end result.
This is not a re-painted model.
It is stock with the unwanted ink-printing scratched off and new decals added.
(with a little bit of chalk weathering).
Ron Bearden
CSX N scale Archivist
http://u18b.com

"All get what they want-- not all like what they get."  Aslan the Lion in the Chronicles of Narnia by C.S.Lewis.

eja

  • Crew
  • *
  • Posts: 1404
  • Gender: Male
  • Respect: +212
Re: Removing graphic on Kato Amfleet Cars
« Reply #9 on: June 26, 2020, 12:23:53 AM »
0
Thanks for all the input folks, but I have decide to go another route.  I wanted to add an Amfleet I care to my Phase III Amfleet II train.  My railroad's time frame stops before the current Antrack logo was born thus the desire to create a Phase IV car.

Given my recent (lack of ) success modifying cars, I decide to go with a Pointless Arrow Amfleet I car.

Why add a Amfleet I car in the first place?   A car with two vestibules allows more passenger loading options which is useful at stops with limited platform length.

eja