Author Topic: Straighten a resin loco shell - how to  (Read 1327 times)

0 Members and 1 Guest are viewing this topic.

craigolio1

  • Crew
  • *
  • Posts: 2530
  • Respect: +1877
Straighten a resin loco shell - how to
« on: January 28, 2016, 11:23:18 AM »
+1
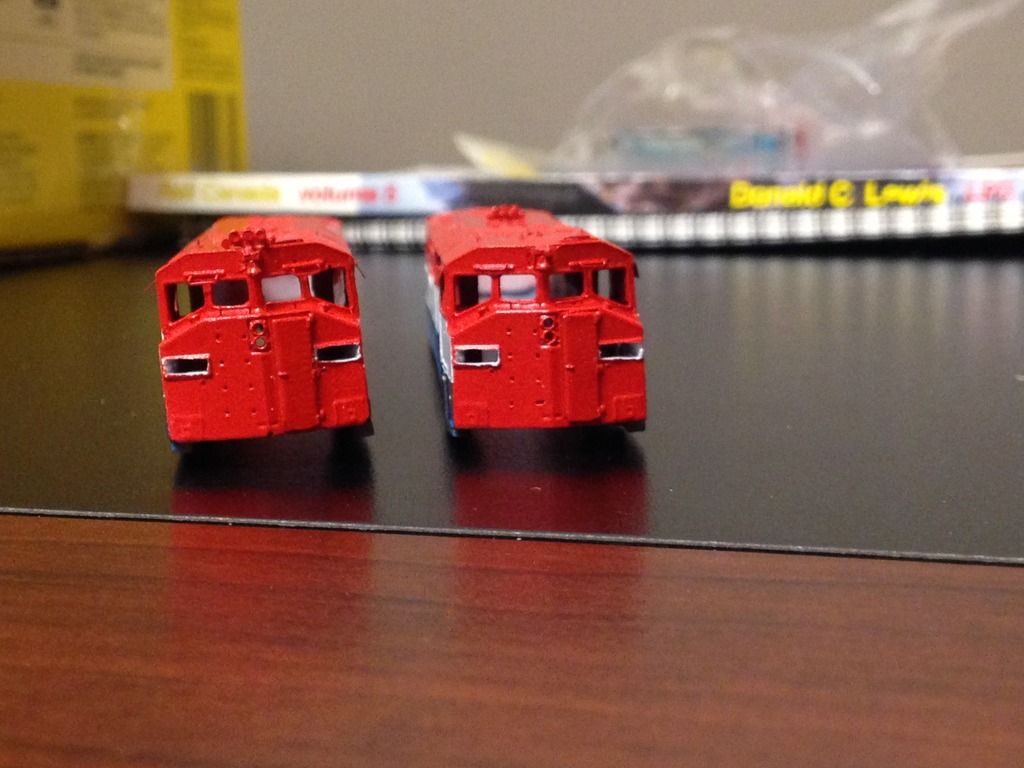
A while back I noticed that one of my Briggs Models 8-44CM resin shells was warped.  Notice the one on the left is leaning to the left.


I posted this photo on the Weekend Update and received several helpful suggestions, all including the use of heat to set it right.  I had used hot water to straighten flat styrene and resin parts prior to assembly but never on an assembled painted model.  Embracing the, "What's the worst that can happen", mentality I figured I'd give it a shot.

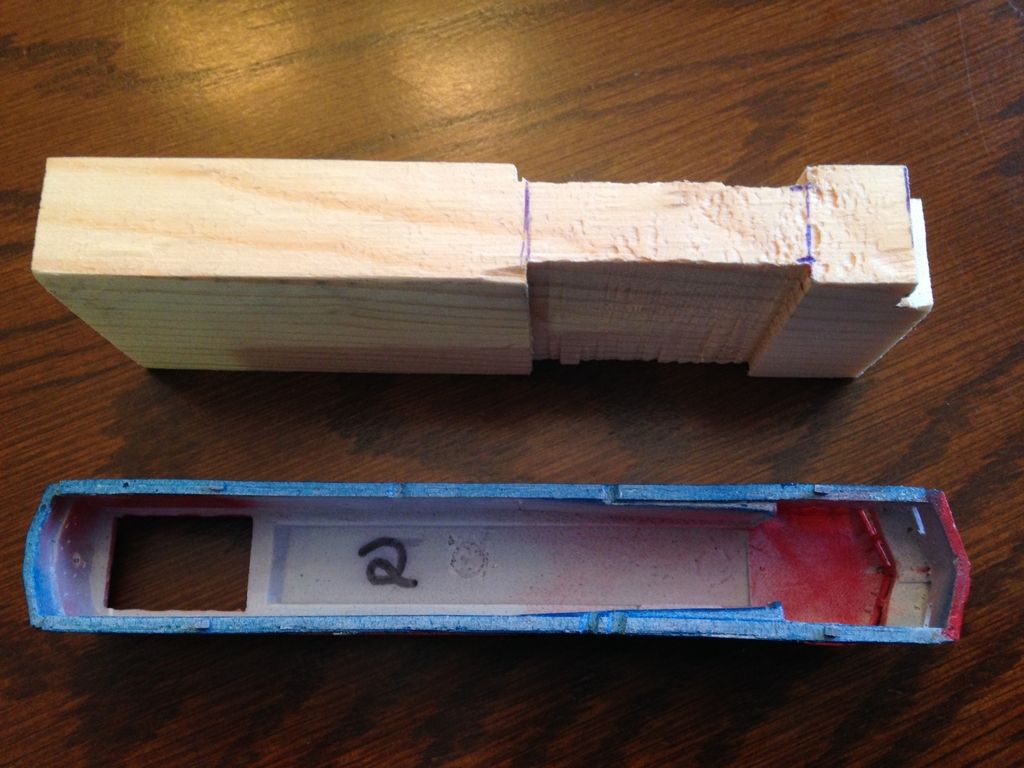
Thankfully I had a second shell that was straight.  I measured various points inside the shell and came up with a width.  I then cut a 2x4 block out on the table saw and sanded it so that it fit snugly but didn't require force to fit it inside the shell.  I also cut relief for the cab and where the tapers behind the cab are.


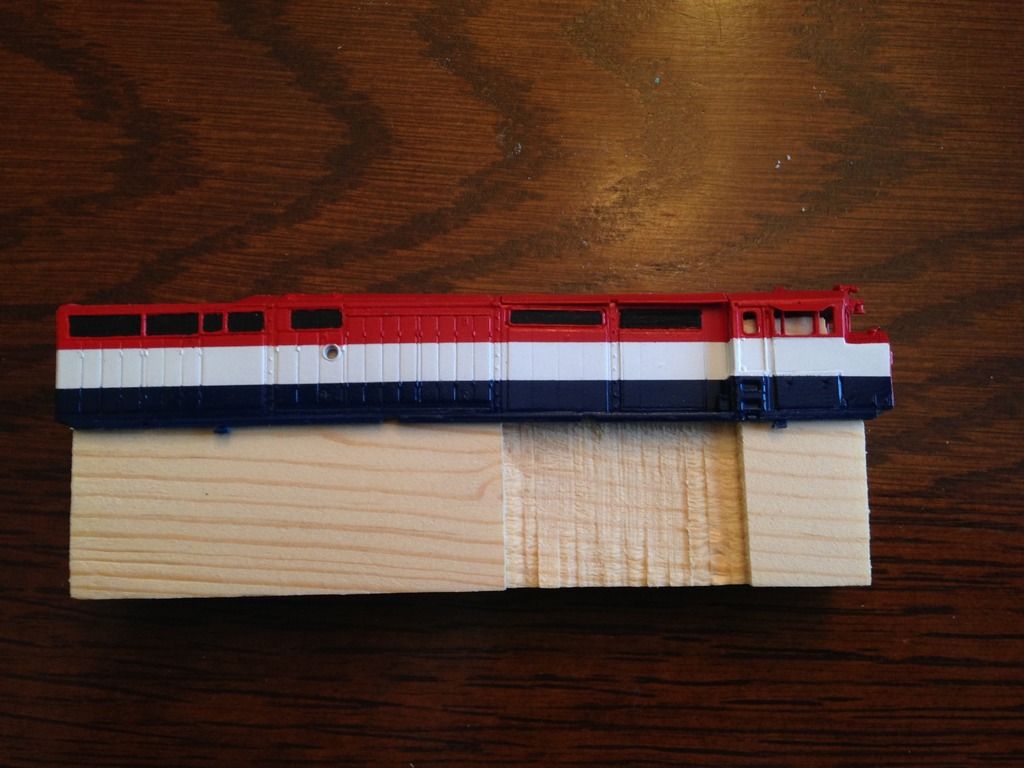
I boiled up some water and held the block with my tongs.  I submerged it in the water for 10 seconds.  It relaxed and almost fell off the block when I removed it, which would have been catastrophic, so in the future I'll set it up so I can submerge it right side up.


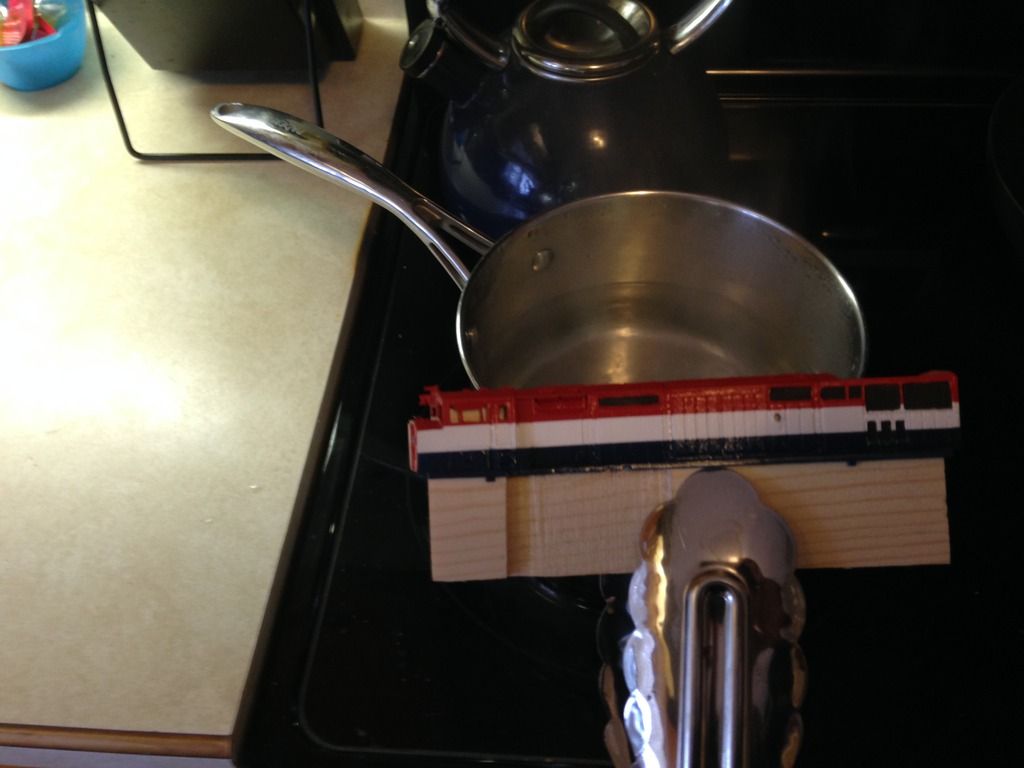
I let it sit after draining until it was no longer hot to the touch and slid the shell off the block.  The resin was still soft enough to position parts with a light touch so I fixed slight bows on either side, over the taper I had cut out, and that left me with a perfectly straight shell.


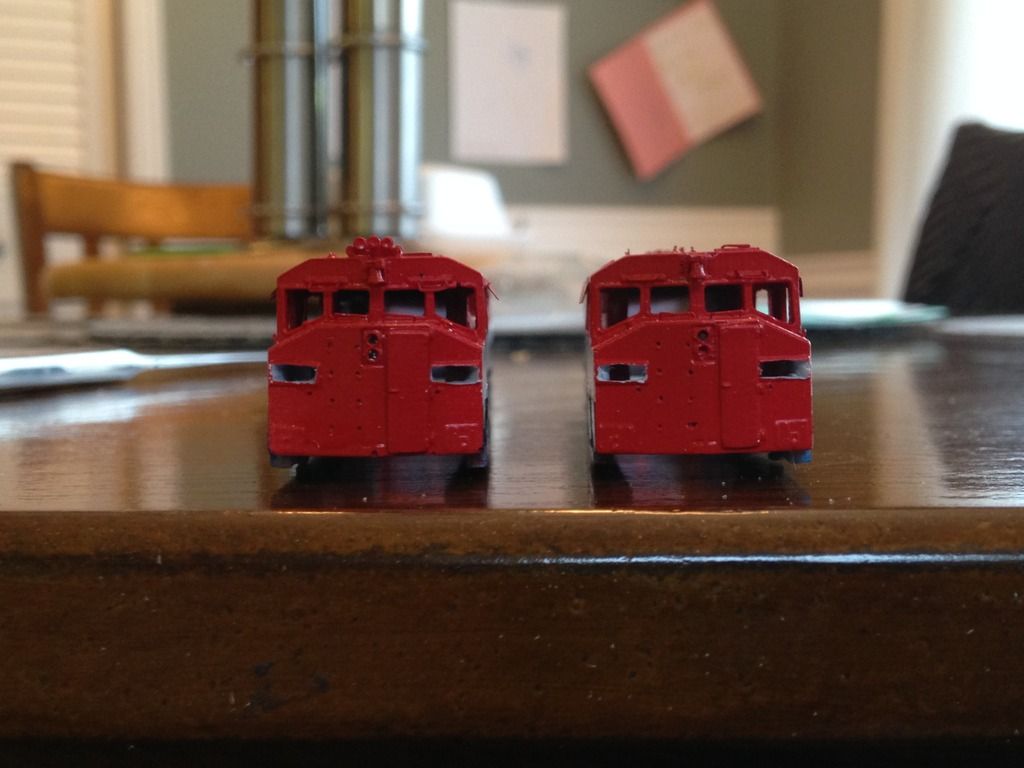
Quite an improvement:


The whole process took about 20 minutes.

Hopefully this can help someone in the future.

Craig


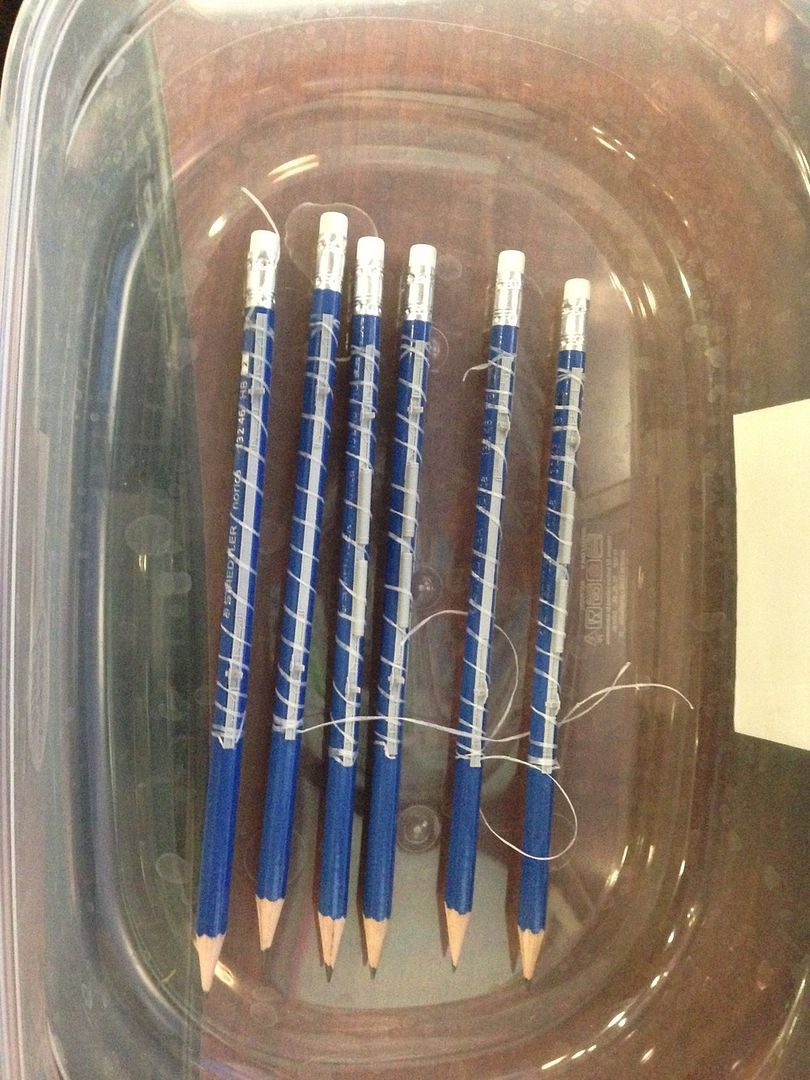
Edit:  while I'm on the topic, here a some parts I straightened a while back.  These are frame pieces for the Briggs Models M420.  They were wavy like crinkle cut french fries.  I lashed them to flat sided pencils with dental floss and submerged in hot water.  Worked like a charm, except in the future I will use un-waxed dental floss.  Ugh.


« Last Edit: January 28, 2016, 11:29:33 AM by craigolio1 »

BCR751

  • Crew
  • *
  • Posts: 835
  • A.K.A. Mr. Goodenough
  • Respect: +162
Re: Straighten a resin loco shell - how to
« Reply #1 on: January 28, 2016, 11:39:27 AM »
0
Isn't it fun to work with resin ! :facepalm:  I've had to straighten parts in almost every resin kit I've ever assembled.  I've also used the hot water technique with various "jigs" and it does work but what  PITA !  Same with some of the Shapeways stuff.  Give me styrene any day.

Doug

craigolio1

  • Crew
  • *
  • Posts: 2530
  • Respect: +1877
Re: Straighten a resin loco shell - how to
« Reply #2 on: January 28, 2016, 11:46:21 AM »
0
No kidding.  If one wants to model BC Rail, one had better like working with resin...    or at least like BC Rail more than they hate working with resin.

Please feel free to add anything you've tried.

Craig
« Last Edit: January 28, 2016, 11:51:15 AM by craigolio1 »

basementcalling

  • Crew
  • *
  • Posts: 3653
  • Gender: Male
  • Respect: +825
Re: Straighten a resin loco shell - how to
« Reply #3 on: January 28, 2016, 01:27:03 PM »
0
Now I know how to straighten my pencils. :)

BTW, now that the shell on the left is much straighter, I hate to point out it looks like the one on the right is also not sitting perfectly level.

Good post here. I have a resin shell I may have to treat the same way, but I don't have access to the cavity inside as it came with a floor.
« Last Edit: January 28, 2016, 03:16:14 PM by basementcalling »
Peter Pfotenhauer

craigolio1

  • Crew
  • *
  • Posts: 2530
  • Respect: +1877
Re: Straighten a resin loco shell - how to
« Reply #4 on: January 28, 2016, 01:51:46 PM »
0
I saw that too. I was hoping no one would notice. Haha. I tried fitting the block into it but it needs to be shaved down to fit.

rrjim1

  • Crew
  • *
  • Posts: 327
  • Respect: +44
Re: Straighten a resin loco shell - how to
« Reply #5 on: January 28, 2016, 02:15:30 PM »
0
Better Plastic, degas, pressure and heat cure and the shell will not warp. Made hundreds of bodies and haven't seen one warp yet! 

peteski

  • Crew
  • *
  • Posts: 33391
  • Gender: Male
  • Honorary Resident Curmudgeon
  • Respect: +5580
    • Coming (not so) soon...
Re: Straighten a resin loco shell - how to
« Reply #6 on: January 28, 2016, 03:09:53 PM »
0
Urethane resin is not the only thing prone to warping. Even injection-molded polystyrene items can end up warped.  That happens when the parts are are still too hot (and soft) when being ejected from the mold.  Or even if the are stored with some pressure causing them to warp when in storage for decades. I have had 1:24 scale model automobile kits which had warped bodies.   Similar hot water techniques are used to straighten those.
. . . 42 . . .

craigolio1

  • Crew
  • *
  • Posts: 2530
  • Respect: +1877
Re: Straighten a resin loco shell - how to
« Reply #7 on: January 28, 2016, 04:24:14 PM »
0
I have also experienced warped styrene kits. I built a dozen BCR wood chip hoppers a few years ago. The kits were very CHEAP, like maybe $5?  I knew what I was getting. The kit consisted of 2 sides, 2 ends and a floor. The floors and sides were so bad I couldn't even assemble a couple of them. Hot water flattened those parts too and they made decent models. Hmmmmm. I still have to paint those too.