Author Topic: Bachmann EM-1 Repair - brief tutorial  (Read 2813 times)

0 Members and 1 Guest are viewing this topic.

mmagliaro

  • Crew
  • *
  • Posts: 6391
  • Gender: Male
  • Respect: +1884
    • Maxcow Online
Bachmann EM-1 Repair - brief tutorial
« on: May 19, 2014, 01:29:38 AM »
0
I recently did some repairs on someone's Bachmann EM-1.  The two issues involved are not specific to the EM-1, so I thought I would share a few photos on the repair as they may be handy to others.

Issue 1: Engine stopped dead while running.  Would then run very slowly, but the front engine truck wasn't turning, just dragging.

Issue 2: Spotty pickup (stalling issues) - broken wire to the front engine truck.

Issue 1:
The front engine truck was jamming because the crank screw on the eccentric crank was loose, letting the eccentric spin around
eventually to a bad spot and jam.   Checking the engine, I found that all 4 crank screws were loose.  I positioned the cranks
correctly, tightened them all, and then found that the engine had a bad lope/tight spot in its rotation.

Eventually, I found that the bind was in the link between the eccentric crank and the expansion link. 

Here's a photo that explains it all:


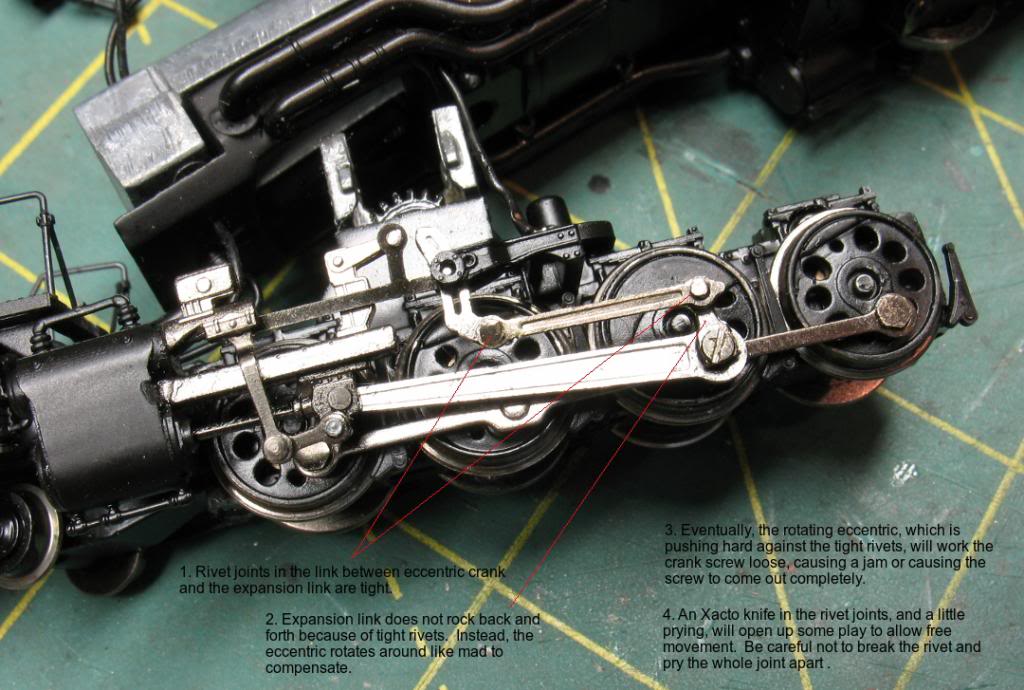
Remember, if you don't see that expansion link rocking back and forth like it should, and instead the eccentric is just
whizzing round and round, something is wrong.


Issue 2:
One of the 2 wires from the front engine truck was broken off, so there was no pickup from one rail from the front truck.
This pickup scheme, of having bronze tangs mounted in the truck, with wires soldered to them and snaked up into the frame,
is also used on the Bachmann 2-6-6-2.   It's a crummy design, period.  The potential for the wire to break off is high,
and the wire itself interferes with the free swiveling and rocking of the truck.   It can be made to work if you get the wire
positioned "just so".

To repair this, you must disassemble the engine enough to drop the truck out of the frame.

Here are some photos:


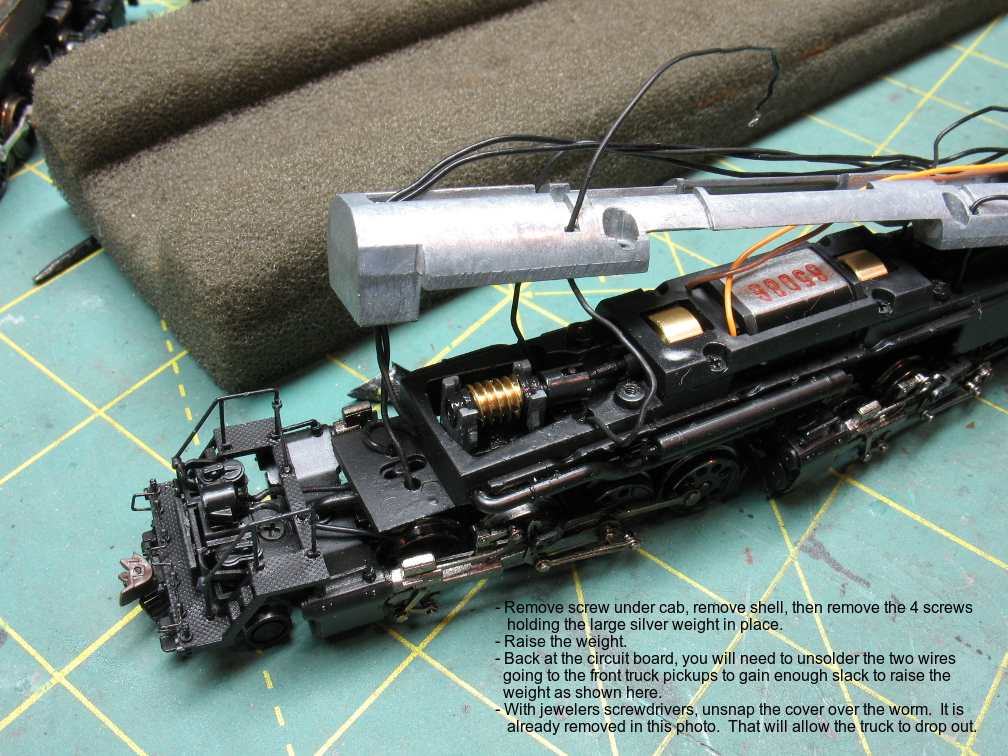
The toughest part was getting the cover over the worm to come off.  It's in a very tough spot.
I was able to get jewelers screwdrivers gently shoved in along each side to spread the cover a little, and then
it popped off.  The cover is the only thing holding the truck (and the worm, and the drive shaft) in place.

If you can, just resolder the wire to the little bronze tang sticking up near the center of the truck.
In my case, that was the failure point.  The wire didn't break.  The solder joint didn't break.  The tang itself broke off.
What to do?

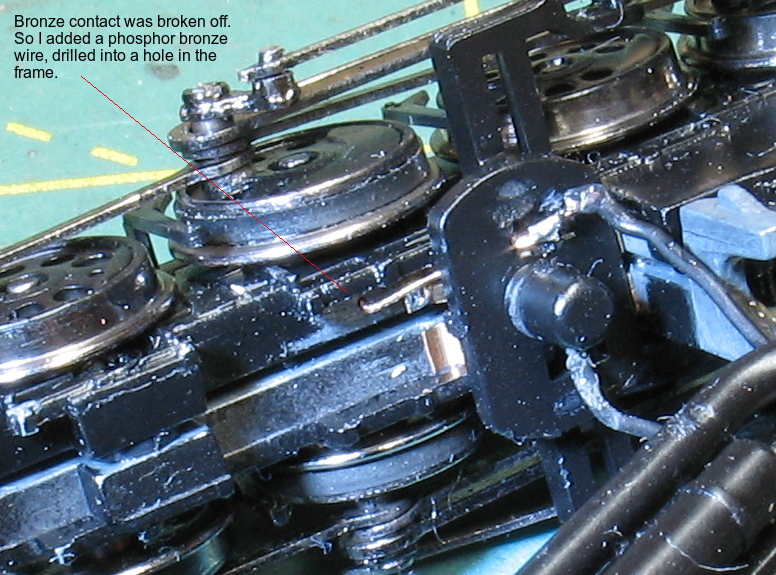
I drilled a diagonal hole in there, and shoved a bronze wire through.  Then, I drilled a #80 hole directly into the frame, bent the wire,
and stuck the end of it into the hole.  With lots of spring tension on it, I soldered the bronze wire to what was left of the original
contact.  That keeps the wire in tight contact with the frame.  Then, I soldered the pickup wire to the end of my
bronze wire.  There is NOT much room between the top of the truck and the bottom of the frame, so you have to
allow just a little nub in there to solder to. 

Here's a photo:


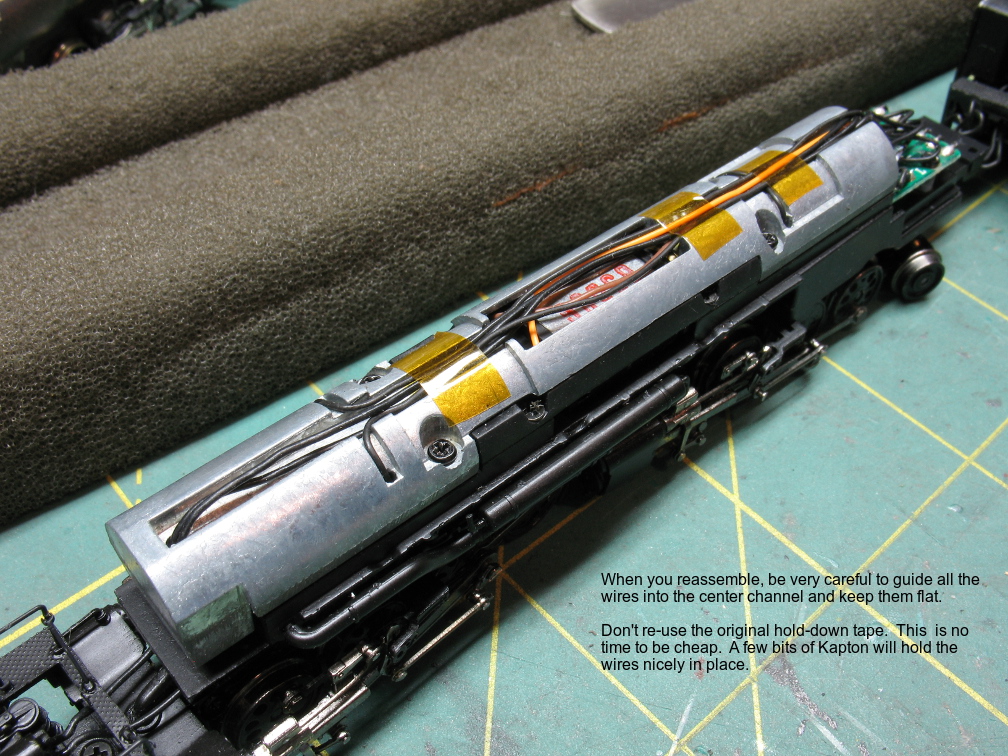
Finally, pull the wires up through the weight, and lower the weight back into place, being very careful not to let any wires
bunch up under the weight, or under the frame between the frame and the trucks.  And be especially careful not to skin
any of the wires.   Once you've got them all pulled up through and the weight is down, screw it back down and reroute
all the wires.


It runs beautifully once again.  No more binding, hopping, or wobbling (which it was doing before I finally figured out what was
going on with that eccentric).

« Last Edit: July 02, 2017, 04:15:20 AM by mmagliaro »

GN Fan

  • Crew
  • *
  • Posts: 71
  • Respect: 0
Re: Bachmann EM-1 Repair - brief tutorial
« Reply #1 on: May 19, 2014, 03:08:58 AM »
0
Thanks Max, you made my Loco run again.

For the rest of you here is a video of it now:


Tom

peteski

  • Crew
  • *
  • Posts: 33387
  • Gender: Male
  • Honorary Resident Curmudgeon
  • Respect: +5577
    • Coming (not so) soon...
Re: Bachmann EM-1 Repair - brief tutorial
« Reply #2 on: May 19, 2014, 03:14:28 AM »
0
Very nice and useful writeup Max!
. . . 42 . . .

glakedylan

  • Crew
  • *
  • Posts: 1485
  • Gender: Male
  • Give Respect. Expect Respect.
  • Respect: +244
    • Justice Kindness Humbleness —Micah 6.8
Re: Bachmann EM-1 Repair - brief tutorial
« Reply #3 on: May 19, 2014, 07:06:45 PM »
0
Max, great work and very fine article and helpful photos
thanks so much
Gary
PRRT&HS #9304 | PHILLY CHAPTER #2384

carlso

  • Crew
  • *
  • Posts: 1124
  • Gender: Male
  • Respect: +508
Re: Bachmann EM-1 Repair - brief tutorial
« Reply #4 on: May 19, 2014, 07:18:30 PM »
0
Thanks Max. That may come in handy with my AC-9 conversion. I dropped it and had to put exp joint back on.

Carl
Carl Sowell
El Paso, Texas

carlso

  • Crew
  • *
  • Posts: 1124
  • Gender: Male
  • Respect: +508
Re: Bachmann EM-1 Repair - brief tutorial
« Reply #5 on: May 19, 2014, 09:53:05 PM »
0
Max, thanks again for the tutorial. I have a question. In the photo showing the pb wire you added it looks like a lot of metal shavings. If in fact that is the case how did you clean it up before running? I was not careful enough when I ground down the weight to fit the AC-9 casting and am not sure how I should clean. Soak in alky, or blow off with a very light air stream from my air brush or maybe some other way.
 Any thoughts?

carl

Carl Sowell
El Paso, Texas

mmagliaro

  • Crew
  • *
  • Posts: 6391
  • Gender: Male
  • Respect: +1884
    • Maxcow Online
Re: Bachmann EM-1 Repair - brief tutorial
« Reply #6 on: May 20, 2014, 12:49:50 AM »
0
Thank you all for your nice words! 

Carl,
There are no metal shavings.  I am not sure what you are talking about, but if it's the white little specks in that super-macro photo,
that is just dust.   The only drilling I did was done with a pin vise.  I drilled a .020" diagonal hole down through the rectangular
slot (the hole that my wire is passing through).  I drilled a #80 (.013") hole straight down into the metal frame, where the end
of the .010" phosphor bronze wire is inserted.

There were some shavings from doing that drilling.  As I drill, I blow and brush them away, with a small soft paint brush,
always brushing in one direction only, and always brushing from inside toward the outside of the frame.  For the small amount
of debris involved here, that is fine.  If I were cutting with a cut-off wheel or grinder, forget it.  The whole frame has to come apart,
gears out, drivers out... everything out.   Grind away, then blow (just by mouth, nothing fancy), brush, then wash in alcohol,
let dry, and brush some more.    And keep the gears, drivers, motor, and bearings AWAY from the work area, in a clean bag,
when you are doing this.

I have been able to grind/cut a metal loco frame without disassembling by wrapping the whole thing securely in lots of masking tape.  You have to be careful to really seal the whole thing off from where you are grinding, and then brush and blow away really
well before you remove that tape.  Another nice property is that the sticky side of the tape tends to attract any flying metal dust that tries to get in there.  I did it that way when I made my PRR I-1 2-10-0.

This works.  But complete disassembly is better if you can do it.   

brokemoto

  • Crew
  • *
  • Posts: 1268
  • Respect: +246
Re: Bachmann EM-1 Repair - brief tutorial
« Reply #7 on: May 20, 2014, 11:30:14 AM »
0
Max,

Thanks for the tutorial/heads up.  I generally pass on big steam/superpower in favour of small to average sized steam, these days, but as this one is specific to one of my roads, I did buy one.  It did get a test run after I bought it, but it has been sitting in its box awaiting the reconstruction of my larger pike that has curves more fitting to the locomotive.  Still, the thing will take the UNITRAK thirteen and three quarter without complaining, so I put it on the track to check the expansion links that you cited.

It seems that the expansion links on the aft engine rock more/have a greater distance of travel than those on the front.  Further, the expansion link on the aft engineer's side engine rocks more than the other three.  Is this cause for alarm, or should I leave well enough alone?  If it ain't broke , I really do not want to fix it.  Conversely, if something should be done, I would prefer to do it before I get into trouble.  I have to wonder if the binding that you cited in the fore engine caused the wire to come off.

mmagliaro

  • Crew
  • *
  • Posts: 6391
  • Gender: Male
  • Respect: +1884
    • Maxcow Online
Re: Bachmann EM-1 Repair - brief tutorial
« Reply #8 on: May 20, 2014, 12:59:45 PM »
0
Broke...  If they are all rocking, you are fine.   You'll know you have a problem when you have one that is not moving at all, or is
moving almost not at all, and the eccentric (the little arm that is screwed to the driver) is spinning around taking up all the motion.

As for why they don't all move the same, it is probably the orientation of the eccentric crank as it is screwed into that driver.
When the rank hole is at the bottom dead center, the expansion link, eccentric rod, and eccentric crank should make a sideways "Z", like this:

| (expansion link)
|
|        (eccentric rod)
--------------------
                           | (eccentric crank)
                           |
                           X (crank hole)


Note, these parts have other names.  They are sometimes called the "fly crank", "fly crank link", and other names.

So if you have one that isn't set like this, the expansion link will rock a little more or less.  The important thing is to wiggle
the eccentric crank at the driver with tweezers and make sure it can't whiz around on the screw by itself.  If it can, you
need to set it in the proper position and tighten that screw.  But first, if you are brave, take the screw OUT,
and make sure the whole 3-piece thing can pivot on its joints very smoothly.  That is the source of the woes.