Author Topic: N Scale Logging Car...  (Read 1626 times)

0 Members and 1 Guest are viewing this topic.

Sumner

  • Crew
  • *
  • Posts: 359
  • Gender: Male
  • Respect: +764
    • My Home Pages....
Re: N Scale Logging Car...
« Reply #15 on: September 03, 2024, 08:36:36 PM »
0
Day's work...


Won't be getting much done the next 3 days.  Have to go get my pace-maker replaced.  The batteries are coming to an end after 9 years.  It has been good for me.

Sumner
Working in N Scale ---Modeling UP from late 40's to early 70's very loosely......

Under$8.00 Servo turnout Control --- 3D Printed Model RR Objects -- My Home Page

http://1fatgmc.com/RailRoad/RR Main/Link Page Menu.html

samusi01

  • Crew
  • *
  • Posts: 525
  • Respect: +583
Re: N Scale Logging Car...
« Reply #16 on: September 03, 2024, 09:23:33 PM »
+1
@Sumner

Hope all goes smoothly for you over the next couple of days.

I can't cut after they are in as they would then come up through the deck and ruin the detail at that point.

@peteski and I had a discussion about this a year or two ago - find yourself a sacrificial piece of thin metal, drill & tap, thread the screw in to the desired length, and cut off the part extending out the other side of the metal. Some minor cleanup may be required but you'll have screws to the length you need without needing to destroy any detail on the car.

When designing cars, I usually use Fusion's XY plane as top of rail. First thing I'll do is figure out where the trucks are going to go and create offset YZ planes, as well as a vertical axis that the truck can pivot around. Then I'll make an offset plane off the XY plane 0.216" above it - this is the center of the MTL coupler as defined by their diagrams and fairly close (less than an inch off, if I recall) from the average height of the AAR standard for coupler height. Then it's off to the races... I use components a lot and am not above recycling parts from other designs if they are applicable. One handy feature of using the axis for the truck is you can pivot it and find out if things are going to work or not before you ever start up the printer.


I have found this to be generally quite accurate, and the picture of the depressed center flat I posted in the most recent weekend update may well have been the first time that car sat on trucks - and coupler height was spot on using integrated an integrated MTL 1015 box.

wazzou

  • Crew
  • *
  • Posts: 6729
  • #GoCougs
  • Respect: +1655
Re: N Scale Logging Car...
« Reply #17 on: September 03, 2024, 09:38:38 PM »
0
Don’t take this as any criticism, please.
My initial comment is that they look nothing like skeleton flats that I’ve been accustomed to seeing, admittedly in the PNW.
Remember, they were designed to be lightweight.
Your drawing gives truss bridge vibes.
Many earlier ones used a large wood beam as the skeleton frame.
I’ve got a lot of pics and info if you’d like.
Bryan

Member of NPRHA, Modeling Committee Member
http://www.nprha.org/
Member of MRHA


peteski

  • Crew
  • *
  • Posts: 32958
  • Gender: Male
  • Honorary Resident Curmudgeon
  • Respect: +5343
    • Coming (not so) soon...
Re: N Scale Logging Car...
« Reply #18 on: September 03, 2024, 10:32:05 PM »
0
Sumner, instead of waiting for me to post the 1025 dimensions, you have a 1025 coupler in . . . your MTL coupler height gauge. Just take it out of the gauge and take the measurements.   :)  Remember that the lip at the top front of the coupler can be cut off flush with the surface of the cover to make the coupler box even shorter.  I don' like the chunkiness of the 1025s - theyir coupler boxes seem to have thicker walls (which in itself makes them look larger than 1025s).

Samusi01: I forgot about that discussion about trimming screws.  I wanted  to make that trimming plate but that idea got lost among my other projects.  It will come really handy ans I often trim screw length.
. . . 42 . . .

Sumner

  • Crew
  • *
  • Posts: 359
  • Gender: Male
  • Respect: +764
    • My Home Pages....
Re: N Scale Logging Car...
« Reply #19 on: September 03, 2024, 11:30:43 PM »
0
Thanks for the help guys.  Yes the car isn't really a skeleton car but kind of a mixture of what I've seen of some other types of log cars and looks like there are a ton of variations on log cars.  I can probably narrow up the coupler sections by maybe another .040" but that is about it.  Could neck down the middle and might do that at some point but for now when the trucks show up will see what happens with this as it is pretty much. 


samusi01 I designed it fairly similar to how you mentioned, just with some planes I quickly set up.  The bottom two objects are the rails and to the right there is a plane up a ways that is .216 (coupler centerline).  The body, truck and coupler are all different components that I came up with measuring those components (close any way).  I did rotate the truck like you mentioned to get the wheel-wells right or at least I'll see if they are right on the next print.  Thanks for the suggestions though, always looking for new ways to do things.


peteski "Sumner, instead of waiting for me to post the 1025 dimensions, you have a 1025 coupler in . . . your MTL coupler height gauge."

Thanks and looks like they are very similar.  1015 is somewhat shorter.  Since I'm leaving the narrow front part sticking out it is quite a bit shorter and that allowed me to move the truck closer to the end of the car.

I'll try to make a print when I get back home and maybe the trucks will show up later this week or first of next week and I can then decide where to go from there.  3D printing will put some limitations on the car but will let me print a lot of them way faster than scratch building them using another method and that is important to me.

Sumner
« Last Edit: September 05, 2024, 12:01:56 PM by Sumner »
Working in N Scale ---Modeling UP from late 40's to early 70's very loosely......

Under$8.00 Servo turnout Control --- 3D Printed Model RR Objects -- My Home Page

http://1fatgmc.com/RailRoad/RR Main/Link Page Menu.html

peteski

  • Crew
  • *
  • Posts: 32958
  • Gender: Male
  • Honorary Resident Curmudgeon
  • Respect: +5343
    • Coming (not so) soon...
Re: N Scale Logging Car...
« Reply #20 on: September 03, 2024, 11:57:13 PM »
0

peteski "Sumner, instead of waiting for me to post the 1025 dimensions, you have a 1025 coupler in . . . your MTL coupler height gauge."

Thanks and looks like they are very similar.  1015 is somewhat shorter.  Since I'm leaving the narrow front part sticking out it is quite a bit shorter and that allowed me to move the truck closer to the end of the car.

I guess that it is all in the eyes of the beholder.  The 1025 box seems clunkier than 1025 to me.  Yes, 1015 is shorter because the spring is in front of the post instead of being behind the post in 1025. But the rear of 1025 coupler box can be cut off without any ill effects. I do that when the truck bolster is close to the car end.
. . . 42 . . .

nkalanaga

  • Crew
  • *
  • Posts: 9896
  • Respect: +1446
Re: N Scale Logging Car...
« Reply #21 on: September 04, 2024, 01:48:32 AM »
0
My main objection to the 1015, visually, is the thickness of the box.  Mounted, it hangs lower than the 1025, which is about the same thickness as a standard center sill.  But that's the fault of the box, not the coupler. 

The width is about the same.

And, yes, they mount at the same height, for all practical purposes, and both have the same screw hole to end of car distance.
N Kalanaga
Be well

peteski

  • Crew
  • *
  • Posts: 32958
  • Gender: Male
  • Honorary Resident Curmudgeon
  • Respect: +5343
    • Coming (not so) soon...
Re: N Scale Logging Car...
« Reply #22 on: September 09, 2024, 09:45:33 PM »
0
Sumner,
I am wondering why didn't just incorporate a coupler box for the MTL "innards" right into your logging car spine?  That way you wouldn't have to deal with oversize coupler box or mounting screws poking through.
. . . 42 . . .

Sumner

  • Crew
  • *
  • Posts: 359
  • Gender: Male
  • Respect: +764
    • My Home Pages....
Re: N Scale Logging Car...
« Reply #23 on: September 09, 2024, 10:37:51 PM »
0
Not sure how one would do that and make it so you could assemble a coupler inside of it.  Care to draw that up for me and I might consider it.

Sumner
Working in N Scale ---Modeling UP from late 40's to early 70's very loosely......

Under$8.00 Servo turnout Control --- 3D Printed Model RR Objects -- My Home Page

http://1fatgmc.com/RailRoad/RR Main/Link Page Menu.html

Chris333

  • Crew
  • *
  • Posts: 18396
  • Respect: +5667
Re: N Scale Logging Car...
« Reply #24 on: September 09, 2024, 11:06:34 PM »
0
These are HOn30, but you can see how I let the sides of the 1015 coupler box become the sides of the center beam.
https://www.printables.com/model/682414-hon30-logcar

peteski

  • Crew
  • *
  • Posts: 32958
  • Gender: Male
  • Honorary Resident Curmudgeon
  • Respect: +5343
    • Coming (not so) soon...
Re: N Scale Logging Car...
« Reply #25 on: September 10, 2024, 12:19:17 AM »
0
Not sure how one would do that and make it so you could assemble a coupler inside of it.  Care to draw that up for me and I might consider it.

Sumner

That is beyond my abilities.
Just print the coupler box open on the bottom As if it was a 1015 box upside down), and then print the bottom cover or use the 1015's top cover.  The orientation of the coupler box (right side up or upside down does not effect the operation).  You could assemble MTL coupler 1015 upside down, and it will still work properly.  Top and bottom are symmetrical.
. . . 42 . . .

sirenwerks

  • Crew
  • *
  • Posts: 5847
  • Gender: Male
  • Respect: +380
Re: N Scale Logging Car...
« Reply #26 on: September 10, 2024, 12:43:20 AM »
0
I am going to throw out a lame suggestion, but would using 28" low pro wheels help in being able to design a car without the divets?


Does anyone have a Micro Trains# 114 00 050 log car to share measurements off of? While I know it suspended the coupler box below the beam and the flanges dragged on the boxes, it wasn't that bad of a model - although collecting a fleet of them would drain your dowry.
Failing to prepare is preparing to fail.

Sumner

  • Crew
  • *
  • Posts: 359
  • Gender: Male
  • Respect: +764
    • My Home Pages....
Re: N Scale Logging Car...
« Reply #27 on: September 10, 2024, 08:52:03 AM »
0
I just looked and printing the sides as the sides of the coupler box would save .060"/1.5 mm in width total, .030" per side, 10 scale inches.

For me that isn't a big deal.  I'm not the 'detail' modeler that a number of you are.  I appreciate what you guys can do though.  I'm designing these and other things for 'my' layout and my needs.  If I was 20 years younger I'd take more time on some of this but I'm not and at 80 will move on. 

When done I'll put the files up on thingiverse and others can decide if they are worth printing or not.

Sumner

"Live is full of compromises and so is my work"
Working in N Scale ---Modeling UP from late 40's to early 70's very loosely......

Under$8.00 Servo turnout Control --- 3D Printed Model RR Objects -- My Home Page

http://1fatgmc.com/RailRoad/RR Main/Link Page Menu.html

Sumner

  • Crew
  • *
  • Posts: 359
  • Gender: Male
  • Respect: +764
    • My Home Pages....
Re: N Scale Logging Car...
« Reply #28 on: September 15, 2024, 01:04:44 PM »
+2
You can find the print files for this 'low bunk' car on thingiverse ( HERE ).

===========================================================================

Some small changes to the detail as described in the preceding page were made. Also made some changes to the coupler pocket to make it a little stronger as a couple prints partially failed in one of the lower corners.
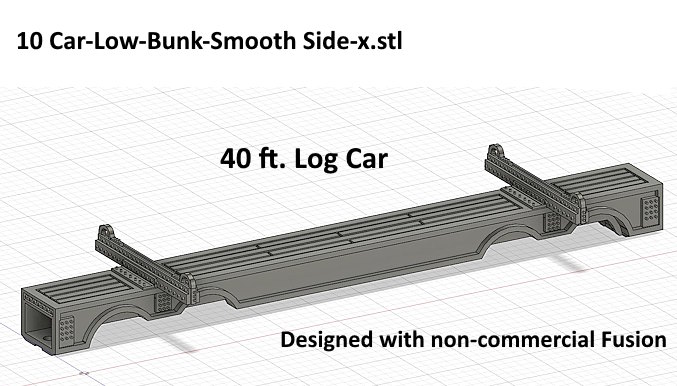

As I was writing this I noticed that the bottom row of bolts or rivets were missing on the plate at the front of the car. That was fixed but you won't see that fix on some of these images.
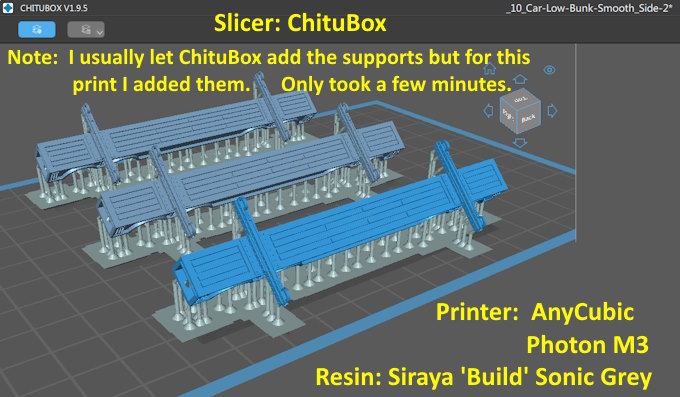


This is the first print where I placed all of the supports. I didn't like how they were automatically place by ChituBox around the coupler boxes and a few other places like the sides of the car on the side facing down above. It took less than 5 minutes to place them. Once placed you can then use the 'copy' command to generate how many other prints that you want.

When the print is done I do a first wash in denatured alcohol for 3-4 minutes with the wash-n-cure station. Then I switch to the cleaner container of denatured alcohol for the second 3-4 minute wash. Then I blow the parts dry and depending on how big/thick they are do a 3-4 minute cure (3.5 min for these).

I love the Elegoo wash-n-cure station since I don't have to mess with trying to hand clean the prints. Not sure if I'd do resin printing without it. I have a lot more on my printing station and the wash-n-cure ( HERE ).
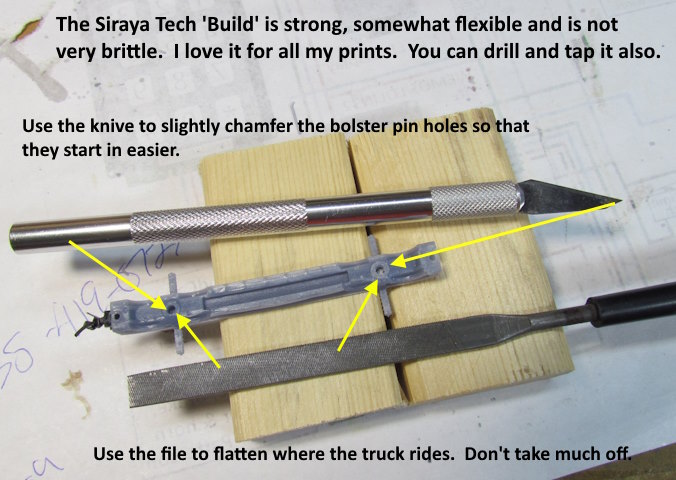


I haven't had to do much cleanup on these prints after the supports have been removed and that takes less than 5 minutes.

You want to flatten out where the trucks sit under the car. Don't get carried away, just a little file work will flatten them. Also take a knife and run it around the holes that bolster pins go in. Chamfer the top of the holes just a bit helps when you push the pins in.
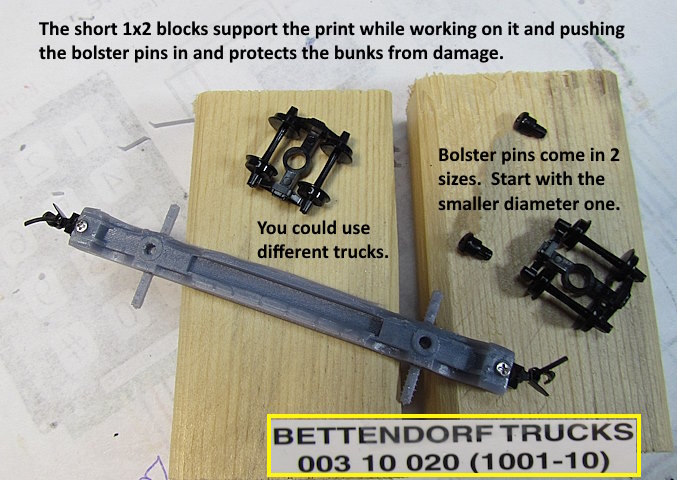


If you don't use something like the blocks shown above to support the care while working on it the tops of the bunks on the ends will probably be damaged. The support also helps while you are putting the coupler screws in and the bolster pins. Put the bunk in the space between the two blocks.

I chose Micro Trains Bettendorf trucks. They come with two bolster pin diameters. Start with the smaller one. After running the knife blade around the hole I've had no problem using the smaller pins that come with the trucks. With the blocks supporting the car you can use some pressure pressing the pins in (at least with the 'Build' resin).
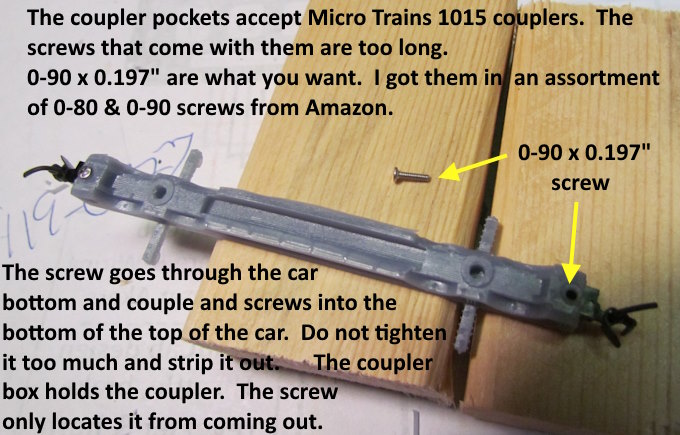


The screws that come with the Micro Train 1015 couplers are too long and will go through the bottom of the top of the car and stick out. You want to use 0-90 x 0.197 length screws for this. I got an assortment of 0-80 & 0-90 on Amazon and I think also eBay at one point.

The hole in the bottom of the coupler pocket is large enough the screw will slide through it and also the coupler. Then screw it gently into the top of the car body. Don't force and strip the threads the screw is creating out. The screw doesn't have to hold the couple up like in some cases as the pocket does that. The screw only prevents the couple from sliding out. Snug is good enough on the screw tension.

With my printer I haven't had to clean the inside of the coupler box up. The coupler slides in and is snug in the box.
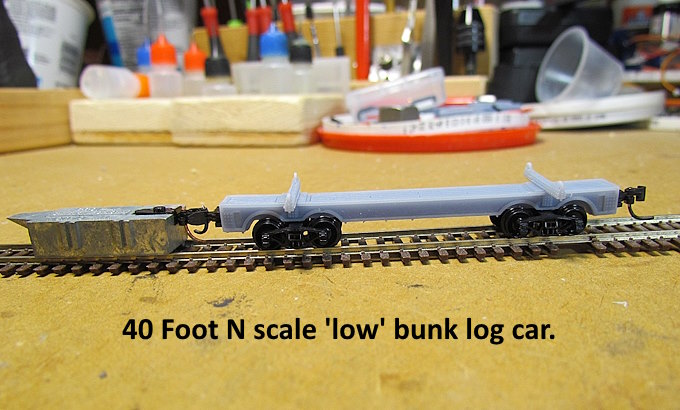


I feel I have the car/coupler height 'close enough'. With the box there is no way to change that.

I have some Z scale couplers ordered. With more thought I don't think I'll use them as I want the car to be as close to compatible as possible to the other equipment. Keep in mind that this wasn't meant to be a perfect or close to perfect scale model of a log car. For me I only need it to represent one and have taken a lot of license in designing it.
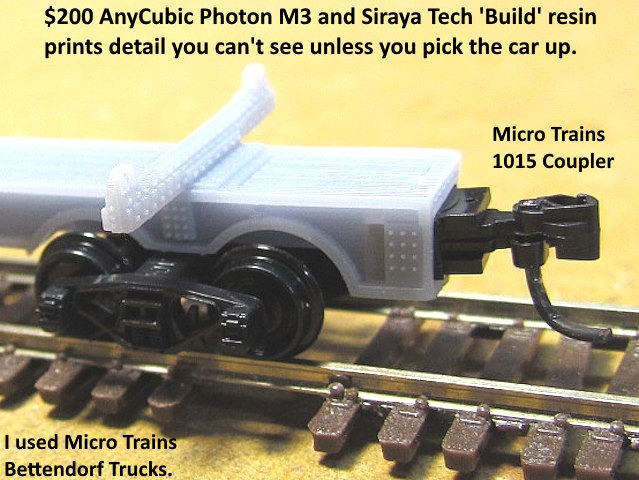
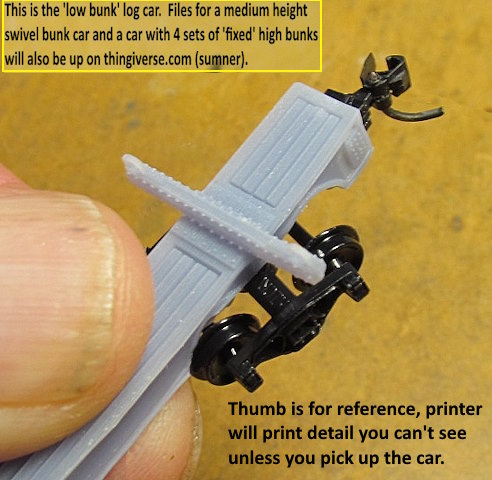


I realize that higher and higher resolution printers are coming but wonder how many of us they benefit. I'm impressed with the detail in the car show above but on the layout you can barely see it from 12-14 inches away. I'm more interested now in build volume as long as I can get this detail.
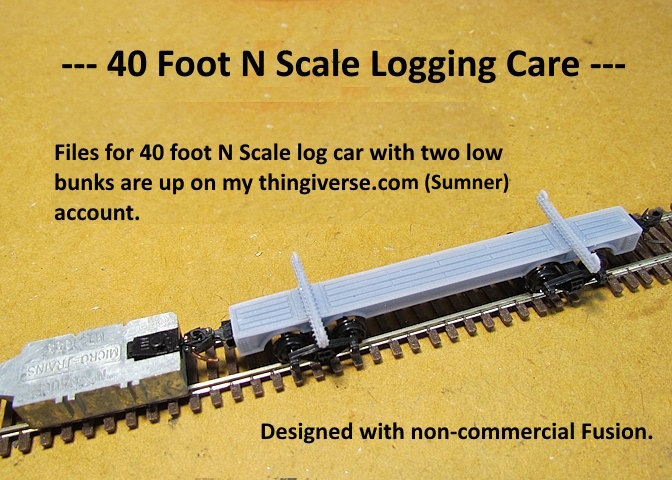


If you are doing CAD work and not happy with the program try Fusion. It is free if you aren't doing commercial design work and one can create designs really quick with it. Start slow and build on learning other features. I designed a lot of things right off the bat by learning what is in the video ( HERE ). Learn what he shows you in that video and you can design a lot of things using those tools. I only use 15-20 fusion tools to design all that I design.
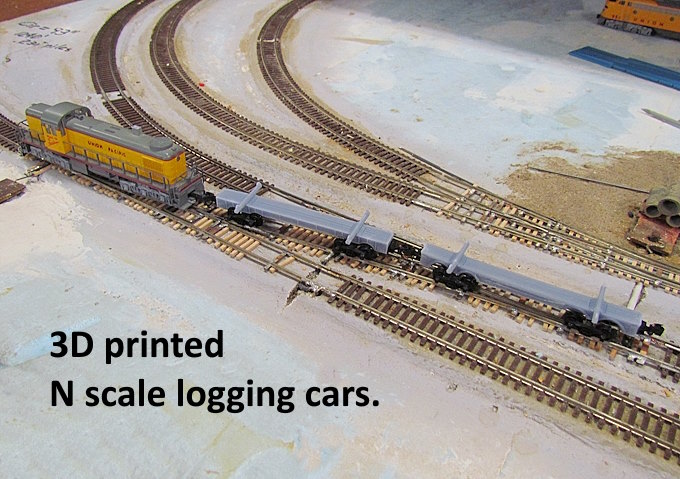


I put a couple of the earlier designed and cars on my small test layout for a test run. I pulled and pushed them through some of the turnouts without a problem. Not sure if all that will be true if there were 10 to 20 of them together. There is a little room for strips of lead weight in the bottoms at the moment which might help and with log loads things might prove to be better or not.

 =============================================================

You can find the print files for this 'low bunk' car on thingiverse ( HERE ).

=============================================================

A link to this whole build ( HERE ).

Sumner
« Last Edit: September 15, 2024, 01:07:59 PM by Sumner »
Working in N Scale ---Modeling UP from late 40's to early 70's very loosely......

Under$8.00 Servo turnout Control --- 3D Printed Model RR Objects -- My Home Page

http://1fatgmc.com/RailRoad/RR Main/Link Page Menu.html