Author Topic: Best Of New Brass EP-2 assembly & Mod clinic  (Read 107402 times)

0 Members and 1 Guest are viewing this topic.

u18b

  • Crew
  • *
  • Posts: 3709
  • Respect: +1954
    • My website
Re: New Brass EP-2 assembly & Mod clinic
« Reply #15 on: October 28, 2013, 11:48:14 AM »
0
Next, I solder a red DCC quality jumper wire.  I use red even though it is potentially a tiny bit conspicuous because it helps keep future DCC wiring straight.  I can always paint the lower part black if it can bee seen.
In this case, Red is for the right rail (R=Right=RED  all Rs).  So the front idlers trucks on both ends with go to the right rail.  The power trucks and the frame will be connected to the left rail.


The wire is looped through the hole to the topside.  Not that the placement of the wire and the tiny solder joint will not obstruct the truck and the pickup.  Also, that insulating edge we filed on the PC board comes in handy here so the solder can be on the edge but yet not risk touching the frame.


Time to finally do some assembly.
The fiber insulating washer goes on the truck screw.


Both then go through the front-most big hole.


Plastic bushing goes on the underside.  The small portion goes up to the frame.


A metal washer then goes last-- though I'm not decided how much I need this washer.  Sometimes the screw is too tight with it, and sometimes just right.  Obviously, removing it will effect the height of the coupler ever so slightly.


There are times I wish I had three hands.  Holding the truck, the frame, and screwing the screw to the truck is tricky.


Now it is starting to look like something.


This shot shows the clearances work out very well.
No more breaking jumper wire!


This is a different view.  Note that the swinging of the wiper is at a good length.


Ron Bearden
CSX N scale Archivist
http://u18b.com

"All get what they want-- not all like what they get."  Aslan the Lion in the Chronicles of Narnia by C.S.Lewis.

u18b

  • Crew
  • *
  • Posts: 3709
  • Respect: +1954
    • My website
Re: New Brass EP-2 assembly & Mod clinic
« Reply #16 on: October 28, 2013, 12:29:05 PM »
0
Now, before we leave the front idler truck, we might as well install the coupler.
It also is not a drop fit and requires modification!

Like many brass locos, it is designed to take the old MT 1025 coupler.


The first thing that has to go is the lip on the front edge of the top.  Better to do this BEFORE you assemble the coupler.


Now it need cleaning up with an Xacto knife.


Here is the assembled coupler without the lip.  I use the soldering iron method to melt to pieces together.
There are still two problems.
Hole is too small.  KMT screw is bigger.
Coupler is too wide for the slot.  Has to be trimmed down.


To open up the hole, I just use the tap to get me "in the neighborhood".  I little round file can take it the rest of the way so the screw can pass through.


Now it is a little hard to see, but I have trimmed the edges from the center forward.  The tricky part is that right edge where the guide hole is.  You have to leave a thin strip there.
Actually, after test installing, the edge at the front next to the coupler was still too wide and needed trimming.


Since the coupler actually goes under the front pilot axle, it is sometimes easier to install the coupler if the cover plate is removed and the small front wheels are removed.
Here, the coupler is in place.  A tight squeeze!


Ron Bearden
CSX N scale Archivist
http://u18b.com

"All get what they want-- not all like what they get."  Aslan the Lion in the Chronicles of Narnia by C.S.Lewis.

u18b

  • Crew
  • *
  • Posts: 3709
  • Respect: +1954
    • My website
Re: New Brass EP-2 assembly & Mod clinic
« Reply #17 on: October 28, 2013, 12:41:09 PM »
0
Next, it is time to move to the new 4-axle power truck.
Ron Bearden
CSX N scale Archivist
http://u18b.com

"All get what they want-- not all like what they get."  Aslan the Lion in the Chronicles of Narnia by C.S.Lewis.

u18b

  • Crew
  • *
  • Posts: 3709
  • Respect: +1954
    • My website
Re: New Brass EP-2 assembly & Mod clinic
« Reply #18 on: October 30, 2013, 10:57:05 AM »
0
Now it is time to turn our attention to the power truck.
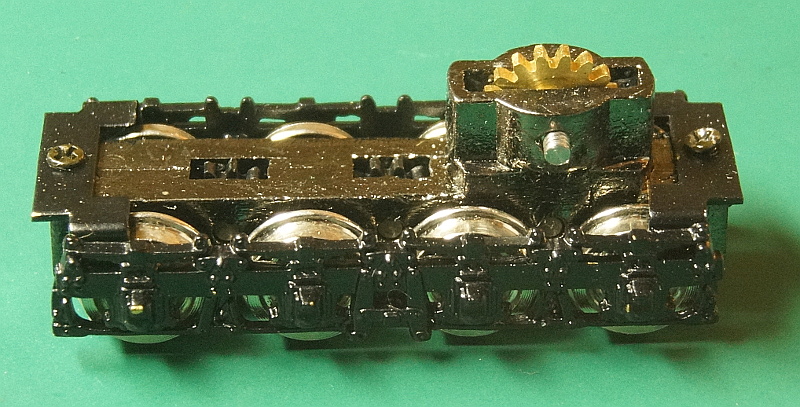

This is one of the more exciting aspects of this new model. 
The old NJ 83 version only had two powered axles per truck- and all of the weight was not even on those two axles.  They ran terribly.

But these new trucks have all 4 axles powered.  Weight distribution is no longer an issue at all.

In the kit, the truck came fully assembled.  But here is where potential benefit can come in.
Most of the friction in this loco is in these power trucks.  So if I can lower friction in any little ways possible, it might add up to big returns.

Spinning the crown gear (or main drive gear) can give a subjective "feeling" for how the truck is working.  It feels a little stiff.
Also, if you place the truck on track and merely push it with your finger from the end (not top), then the truck will SLIDE along the rails and the gears and wheels will not move.
Remember this for when we are finished.
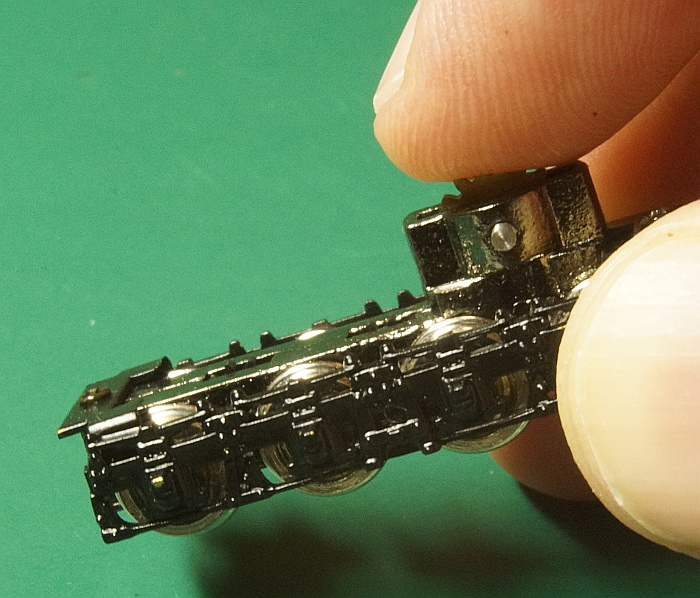


Disassemble the truck by removing the headless screw in the geartower, and the four small screws that hold the bottom cover plate and the sideframes.
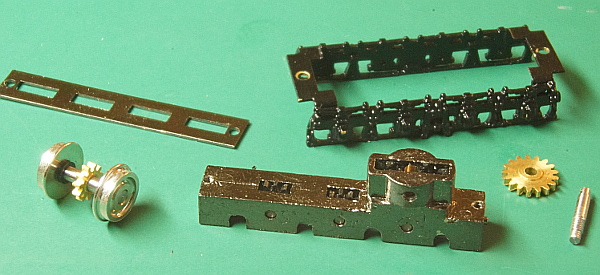


But we need to COMPLETELY disassemble this truck.  Those pins need to come out with their transition gears.
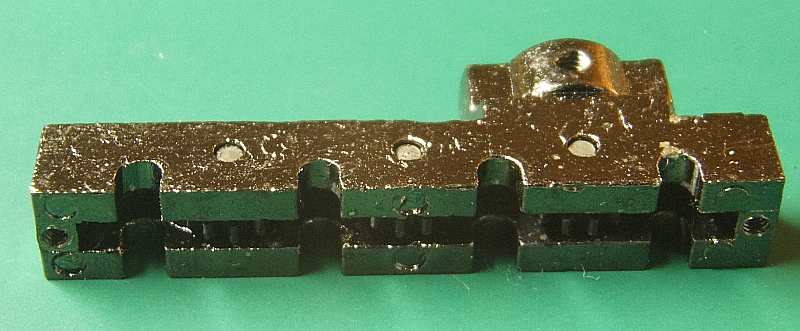


VERY IMPORTANT!  These pins should be treated as if they only go ONE way.  If you push them out one way and then insert them back another way, then the frame metal will be stretched a bit and the pin will be loose.

If you study the frame and pins carefully, you can figure out which way they went in.
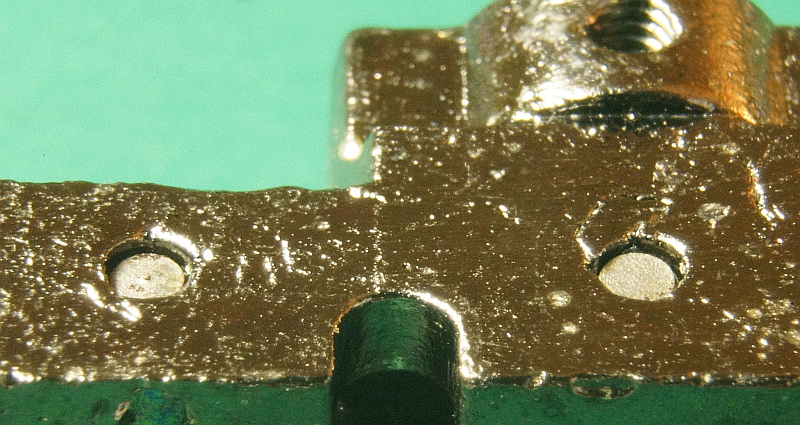


In the photo above, note that there is a little hollow at each pin.

Now look at the other side.
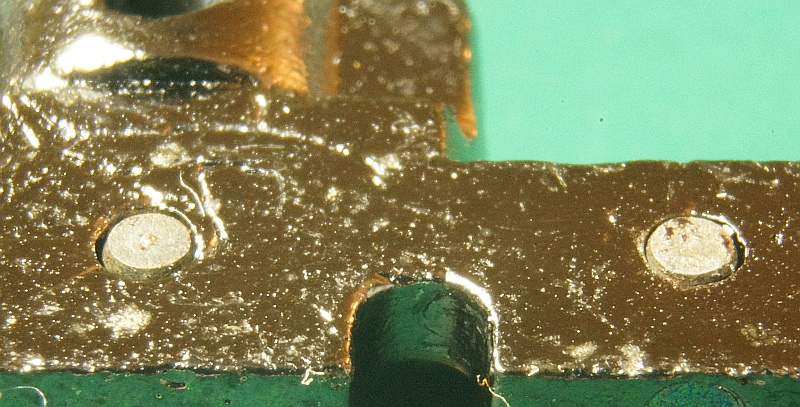

On this side they are flat---- even with the frame.
So THIS side is the side that the pins were beaten in.
So we want to press them out from the side with the hollow!

But if we are not careful, we will loose track of what we are doing.  So I make a mark on the side that I will insert them back. (the even side).
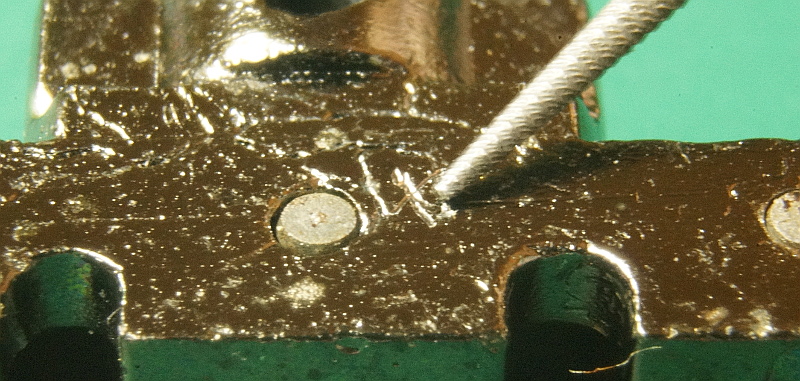

A little fuzzy, but you can see my tiny X.
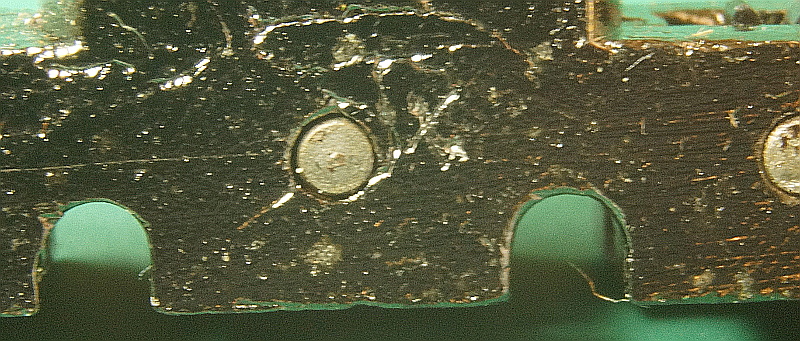


Some specialized tools will help.
Obviously a NWSL puller could possibly press out these shafts- but I find it is cumbersome for this application.
So I made my own tool.

I took a 2x2 piece of wood from a leftover portion of a layout module leg.  Square ends helps.
I then mounted a T nut in one end.  I drilled the large hole for the center section just deep enough for the metal and then mounted a big long screw to hold it down.

I then found a drill bit that matched the little hole almost perfectly and drilled it fairly deep.  This is the receptacle for my shafts.  They can drop in.

The punch was an old Dremel bit.  I think this one had a little tiny ball on it. I cut the ball off with a ceramic disc.   I like this bit/punch because it has such a sharp taper.

I can now use a little brass hammer that I got cheaply from Harbor Freight and beat shafts out of worms (I do that a lot) or here in this case.... to get those pins out of the gearcase frame.  Remember, I'm working on the HOLLOW end.
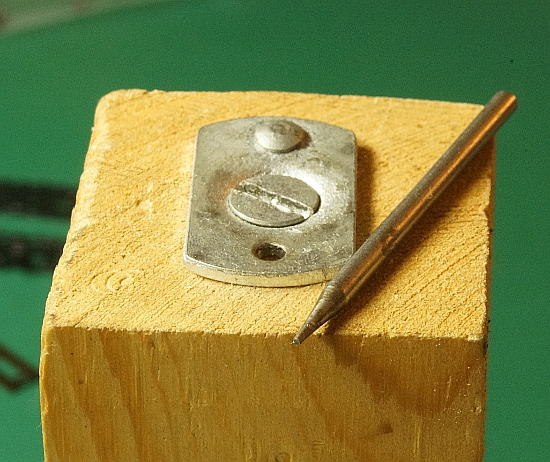


Just line up the pin or shaft over the little hole and tap it out.  If the pin or shaft falls down in the hole, it does not get trapped.  Just turn the block over and it will fall out since the hole in the wood is the same size as the hole in the metal.
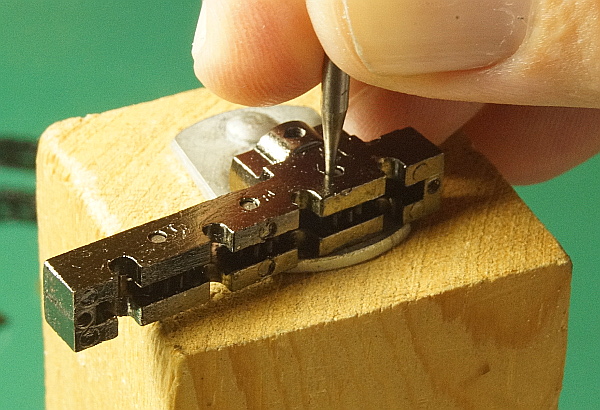


OK.  The first pin has been beaten gently.  I can now pull it out with my fingers and get the gear out.
Two more to go.
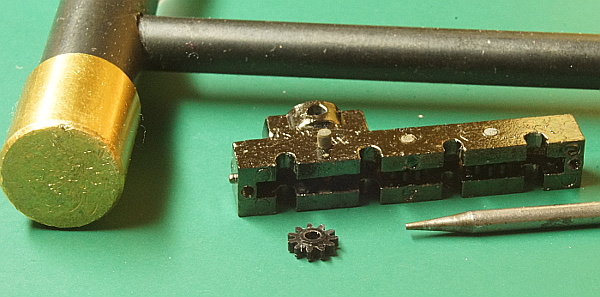


Now I am down to the bare gearcase frame.
One other thing to notice that Kumata did on this new model is chrome plate the Zamac metal.
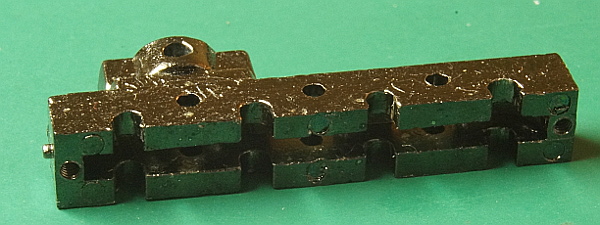

Now time to get to work on the mods for this truck.

« Last Edit: October 30, 2013, 12:08:15 PM by u18b »
Ron Bearden
CSX N scale Archivist
http://u18b.com

"All get what they want-- not all like what they get."  Aslan the Lion in the Chronicles of Narnia by C.S.Lewis.

superturbine

  • Crew
  • *
  • Posts: 909
  • Gender: Male
  • Respect: +62
Re: New Brass EP-2 assembly & Mod clinic
« Reply #19 on: October 30, 2013, 11:15:13 AM »
0
Thanks for sharing,  I am really enjoying your build.

mmagliaro

  • Crew
  • *
  • Posts: 6368
  • Gender: Male
  • Respect: +1871
    • Maxcow Online
Re: New Brass EP-2 assembly & Mod clinic
« Reply #20 on: October 30, 2013, 11:48:51 AM »
0
Great project, Ron.
I think I know where you're going with friction in those trucks.  The Bachman 2-6-6-2 engine trucks had similar issues where the gears didn't spin free on their pins, but I'll await your next installment to see what happens here.

u18b

  • Crew
  • *
  • Posts: 3709
  • Respect: +1954
    • My website
Re: New Brass EP-2 assembly & Mod clinic
« Reply #21 on: October 30, 2013, 03:07:57 PM »
0
Jason,
You PM me, but your inbox is full.
Ron Bearden
CSX N scale Archivist
http://u18b.com

"All get what they want-- not all like what they get."  Aslan the Lion in the Chronicles of Narnia by C.S.Lewis.

Roger Holmes

  • Crew
  • *
  • Posts: 1234
  • Gender: Male
  • Respect: +594
Re: New Brass EP-2 assembly & Mod clinic
« Reply #22 on: October 30, 2013, 03:41:24 PM »
0
Ron-- What a fantastic tutorial.  I'm looking forward to seeing it painted.  The early all black scheme is the easiest but I prefer the 1950 orange and black with the maroon band.

Watching this thread is like watching the old serials as a kid.  I can't wait for the next episode!
Best regards,

Roger

There are 10 kinds of people in the world.  Those who understand the binary system and those who don't.

u18b

  • Crew
  • *
  • Posts: 3709
  • Respect: +1954
    • My website
Re: New Brass EP-2 assembly & Mod clinic
« Reply #23 on: October 30, 2013, 08:58:01 PM »
0
Roger.  Thanks.
And thank you for loaning me your nj ep2.

You know, some of the things I'm doing - like the wiper under the front truck -  would work for the nj model too.
Ron Bearden
CSX N scale Archivist
http://u18b.com

"All get what they want-- not all like what they get."  Aslan the Lion in the Chronicles of Narnia by C.S.Lewis.

u18b

  • Crew
  • *
  • Posts: 3709
  • Respect: +1954
    • My website
Re: New Brass EP-2 assembly & Mod clinic
« Reply #24 on: October 31, 2013, 01:25:37 AM »
0
With the power truck frame isolated, it is time to start reducing friction.

I take a somewhat dull mini-file and go over the entire outside.


Even the bottom.  I'm not really trying to remove metal.  I'm smoothing things out.  The way it works is this.... when you first pass the file over an area, it feels a bit rough.  But within a few light strokes, it suddenly gets smooth and easy.

What I've done is cut down any little tiny bump and started levelling everything out.


Now, the outside edges mainly effect the INNER surface of the wheelsets.
But the more important portion is the INNER part where the gears spin.
I want it perfectly smooth.
This is ESPECIALLY needful anywhere that a pin went through since there is often a tiny burr at that spot.

So here I'm filing (well, actually just smoothing) the inside of the geartower.  This is where the crown gear runs.


But the same is true for the transition gears.


I found that the metal can be very thin at the spots where the gear teeth can peek out.  But that means there can be flash too.  So I use a very very small file to smooth this area out.


I very very lightly spin a tiny round file in the axle slots.  Sometimes there are burrs here.


I also test fit an axle in each hole.  If an axle feels too tight, the I use the round file to open up the slots a bit more.

So with the entire frame filed smooth, it found it helpful once again to run a tap through the screws holes to freshen them up.


One the frame is clean, I'm ready to move to the next step.


Ron Bearden
CSX N scale Archivist
http://u18b.com

"All get what they want-- not all like what they get."  Aslan the Lion in the Chronicles of Narnia by C.S.Lewis.

u18b

  • Crew
  • *
  • Posts: 3709
  • Respect: +1954
    • My website
Re: New Brass EP-2 assembly & Mod clinic
« Reply #25 on: October 31, 2013, 05:42:22 PM »
0
I have done all I can to reduce friction in the frame itself.  Not move to the parts and reassembly.

The transition gears are made of a Delryn like plastic.
I inspected them for flash, and then rubbed the side surfaces on very very worn out extra fine sandpaper.


I then burnished the surfaces by rubbing them on a piece of wood.
Here, left is the modified gear, right is the stock gear.  You can see some crud and scratched on the stock gear.


When I pulled the pins to the transition gears, it was really astonishing how much corrosion/oxidation was on them.
I took an old worn minifile and filed around the middle where the gear would ride.  Of course, I was not trying to remove metal, and I worked in a rocking motion so that I would leave no flat spots on the round surface.  I did not care about the edges since they would be embedded in the frame -- and the crud might help it have a tight fit.
Here is a before and after shot.


I find my mark on the frame and insert a pin and a gear from the side of the mark.


Hard to photograph, but I press the pin in with my fingernails.  That's usually enough pressure to do the job.  But if a pin is stubborn, I can always tap it in.


The goal is to have the pin even with the insertion wall.


With all the gears installed, this is a good time to gauge the wheels.  Most were just a tad too tight-- like this one.


All the wheels are now installed.


Now for the cover plate on the bottom of the truck.  This is the way it came from the factory- with this side toward the wheel axles.  But I decided to flip it to reduce friction.


The piece is stamped with a machine.  Consequently, there is a smooth side where the edges are contoured inward (the top side of the stamping process) and the other side the edges are contoured OUTWARD.
You can see the two side it you look carefully at this photo.
Why would you want the wheel axles to ride on the rough edges?
I flipped it with the rounded edges toward the gears and the rough edges to the outside.


The the main portion of the truck assemble, time to install the sideframes.  But I don't want the sideframe to touch a wheel and cause a short.  Looking at the end of this sideframe, it is clear the sides are pinched IN a bit toward the wheels.  I VERY carefully pulled the sides outward.


The basic truck is now reassembled except for one piece.


Ron Bearden
CSX N scale Archivist
http://u18b.com

"All get what they want-- not all like what they get."  Aslan the Lion in the Chronicles of Narnia by C.S.Lewis.

u18b

  • Crew
  • *
  • Posts: 3709
  • Respect: +1954
    • My website
Re: New Brass EP-2 assembly & Mod clinic
« Reply #26 on: October 31, 2013, 07:49:21 PM »
0
oops.

I forgot to mention that there is one more thing that this truck needed before I get to the crown gear.

One of the most troublesome aspects of Kumtata locos is that they are so susceptible to shorts.  Curing these shorts is key to great running locos.

I've already mentioned that the sideframe were a little too close for comfort.

But there is one more trouble spot.  It is where the bracket that holds the sideframes hovers over the wheels.

The metal is AWFULLY close to the flanges-- even though these flanges are very small and probably capable of code 40 track.


So I take a pair of pliers and bend the little corners up a bit.
Doesn't look pretty in these photos.  But it is all hidden when everything is assembled.


Ron Bearden
CSX N scale Archivist
http://u18b.com

"All get what they want-- not all like what they get."  Aslan the Lion in the Chronicles of Narnia by C.S.Lewis.

superturbine

  • Crew
  • *
  • Posts: 909
  • Gender: Male
  • Respect: +62
Re: New Brass EP-2 assembly & Mod clinic
« Reply #27 on: November 01, 2013, 10:34:46 AM »
0
Very thorough!  And applicable to some many other brass engines.  Thanks Ron.

TiVoPrince

  • Crew
  • *
  • Posts: 5156
  • Respect: +3
    • http://www.technologywrangler.com
Re: New Brass EP-2 assembly & Mod clinic
« Reply #28 on: November 01, 2013, 11:33:24 AM »
0
<snip>
The metal is AWFULLY close to the flanges-- even though these flanges are very small and probably capable of code 40 track.


So I take a pair of pliers and bend the little corners up a bit.
Doesn't look pretty in these photos.  But it is all hidden when everything is assembled.


Does
bending the frame material create trackwork clearance issues later on?  Would grinding away the potentially offending material be a wiser choice in the long term?  I'm not familiar enough with the prototype or model to really know for certain.  This clear and concise tutorial almost has me shopping the auctions for Nscale brass...
Support fine modeling

u18b

  • Crew
  • *
  • Posts: 3709
  • Respect: +1954
    • My website
Re: New Brass EP-2 assembly & Mod clinic
« Reply #29 on: November 01, 2013, 11:54:16 AM »
0
Tivo.

Great question.

That little bend I made is on the TOP side of the truck-- so there are no clearance issues with the track.

Potentially, there could be a clearance issue between the top side of the truck and the loco frame--- but in reality, there is a TON of room.

I think the reason there is a fairly big space is because Kumata is using the same basic design from the 1983 version (though tweaked and better).  But back in 83, the flanges on the wheels were bigger.  Not pizza cutters, but they just BARELY made code 55 track.  Thus the room was there for those flanges.

These flanges are MUCH finer and while I don't have any code 40 track, I feel pretty certain this new loco could run on it.

If I was on the KMT design team, I would have lowered this new model.

But Hey!  The current gap allows me to do the adaptation of the wiper on the front truck.

Ron Bearden
CSX N scale Archivist
http://u18b.com

"All get what they want-- not all like what they get."  Aslan the Lion in the Chronicles of Narnia by C.S.Lewis.