Author Topic: Mill Pond Log Lift and Track/Chain...  (Read 460 times)

0 Members and 3 Guests are viewing this topic.

Sumner

  • Crew
  • *
  • Posts: 354
  • Gender: Male
  • Respect: +758
    • My Home Pages....
Mill Pond Log Lift and Track/Chain...
« on: April 07, 2024, 01:02:39 PM »
+6
Sawmill Design/Build – Part 7

Been spending a lot of the past month working on the HandCab, a WiFi throttle that looks like and works like the 'Barrel' control stand in a GP7/9 ( HERE ).

Just got back to the sawmill complex I want for the layout. I'd started on the mill pond log lift and track/chain to the de-barker building and then onto the mill and finally got back to it. This is designed from inspiration from the one at Hull Oakes mill in California (Update: forgot but as Bryan has point out should be Oregon). I've been able to find a lot of pictures of that mill from back in time up until now. It was the last mill to be partially (at the end of that period) steam operated. As I write this it is still in business and specializes in cutting very large timber for special needs.

I'll start with a couple pictures from the mill but please remember the design isn't suppose to be an exact replication of the lift and track at the mill. As usual I take liberties to account for lack of real measurements, my and the printers capabilities when doing the design work. Also another plug for Fusion 360 (free if you are non-commercial) and thanks to Autodesk for letting us use this great program. I wouldn't try something like this on any other free software that I know of.


.


.


.


.


.


.


.


.


.


For now I think I'm happy with this. Some little things I could consider changing but nothing big. Need to move onto the de-barker building and the continuation of the track/chain to the mill's log deck. That will be about it for the sawmill presently but might design a couple other outbuildings later such as the office, burner, steam plant and a shed over the track loading area. Need to get back to the layout scenery and track laying.

To be continued............

A link to this whole build ( HERE ).

Sumner
« Last Edit: April 07, 2024, 04:21:33 PM by Sumner »
Working in N Scale ---Modeling UP from late 40's to early 70's very loosely......

Under$8.00 Servo turnout Control --- 3D Printed Model RR Objects -- My Home Page

http://1fatgmc.com/RailRoad/RR Main/Link Page Menu.html

wazzou

  • Crew
  • *
  • Posts: 6727
  • #GoCougs
  • Respect: +1656
Re: Mill Pond Log Lift and Track/Chain...
« Reply #1 on: April 07, 2024, 02:49:33 PM »
+1
Sawmill Design/Build – Part 7

Just got back to the sawmill complex I want for the layout. I'd started on the mill pond log lift and track/chain to the de-barker building and then onto the mill and finally got back to it. This is designed from inspiration from the one at Hull Oakes mill in California.

Sumner


Very nice. 
Just one point of clarification though.  Hull Oakes is located in Monroe, Oregon.
Bryan

Member of NPRHA, Modeling Committee Member
http://www.nprha.org/
Member of MRHA


Sumner

  • Crew
  • *
  • Posts: 354
  • Gender: Male
  • Respect: +758
    • My Home Pages....
Re: Mill Pond Log Lift and Track/Chain...
« Reply #2 on: April 07, 2024, 04:24:25 PM »
0

Very nice. 
Just one point of clarification though.  Hull Oakes is located in Monroe, Oregon.

Thanks, I should of remembered that since I've looked at it on Google Earth a hundred times  :oops:.  I updated it.

Sumner
Working in N Scale ---Modeling UP from late 40's to early 70's very loosely......

Under$8.00 Servo turnout Control --- 3D Printed Model RR Objects -- My Home Page

http://1fatgmc.com/RailRoad/RR Main/Link Page Menu.html

JMaurer1

  • Crew
  • *
  • Posts: 1185
  • Gender: Male
  • Respect: +306
Re: Mill Pond Log Lift and Track/Chain...
« Reply #3 on: April 08, 2024, 12:21:23 PM »
0
Been anxiously waiting for you go get back to work on this. I hope to some day be half as proficient as you are with designing things. I know, all it takes is time practice and effort...all three of the things I don't want to have to do.

Don't remember if I posted this earlier, but there is still a steam powered mill in California: http://www.sturgeonsmill.com

No mill pond but the videos may help depending on how much of the interior you plan on doing. Also, one of my first trips once I retire (22 days, but who's counting?) is back to the West Side Lumber (and Pickering) to see how nothing has really survived...but that isn't going to keep me from going.
Sacramento Valley NRail and NTrak
We're always looking for new members

Sumner

  • Crew
  • *
  • Posts: 354
  • Gender: Male
  • Respect: +758
    • My Home Pages....
Re: Mill Pond Log Lift and Track/Chain...
« Reply #4 on: April 08, 2024, 06:49:06 PM »
+2
...Don't remember if I posted this earlier, but there is still a steam powered mill in California: http://www.sturgeonsmill.com

Thanks for the link.  I was familiar with that mill but never saw the video before.  That will be a big help if I get around to working on the inside of the mill.  Working on .....


.... the debarker now.  Won't know how it will print until I get a little further with it and try a print.  It will probably need changes.

The key to doing this is just getting started and then work on learning more and how to use what you've learned in new ways.  I only use about 14 design features in Fusion 360, probably not even 5% of what it is capable.  Using mainly the same ones I used a couple years ago, just learning how to use them better.  So one doesn't need to know lots of the design tools Fusion has just learn more ways to use a few of them  About the same as working with any tools, real ones or software ones.

Sumner
Working in N Scale ---Modeling UP from late 40's to early 70's very loosely......

Under$8.00 Servo turnout Control --- 3D Printed Model RR Objects -- My Home Page

http://1fatgmc.com/RailRoad/RR Main/Link Page Menu.html

Sumner

  • Crew
  • *
  • Posts: 354
  • Gender: Male
  • Respect: +758
    • My Home Pages....
Sawmill Design/Build – Part 8...
« Reply #5 on: April 14, 2024, 10:52:00 AM »
+4
I could of skipped or just had a de-barker building but got carried away and started designing the interior of the building. This proved difficult with a lot of guess work. I worked off of some photos looking into the building from a distance and also used some videos that were taken with the de-barker in action. Never did find pictures of some of this, just the edges of equipment so guess work was required as well as guesstimates of dimensions.
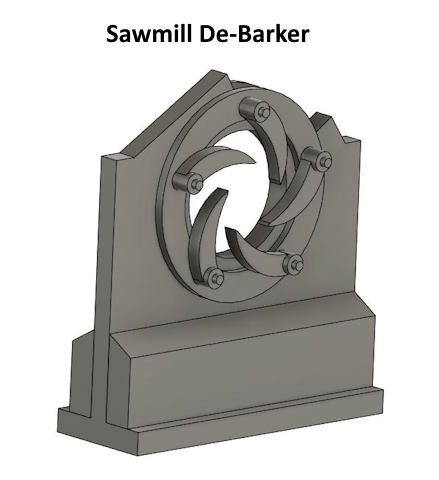
 

Main component and easiest to design was the actual part that strips the bark off.
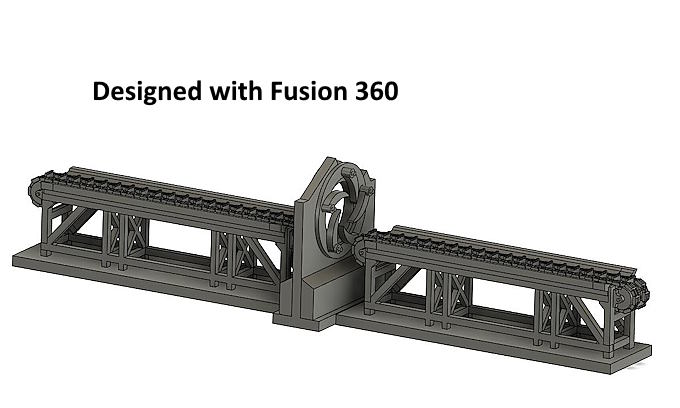
 

The chains/tracks above turned out to be a nightmare. Not so much how hard it was to design them but they slowed my computer, which normally isn't slow at all, way down. I'd make a change and have to wait 2-4 or 5 minutes at times for it to take effect. With the chain there are lots of faces and angles that I guess have to be kept track of and redrawn each time you do anything. Haven't had this big wait time for some time since getting a more powerful computer and graphics card. Last time was on really large brick walls and it wasn't as bad as this for some reason.
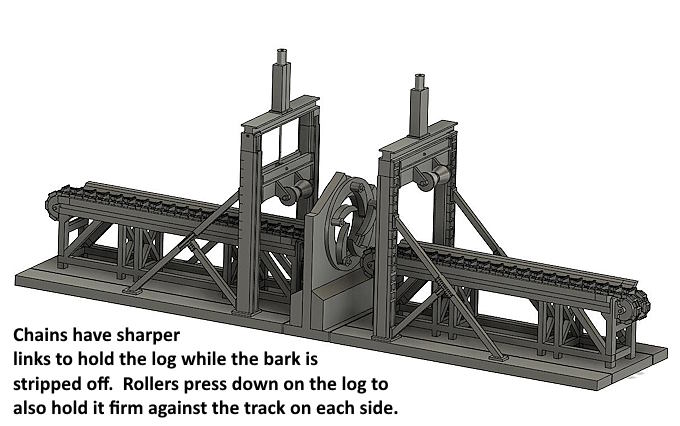
 

The gantries and the center stripping part didn't slow the computer down at all. All the parts above were designed separately pretty much and then combined. The print below was a single large print and was to check things. I'll separate them out and print them separately on the printers build plate after making a few changes.
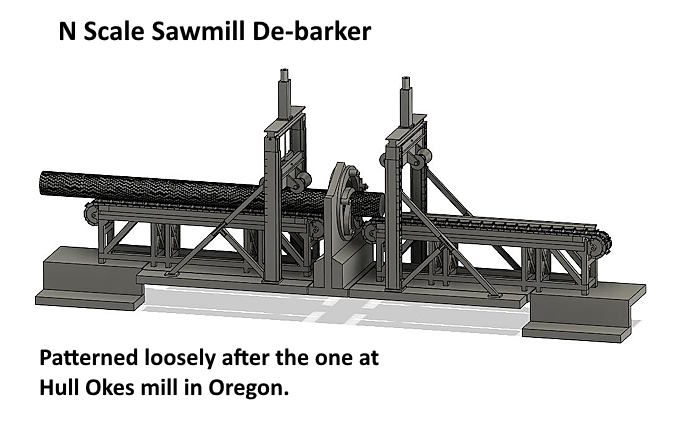
 

.
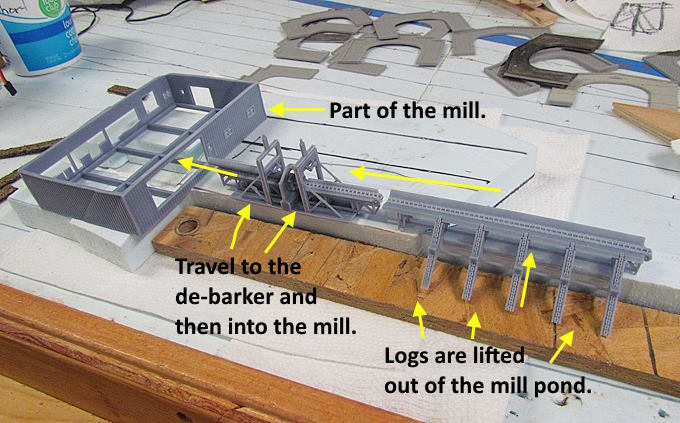
 

There will be a building that goes over the de-barker section but it will be removable. Still need to put a pulley on the left end of the section to the right that lifts the logs out of the mill pond and starts them on their way to the mill.
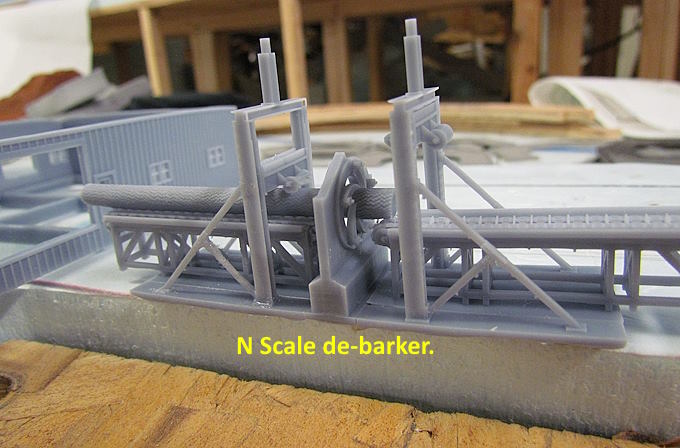
 

The rollers on the gantries press down on the log to hold it still while the center section strips the bark off as the log moves forward towards the mill. Once the log is clear of the roller on the right it raised so that the next log can enter. The same happens with the roller to the left. Once the log clears it will also lift clearing the way for the next log. You can see videos of the de-barker in action and the mill operating ( HERE )
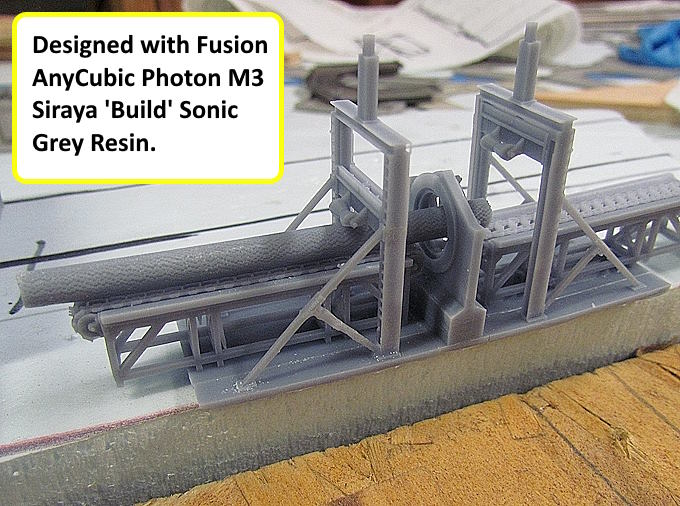


I figured out a way to 'kind of make' bark and have most of it taken down on the side exiting the de-barker and more on the side yet to be de-barked. Might mess with these a little more The log here is 3 foot in diameter (.225” / 5.7mm). I have logs that have all the bark on, most of the bark on and with the bark hardly showing. I'll work on these a little more and then make 2-3 other diameter logs in all three states.
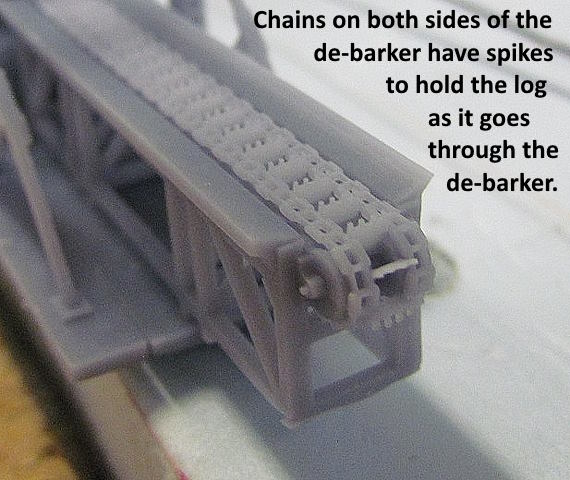
 

The chain after the log lift is similar but without the small spikes that are on this chain. The dig into the log to also help hold it in place as it is being stripped. The little spikes are hard to see unless you are very close. They are .007”/ .177mm wide at the top and .015”/.381mm high.
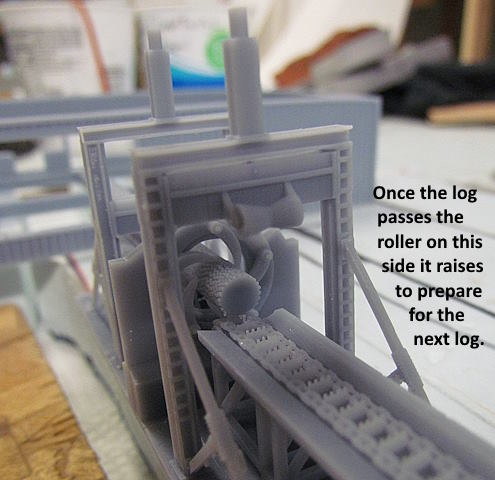
 

The log above is about all stripped of its bark.
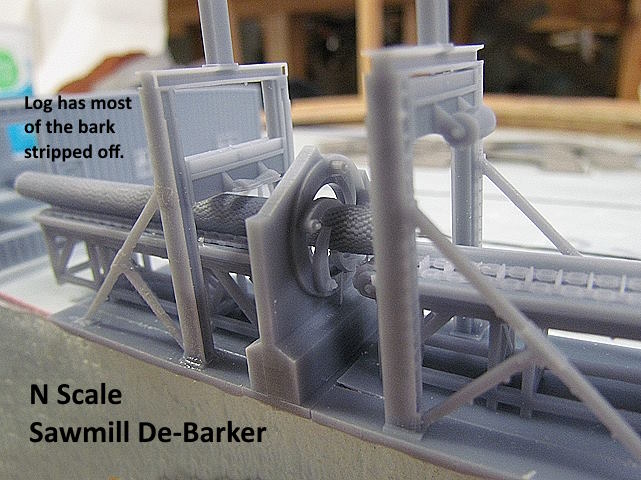
 

I've spent way too much time on this part of the mill.

To be continued............

A link to this whole build ( HERE ).

Sumner
« Last Edit: April 14, 2024, 10:57:15 AM by Sumner »
Working in N Scale ---Modeling UP from late 40's to early 70's very loosely......

Under$8.00 Servo turnout Control --- 3D Printed Model RR Objects -- My Home Page

http://1fatgmc.com/RailRoad/RR Main/Link Page Menu.html