Author Topic: Adding keep-alive to N scale Atlas/ESU Gold S2 locomotive  (Read 861 times)

0 Members and 2 Guests are viewing this topic.

peteski

  • Crew
  • *
  • Posts: 32890
  • Gender: Male
  • Honorary Resident Curmudgeon
  • Respect: +5311
    • Coming (not so) soon...
Adding keep-alive to N scale Atlas/ESU Gold S2 locomotive
« on: December 06, 2023, 01:18:18 PM »
+11
Answering a TRW member's request, I examined the decoder to determine where are best places to connect a keep-alive circuit.
The info here pertains to the original runs of the model. As I understand, Atlas will be releasing another run in 2023-2024 and I do not know if it will be using the same decoder. I suspect not, as they no longer make V4 decoders.
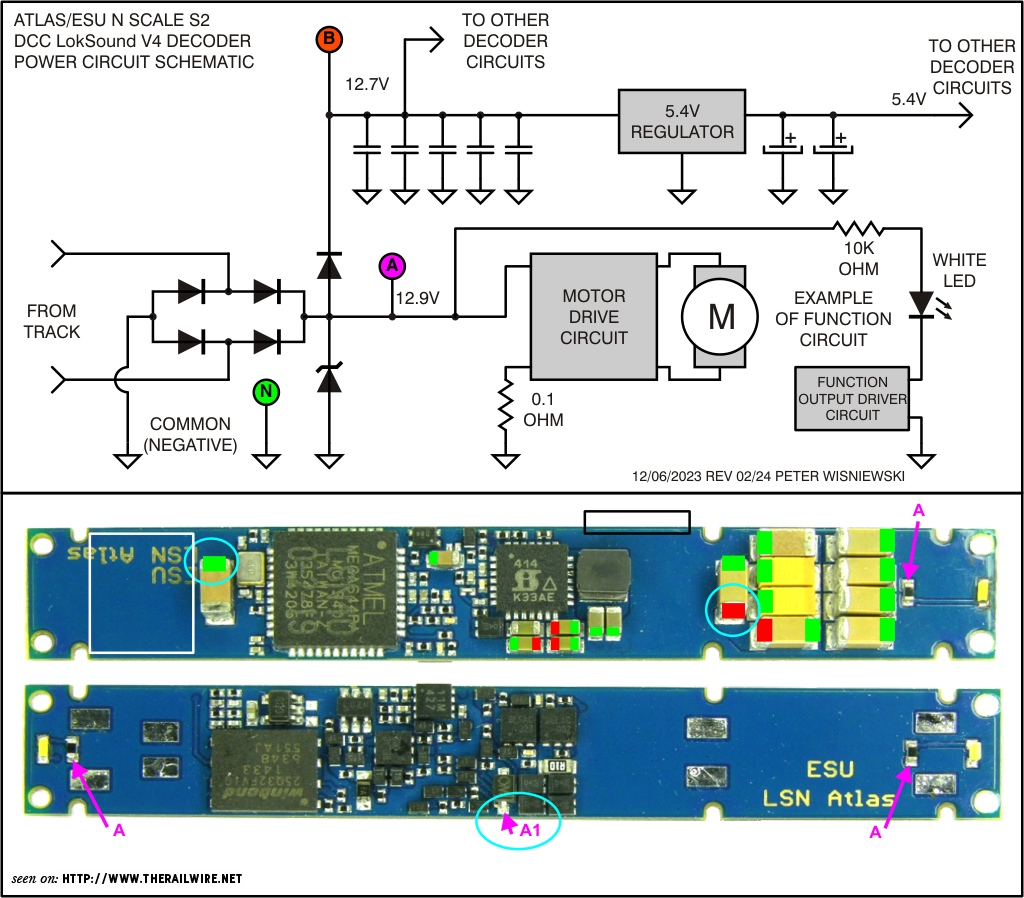


This decoder is a LokSound V4 decoder and it follows the design used in other ESU N scale LokSound V4  decoders.  Shown here is a partial schematic diagram of its power supply section.

There isn't much available space inside the model for a keep-alive circuit.  Largest open space is in the rear of the loco between the worm/flywheel and the bottom of the decoder.  There is a similar open area in the front of the loco, but with less space due to capacitors installed on the bottom of the decoder board.  The white rectangle  in the picture shows the best location for placing the keep-alive circuit.

As far as electrical connections go, keep-alives are usually connected to the raw rectified voltage.  Negative side of the keep-alive connects to any of the decoder's numerous green colored "ground" points, and positive to the purple colored points (identified as "A").  When connected this way, the keep alive will supply power to the entire model (motor, headlights, and the decoder's logic and sound sections).  Unfortunately, most of the raw rectified voltage traces are inaccessible, hidden in the inner layers of the circuit board, or covered by the SMD components soldered to the external pads, and the few exposed "purple" pads are not very easy to deal with.

As shown in the picture, the three current limiting resistors for the LEDs are connected to the "A" voltage. While those are convenient locations for connecting the positive keep-alive wire to, I would not recommend them.  The resistors are very small and there is a good possibility that heating the resistor's positive side solder pad will also melt the solder on the other side of the resistor causing it to shift. Repairing that will require a soldering iron with very small tip, and a very steady hand.  Not worth the risk (IMO).  The other thing I'm worried about is that the "via" connecting the surface positive voltage pad to the internal voltage trace or plane might not be able to handle the heavy current for charging and discharging the keep-alive.

As I see it, the preferred hookup location is a the cathode lead of the Zener Diode (marked  "A1" on the picture). The vias at that diode's solder pad are designed to carry the full current used by the model.  The diode itself and the solder pad are also larger than those of the LED resistors, so accidental unsoldering is unlikely.

But that diode is on the top of the decoder board, so that presents a problem of running a wire to the keep-alive installed on the underside. There isn't much clearance between the sides of the decoder and the metal shelf. A wire could be routed around the front or back of the decoder (as there is clearance), or file small notch (similar to the existing notches the sides of the decoder for the truck pickup wires) to run the keep-alive wire in the new notch. I used a black rectangle in the picture to indicate a possible area for notching the board, but I don't know how many internal traces are hidden there. I recommend using a  triangular or round jeweler's file to make a notch much shallower than the existing notches. Just file it until you hit the external copper ground plane on the board's surface.  That should not damage any internal traces.  But because the notch will be shallow, a thin wire should be used. Enameled magnet wire would be a good choice due to its thinness.

An easier and safer alternative would be to connect the keep-alive to the points colored red, and marked "B". Those are all accessible on the bottom of the decoder.  Keep-alive connected there will provide power to all of the decoder circuits except the motor and LED.  That should prevent decoder from reinitializing on power drops while hopefully the flywheels will get the model moving past the brief dead spots.

I have circled the recommended location for soldering the keep-alive wires (for both "A" and "B" options, and the common ground).

Since most of the connection points are on MLCCs (multi-layer ceramic capacitors), I will mention another warning. MLCCs are made up internally of a sandwich of hundreds of very thin layers of ceramic and metal, and they can be affected by a heat shock (the sudden expansion of the ceramic can create tiny fractures) when using a soldering iron. When soldering wires to their metal end caps, try to be quick.

As far as keep-alives go, most have the recommended resistor/diode circuit built-in. To make your own, use the diagram shown in the LokSound decoder manual (6.12.2.PowerPack section of the manual).

Another unrelated item worth mentioning is an LED on the top of the decoder in the front of the loco. It is controlled by function F6.  Not sure what was its intended purpose since I don't believe any of the S2s have any lights up front other than the headlight, but if someone wants to utilize that function (rotary beacon maybe?), it is there.
« Last Edit: December 06, 2023, 10:23:47 PM by peteski »
. . . 42 . . .

tehachapifan

  • Crew
  • *
  • Posts: 3139
  • Respect: +876
Re: Adding keep-alive to N scale Atlas/ESU Gold S2 locomotive
« Reply #1 on: December 06, 2023, 05:12:43 PM »
+1
Awesome! Thanks, Peteski!

Regarding that F6 light, I think that one was for the numberboards.

I rearranged the front light situation in mine a while back so the headlight would be brighter and, in the process, I got rid of the separate numberboard light.


peteski

  • Crew
  • *
  • Posts: 32890
  • Gender: Male
  • Honorary Resident Curmudgeon
  • Respect: +5311
    • Coming (not so) soon...
Re: Adding keep-alive to N scale Atlas/ESU Gold S2 locomotive
« Reply #2 on: December 06, 2023, 06:59:39 PM »
0
Awesome! Thanks, Peteski!

Regarding that F6 light, I think that one was for the numberboards.

I rearranged the front light situation in mine a while back so the headlight would be brighter and, in the process, I got rid of the separate numberboard light.

Sure thing Russ!
Number boards  make sense.
. . . 42 . . .

GaryHinshaw

  • Global Moderator
  • Crew
  • *
  • Posts: 6335
  • Respect: +1858
Re: Adding keep-alive to N scale Atlas/ESU Gold S2 locomotive
« Reply #3 on: December 06, 2023, 07:46:25 PM »
0
Excellent info.  Now that you've cleared this one from your inbox you can weigh in on adding a keep-alive to the Kato LokSound 5 board 58741 ("coming soon"). ;)

peteski

  • Crew
  • *
  • Posts: 32890
  • Gender: Male
  • Honorary Resident Curmudgeon
  • Respect: +5311
    • Coming (not so) soon...
Re: Adding keep-alive to N scale Atlas/ESU Gold S2 locomotive
« Reply #4 on: December 06, 2023, 08:09:57 PM »
+2
Excellent info.  Now that you've cleared this one from your inbox you can weigh in on adding a keep-alive to the Kato LokSound 5 board 58741 ("coming soon"). ;)

LOL!  Ah yes.  Still coming soon.  :)  I have most of the info, Just have to put the writeup together and post it.  I hav a bad habit of being easily distracted by all the new shiny objects.  :D
. . . 42 . . .

GM50 4164

  • Crew
  • *
  • Posts: 230
  • Respect: +100
Re: Adding keep-alive to N scale Atlas/ESU Gold S2 locomotive
« Reply #5 on: December 06, 2023, 10:15:32 PM »
0
Another excellent write up Peteski! Thank you for doing this for us. I am amazed by all the info you are able to pull from these boards.


Benjamin H

kiwi_bnsf

  • Crew
  • *
  • Posts: 232
  • Respect: +239
Re: Adding keep-alive to N scale Atlas/ESU Gold S2 locomotive
« Reply #6 on: December 06, 2023, 10:22:48 PM »
+1
Excellent info.  Now that you've cleared this one from your inbox you can weigh in on adding a keep-alive to the Kato LokSound 5 board 58741 ("coming soon"). ;)

The ESU 58741 Kato decoder conveniently has dedicated solder pads for U+ and GND that you can connect a Keep Alive to  :)

I'm still looking forward to Peteski's excellent write-up though!

It would be good if ESU and the manufacturers using built-in circuit boards with E24 connectors could standardise on always providing U+ and GND pads of a decent size and location. Not all of us have the micro-soldering abilities necessary for some of the more awkward decoders.

Cheers
--
Tim Benson

Modelling Tehachapi East Slope in N scale circa 1999

peteski

  • Crew
  • *
  • Posts: 32890
  • Gender: Male
  • Honorary Resident Curmudgeon
  • Respect: +5311
    • Coming (not so) soon...
Re: Adding keep-alive to N scale Atlas/ESU Gold S2 locomotive
« Reply #7 on: December 06, 2023, 11:30:42 PM »
0
It would be good if ESU and the manufacturers using built-in circuit boards with E24 connectors could standardise on always providing U+ and GND pads of a decent size and location. Not all of us have the micro-soldering abilities necessary for some of the more awkward decoders.

I have only encountered two e24 interface circuit boards:  The nano wire adapter and the Kato wide-body decoder. Both of those have GND, U+ and logic-level AUX output pads.  They are fully compatible with either ESU Power Pack or with any generic keep-alive circuit.  That is a promising sign.

I know Atlas recently released a model with E24 connector board, but I have no knowledge about its layout.
. . . 42 . . .

GaryHinshaw

  • Global Moderator
  • Crew
  • *
  • Posts: 6335
  • Respect: +1858
Re: Adding keep-alive to N scale Atlas/ESU Gold S2 locomotive
« Reply #8 on: December 07, 2023, 12:16:06 AM »
+2
The ESU 58741 Kato decoder conveniently has dedicated solder pads for U+ and GND that you can connect a Keep Alive to  :)

Right, that's what I figured.  But one should never pass up an opportunity to razz peteski.  :)

kiwi_bnsf

  • Crew
  • *
  • Posts: 232
  • Respect: +239
Re: Adding keep-alive to N scale Atlas/ESU Gold S2 locomotive
« Reply #9 on: December 07, 2023, 02:49:50 AM »
0
I have only encountered two e24 interface circuit boards:  The nano wire adapter and the Kato wide-body decoder. Both of those have GND, U+ and logic-level AUX output pads.  They are fully compatible with either ESU Power Pack or with any generic keep-alive circuit.  That is a promising sign.

I know Atlas recently released a model with E24 connector board, but I have no knowledge about its layout.

Yeah — I'm concerned about the Atlas E24 board, and the Scale Trains E24 boards for their SD40-2s, and the 2024 releases of AC4400CWs and Dash 9s.

Hopefully they have solder pads.
--
Tim Benson

Modelling Tehachapi East Slope in N scale circa 1999

peteski

  • Crew
  • *
  • Posts: 32890
  • Gender: Male
  • Honorary Resident Curmudgeon
  • Respect: +5311
    • Coming (not so) soon...
Re: Adding keep-alive to N scale Atlas/ESU Gold S2 locomotive
« Reply #10 on: December 07, 2023, 11:00:08 AM »
0
Right, that's what I figured.  But one should never pass up an opportunity to razz peteski.  :)

Actually that decoder does have a bit of a unconventional design if you were going to utilize all the function outputs.  Working on the writeup.
. . . 42 . . .

tehachapifan

  • Crew
  • *
  • Posts: 3139
  • Respect: +876
Re: Adding keep-alive to N scale Atlas/ESU Gold S2 locomotive
« Reply #11 on: December 07, 2023, 12:24:06 PM »
0
On the S2 board, are the tan-colored blocks all keep alive caps? If so, seems like this board is already well equipped with them. Still, this is my most troublesome loco with sound dropouts.

peteski

  • Crew
  • *
  • Posts: 32890
  • Gender: Male
  • Honorary Resident Curmudgeon
  • Respect: +5311
    • Coming (not so) soon...
Re: Adding keep-alive to N scale Atlas/ESU Gold S2 locomotive
« Reply #12 on: December 07, 2023, 02:45:49 PM »
0
On the S2 board, are the tan-colored blocks all keep alive caps? If so, seems like this board is already well equipped with them. Still, this is my most troublesome loco with sound dropouts.

No, those 4 large MLCCs (multi-layer ceramic capacitors) on the front end of the decoder are utilized in another way. Some other large MLCC and Tantalum caps are on the 5V side of the power supply.  The only "keep alive" on the 12V side (for the internal circuitry, not for motor or LEDs) is the 2 larger and 3 smaller MLCCs with red colored ends.  Since I cannot measure capacitance in-circuit, I guess their total capacitance is less than 100µF.  Not much of a keep alive. No caps are connected on the raw rectified voltage side of the decoder.  But that is typical for ESU decoders.
. . . 42 . . .

Tjack757

  • Crew
  • *
  • Posts: 54
  • Gender: Male
  • Respect: +98
Re: Adding keep-alive to N scale Atlas/ESU Gold S2 locomotive
« Reply #13 on: December 10, 2023, 10:34:28 AM »
0
I just picked up two Atlas GP35 Gold Series with a ESU LokSound decoder.
I was wondering, want is the best way to disable the startup sequence?
“Wonder is the seed of knowledge” – Sir Francis Bacon