Author Topic: Best Of The Overland/Wiseman brass Western Maryland Shay thread  (Read 41149 times)

0 Members and 2 Guests are viewing this topic.

u18b

  • Crew
  • *
  • Posts: 3709
  • Respect: +1955
    • My website
Re: The Overland/Wiseman brass Western Maryland Shay thread
« Reply #360 on: September 02, 2021, 02:22:09 PM »
+3
You should show the soldering rig you use. I could un-solder those parts, but I think the rest of the locomotive would form a soup on the workbench  :scared:

Chris, here is my resistance soldering set-up.

I have an American Beauty 105A12.


I think the differentiating feature of this model is the on/off switch (which also lights up when juice is flowing).
You can find other models without the switch.

I like the switch.  I’m always afraid I'll accidentally depress the foot pedal while the contacts are touching something.  So I like actually turning this off in the front.

I then have two tweezers.

The first is the light duty tweezers.

The electrodes are steel with a copper coating.
These fine points are helpful for getting in tight spots.


And then I have a set of heavy duty tweezers.  These are the ones I use the most.  Heat transference is strong.   And you can see the big heat dissapation vanes on the handle.

I only use the light duty when these are just too big.


Now, I did kitbash mine (are you surprised?).
After I bought this rig, it did not take long using it before I realized that the ROUND electrode were not all that helpful.

So I ran a motor tool diamond disc between them to flatten the inner edges.


NOW, with flat edges, I can grasp thing better.


I flattened the light duty as well- though it is less noticeable.

So, this all works by electricity.  And if electricity does not flow- then nothing happens.

So the brass has to be clean at the point the electrodes touch….. but the electrodes themselves have to be clean. 

And they get dirty from use.  Brass oxidation (or whatever it is), dirt, oils, and especially flux all burn on the tips and foul it up.

So every few uses, I run a mill file  over the inner edges of the electrodes to clean them (and the outside edges too sometimes).

I don’t rub hard- the goal is not to file down the metal, it’s to clean off the crud.


I bought this setup used when I had begun the brass EP-2 project.  This device allowed me to work better and do new things.

But here on this project, it is invaluable.   There is no way I could work on these Shays like this without this set-up.


« Last Edit: September 02, 2021, 02:24:33 PM by u18b »
Ron Bearden
CSX N scale Archivist
http://u18b.com

"All get what they want-- not all like what they get."  Aslan the Lion in the Chronicles of Narnia by C.S.Lewis.

u18b

  • Crew
  • *
  • Posts: 3709
  • Respect: +1955
    • My website
Re: The Overland/Wiseman brass Western Maryland Shay thread
« Reply #361 on: September 02, 2021, 11:57:32 PM »
+4
Correcting the Main Frame?

It occurs to me that the old trashed and mangled frame was ideal for exploring and illustrating.

So I decided to do an experiment for educational purposes – both mine and posterity for all who refer to this thread.

I’m going to study and disassemble it.   Hopefully, that would give me an idea if I even want to attempt any adjustment on Shay #1 cylinder assembly.

First, it was so filthy and corroded I sandblasted it a bit just so that we could see things.


You can see that the main frame is a thick brass plate that is folded down to the left in this shot.


I confess I was amazed when I inserted the vertical drive shaft.  Based on this photo, it looks like the bearings are not in a perfectly straight line.   This was assembled with some “slop.”


In that view below, there are actually many parts.
Here they are color-coded:

Main frame heavy brass- yellow
upper bearing- purple
lower bearing- green
cylinder assembly frame- red
main crankshaft bearings- blue


I heated the cylinder assembly frame and removed it.
WOW!  Look at the corrosion.  The OMI Shay can be plagued by poor solder joints.  And further evidence this frame had to be trashed.


Here is the back side of the cylinder assembly frame (with the cylinders present).   You can see that the lower bearing is in the shape of a T-nut, soldered in place.  The upper bearing is the same design.


I cleaned the solder from the motor well and proceeded to heat up the main frame, grabbing it where the worm bearings sit up top.

My desired goal was to pull that plate up top that folds down- leaving behind the heavy frame in the motor well.

And just as I feared… it took a LOT of heat to get that thing loose… and a whole bunch of other things got hot and fell off.


And I was surprised.  Because in all the Shays I have seen, there is always a bunch of solder in the motor well  I (wrongly) assumed that the frame was in two pieces and thus soldered together at that spot: the motor well one piece, and the floor below the upper worm and bearings the other.

Well, as you can see (much to my surprise) this is all ONE piece.


This is a complex piece at the very heart of this locomotive.


Well, I’m glad I did this.
Because I learned that there is NO WAY you can do anything with that frame as far as repositioning.  To do so, you would have to take this Shay down to every last frame part and 100% start over.
Ron Bearden
CSX N scale Archivist
http://u18b.com

"All get what they want-- not all like what they get."  Aslan the Lion in the Chronicles of Narnia by C.S.Lewis.

u18b

  • Crew
  • *
  • Posts: 3709
  • Respect: +1955
    • My website
Re: The Overland/Wiseman brass Western Maryland Shay thread
« Reply #362 on: September 04, 2021, 12:17:23 AM »
+4

Time To Attempt Cylinder Assembly Re-build


Given what I learned in the last post, I’m going to attempt adjusting the cylinder assembly.

It’s either now or never.   Once a Shay is superdetailed (like Resurrected Shay #3) you cannot easily go back and make such a fundamental change

So I took Shay #1 and completely disassembled it down to the frame.

I then heated up and removed the cylinders.


Next I made SURE I know what I wanted.  The cylinder assembly needs to be lowered on the rear/left side of this photo AND the same side has to come out away from the frame  (This is the bottom view).


I needed to break the solder joint as shown below.  I heated the joint and inserted an Xacto knife in there.


I then heated the cylinder assembly frame and removed it.


I then tugged with my fingernail on the left/rear piece of this heavy brass that comes down, and it moved. 
I was able to bend it outward slightly.

Both pieces are now more in line.


I then cleaned up the area for re-soldering.


Next steps will be to re-build.


Ron Bearden
CSX N scale Archivist
http://u18b.com

"All get what they want-- not all like what they get."  Aslan the Lion in the Chronicles of Narnia by C.S.Lewis.

FlyGuyB

  • Crew
  • *
  • Posts: 26
  • Respect: +3
Re: The Overland/Wiseman brass Western Maryland Shay thread
« Reply #363 on: September 04, 2021, 10:30:02 AM »
+1
Greetings Ron. This is James from NY. In going over this thread, I'm thoroughly amazed at how you reverse engineered the Shay  and you focus in getting the most minute details re-engineered, almost to the point of obsession!😳 It's fantastic to see engineering on this level from a novice point of view, and as many commenting on your threads have previously noted I don't there are many ANYWHERE with your skill set and attention to detail. Kudos and salute to you Sir! Thanks again for your magnificent contributions to our wonderful hobby!!👍

u18b

  • Crew
  • *
  • Posts: 3709
  • Respect: +1955
    • My website
Re: The Overland/Wiseman brass Western Maryland Shay thread
« Reply #364 on: September 05, 2021, 12:43:08 AM »
0
Thank you for your kind words James.
I appreciate your encouragement.

Ron Bearden
CSX N scale Archivist
http://u18b.com

"All get what they want-- not all like what they get."  Aslan the Lion in the Chronicles of Narnia by C.S.Lewis.

u18b

  • Crew
  • *
  • Posts: 3709
  • Respect: +1955
    • My website
Re: The Overland/Wiseman brass Western Maryland Shay thread
« Reply #365 on: September 05, 2021, 03:25:16 PM »
+5
Shay #1 is up and Running Again

After that huge disassembly, and many hours work, I finally got Shay #1 rebuilt and running again.

There was one interesting change.
In my parts bag, I had an extra cylinder assembly.

But when I looked at it, I saw something different.


At the very top of the cylinders, there is extra detail present.

Apparently, OMI shaved the tops of the cylinder castings.
Compare these two pieces in this photo and you will see what I mean.


I decided to use the new pieces instead of the old ones.  Since they were just a tiny bit taller, I installed them with the cylinder tops hitting the walkway.


When I reached the final assembly step, I really liked the improvement.   The drive line looks much more in line now.
 Not perfect, but better than it was.


Ron Bearden
CSX N scale Archivist
http://u18b.com

"All get what they want-- not all like what they get."  Aslan the Lion in the Chronicles of Narnia by C.S.Lewis.

peteski

  • Crew
  • *
  • Posts: 32963
  • Gender: Male
  • Honorary Resident Curmudgeon
  • Respect: +5344
    • Coming (not so) soon...
Re: The Overland/Wiseman brass Western Maryland Shay thread
« Reply #366 on: September 05, 2021, 04:34:18 PM »
0
. . .
 I'm thoroughly amazed at how you reverse engineered the Shay  and you focus in getting the most minute details re-engineered, almost to the point of obsession!😳
. . .

Almost obsession?  I think it is a full-blown obsession!   :)

. . . 42 . . .

u18b

  • Crew
  • *
  • Posts: 3709
  • Respect: +1955
    • My website
Re: The Overland/Wiseman brass Western Maryland Shay thread
« Reply #367 on: September 05, 2021, 07:11:16 PM »
+4
The Resurrected Shay #3 is Finished with Super-detailing


I neglected to show a photo of the inside of the boiler with the reconstructed headlight with tube.

You can see I cut the tube off pretty high up inside the boiler.   This left plenty of room left of both the weight and the electronics.


I also went back and adjusted the angle of the roof hatch.
Once again, very hard and it took multiple tries.
But I finally got something I can live with.


And with that….. I hereby declare the detailing of this Shay is finished.

Now waiting on some gears from Poland.    I’ll want to solve the drive train issues before I paint it.

Ron Bearden
CSX N scale Archivist
http://u18b.com

"All get what they want-- not all like what they get."  Aslan the Lion in the Chronicles of Narnia by C.S.Lewis.

Mike C

  • Crew
  • *
  • Posts: 1037
  • Gender: Male
  • Respect: +165
Re: The Overland/Wiseman brass Western Maryland Shay thread
« Reply #368 on: September 05, 2021, 08:37:10 PM »
0
     That looks so much better ! You're brass builds have given me confidence tp attack some HOn3 locos that had very grevious problems !

u18b

  • Crew
  • *
  • Posts: 3709
  • Respect: +1955
    • My website
Re: The Overland/Wiseman brass Western Maryland Shay thread
« Reply #369 on: September 06, 2021, 11:49:03 AM »
0
Thank you Mike.

Be sure and take a few photos and post them on Weekend Update so we can see.

Ron Bearden
CSX N scale Archivist
http://u18b.com

"All get what they want-- not all like what they get."  Aslan the Lion in the Chronicles of Narnia by C.S.Lewis.

u18b

  • Crew
  • *
  • Posts: 3709
  • Respect: +1955
    • My website
Re: The Overland/Wiseman brass Western Maryland Shay thread
« Reply #370 on: September 06, 2021, 12:08:29 PM »
+2
Shay #1:  A Power Train Experiment

So now that two things have happened:
1.  Resurrected Shay #3 is detail-finished and only awaiting gearing
2.  Shay #1 frame issues and crankshaft have been rebuilt

I decided to experiment with the upper power train – and do it on Shay #1.

Actually, it’s out of necessity.    I received the new 7mm coreless motor from the UK and proceeded to Beardenize it just as I did with Shay #3.


Shay #3 was an astounding success.   This one was not.
The noise level was very disappointing and I could not solve it after hours of tinkering.


If you have followed this thread from the beginning, you know that the brass WM Shay is a wonderful- but yet very delicate and troublesome locomotive.

The basic three areas of the loco can all have problems:  the truck gearing, the crankshaft, and the upper powerline.

I’ve learned to solve the truck gearing/cogging issues and I’ve all but solved the crankshaft issues.

That leaves the upper powerline- where it seems like I have spent between 100-200 hours over a decade.


The upper powerline is plagued by FOUR issues as highlighted in the photo above:

1.  Poor quality loud motor.  Easily replaced.  GREEN

2.   Bearings.  If there is any wear from previous use (high wear or poor maintenance, or both)- they will rumble and screech.  In an extreme case, the steel worm shaft can be worn.   RED.

3.  Worm wear.   The Shay eats worms.  As others have suggested, the problem is brass worm riding on a brass worm gear.    YELLOW.

4.  Worm Gear.  I am coming to see that Max @mmagliaro was right.   The design of this worm gear with the countersunk screw head is seriously problematic. 

I’ll talk more about this in a bit.

So……  I’m looking for long-term solutions since I will not only be running my favorite locomotive a lot of hours, but I plan to torture it on a Chaffee Branch layout with serious grades.

And I don’t see the point of building a layout for what may be a shelf queen.  These issues have to be solved before I break ground on a layout.


Thus I’ve spent long evening hours experimenting recently.  My best goal is a solution that is reproduceable.

The first part of my problem is worms.  Even if I solve other issues, I need a supply of worms.

To that end I can reveal that I now discovered TWO sources of worms for this locomotive.

The first is that I found an actual clone for the Shay worm in my Samhongsa parts box.    This was a wonderful discovery!

At present, I don’t know what locomotive it goes to- though almost certainly a Hallmark diesel.   I have sent the worm to Gene Maddox so that he can go through all his Hallmark parts and try to identify that worm.   When he tells me…. I’ll tell you (after I buy some replacements from him first).

That’s a good solution, but not perfect.   Those worms will disappear one day when Gene is sold out.

That’s when I came across a new source for worms- though not clones.

The latest edition of the Atlas Shay.
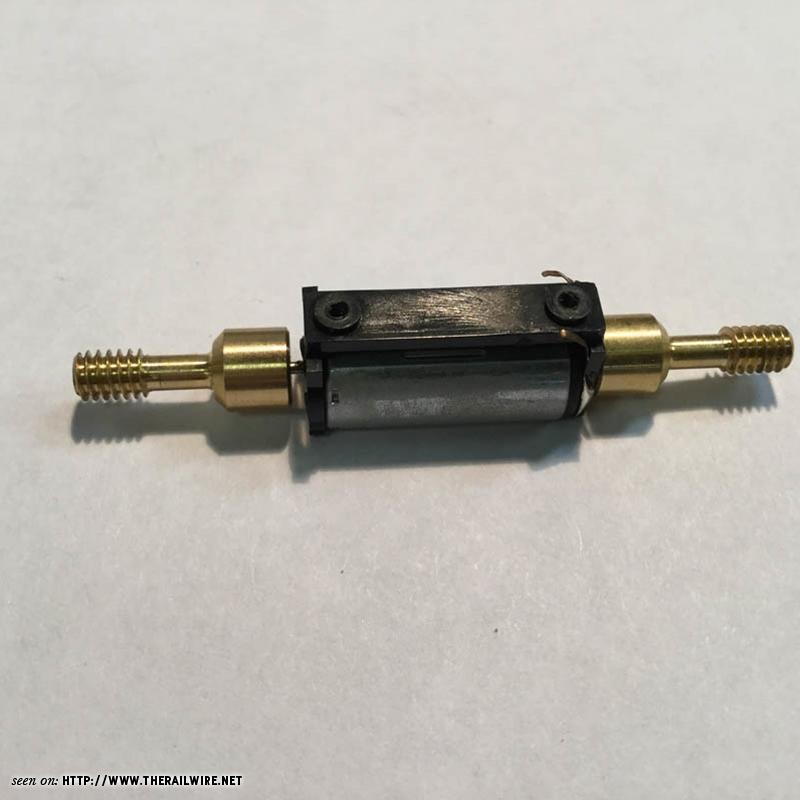


The latest Atlas Shay has a two part fly/worm.
The motor has a really long shaft.  Onto that goes a flywheel.   Then into the slot in the flywheel slides the worm.
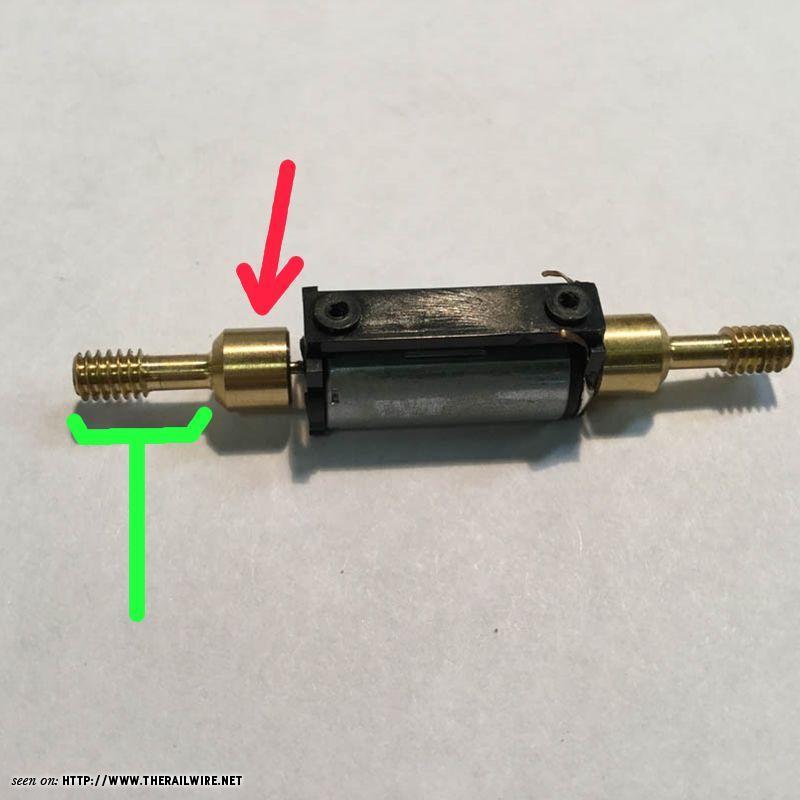


That worm is exactly the teeth size and spacing as the Shay worm.  I know, because I had one in my parts box.


The shank on the worm can be cut off and it actually fits the Shay well since it is longer than the shorter stock worm and fills the gap between bearings.

More will be coming.

« Last Edit: September 06, 2021, 12:56:20 PM by u18b »
Ron Bearden
CSX N scale Archivist
http://u18b.com

"All get what they want-- not all like what they get."  Aslan the Lion in the Chronicles of Narnia by C.S.Lewis.

u18b

  • Crew
  • *
  • Posts: 3709
  • Respect: +1955
    • My website
Re: The Overland/Wiseman brass Western Maryland Shay thread
« Reply #371 on: September 06, 2021, 12:24:15 PM »
+4
Upper Powerline Revision Experiment- cont

But there’s a problem.  The Atlas Shay worm takes a 1.5mm shaft- and the Shay uses a 1mm shaft.

So back to my parts drawer to go searching for my newest experiment.

A long time ago, I bought a bunch of bearings in various sizes.  Some came from ebay, others bought at a hobby store specializing in r/c cars and helicopters.

Micro-Bearings are commonly described in the following dimensions:   shaft diameter x height diameter x thickness.

Here is an example:


This is a bearing I’m going to use:  1.5 x 4 x 2 mm.

They run under a dollar each USA… or about 1/3 of that from ebay/China.  Either way, reasonable price.


They perfectly slid onto the Atlas steel shaft with no slop.


Now I needed a way to hold them in place.
The problem I have is that there are holes in the stock frame.


I could build a solid motor mount out of sheet brass…
or cover the hole.    I chose the latter.

So I scratch-built bearing retainers.

I started with L-angle and shaped it.   The little fingers keep the bearing from falling out.


I’m going to use the stock M1.0 screws.


Now the hard part.   I started with rectangular tubing.


I then drilled screw holes and cut slots.


 It needed is little fill-in thickness so I soldered in some thin locomotive brass pickup strips.  I think they came from an Atlas VO-1000.


The two parts are designed to work together.


 The Atlas worm is larger than the stock worm.  While the mesh was good, the other placements were off.   For example, I added washers to raise the worm gear as seen here.


Oh- I should add that I used a larger 8mm coreless motor for this experiment.   I simply superglued it to the motor mount.

Did it work?

Yes and no.

It is more finicky than I expected.   If you tighten down the bearing caps, a bind is induced- indicating the bearing twists slightly.

But I could adapt to that

But it was STILL noisy- much to my disappointment.

After much unsuccessful tinkering, I began to troubleshoot.   

How about removing the worm gear? 
Result:  With my new motor and worm/bearings only- it ran quiet!

Which means the problem is now with the worm gear.


My worm gear is highly worn.  I determined that it has much too much lateral slop- because the inner hole has worn too large- allowing the gear to vibrate like a tire out of balance or out of round.


Well, this is the gear that I’m hoping to replace with a Delrin gear from Poland.

I know the new worm gear to cylinder head gear will not be a problem since I can buy a new matching brass gear from Poland to replace the cylinder head gear.

The big question which awaits me is how the new Delrin gear with straight cut teeth handles the skewed teeth of the worm.

So even though this is not yet ready to be called successful, I think some progress was made- or at least new ideas and possibilities emerged.


« Last Edit: September 06, 2021, 02:48:31 PM by u18b »
Ron Bearden
CSX N scale Archivist
http://u18b.com

"All get what they want-- not all like what they get."  Aslan the Lion in the Chronicles of Narnia by C.S.Lewis.

mmagliaro

  • Crew
  • *
  • Posts: 6368
  • Gender: Male
  • Respect: +1871
    • Maxcow Online
Re: The Overland/Wiseman brass Western Maryland Shay thread
« Reply #372 on: September 06, 2021, 03:29:20 PM »
0
Really nice work mounting those ball bearings in there.  Although I have to say, I think I would have just sleeved the shaft from 1 to 1.5mm and put the Atlas worm on there.
That worm wheel (worm gear) will always have a problem rotating true because it is using the screw head as the "shaft", and that will
never be round.   You could still try making a sleeve to go inside the gear's bore hole, so the gear actually rotates around that,
and then use a different screw with a smaller diameter head (or spin that screw in a Dremel and run a file on it to take some of the diameter off the screw head, just enough so the screwhead doesn't actually touch the gear except on the underside of the head, as a retainer to keep the gear on).

peteski

  • Crew
  • *
  • Posts: 32963
  • Gender: Male
  • Honorary Resident Curmudgeon
  • Respect: +5344
    • Coming (not so) soon...
Re: The Overland/Wiseman brass Western Maryland Shay thread
« Reply #373 on: September 06, 2021, 03:36:47 PM »
0
Can't steel worms be purchased somewhere (like NWSL)?
. . . 42 . . .

u18b

  • Crew
  • *
  • Posts: 3709
  • Respect: +1955
    • My website
Re: The Overland/Wiseman brass Western Maryland Shay thread
« Reply #374 on: September 06, 2021, 06:32:21 PM »
0
Can't steel worms be purchased somewhere (like NWSL)?

Possibly.  I'm a newbie to this area.
I wouldn't even know what to look for.

Ron Bearden
CSX N scale Archivist
http://u18b.com

"All get what they want-- not all like what they get."  Aslan the Lion in the Chronicles of Narnia by C.S.Lewis.