Author Topic: Best Of The Overland/Wiseman brass Western Maryland Shay thread  (Read 41170 times)

0 Members and 1 Guest are viewing this topic.

u18b

  • Crew
  • *
  • Posts: 3709
  • Respect: +1955
    • My website
Re: The Overland/Wiseman brass Western Maryland Shay thread
« Reply #225 on: August 08, 2021, 02:47:15 PM »
0
Thank you for that information Max.   That's very helpful.

It's interesting that Lima angled that filter backwards toward the frame in this Shay- as compared to the drawing in your reference.


Ron Bearden
CSX N scale Archivist
http://u18b.com

"All get what they want-- not all like what they get."  Aslan the Lion in the Chronicles of Narnia by C.S.Lewis.

u18b

  • Crew
  • *
  • Posts: 3709
  • Respect: +1955
    • My website
Re: The Overland/Wiseman brass Western Maryland Shay thread
« Reply #226 on: August 08, 2021, 02:57:55 PM »
+1
Superdetailing:     Ash pan lever

Most of the details are on the “action side” of a Shay.   But there are two prominent details I wanted to add which I could clearly see on photos of the Big Six.

The first is the lever for actuating the ashpan and dumping the ashes.

Now, what’s sort of amazing to me is that Overland had a link for this lever in the ash pan casting.   So I got a tiny drill bit (like #84) and very carefully drilled out the hole.


Since almost all of this is on the underside, I just guessed on what to do based on what little I could see in photos.

I formed some thin brass rod.


And ran it through the hole.  I chose to run it all the way across the bottom frame to make this detail stronger.  I don’t know if the prototype does it this way, but you can’t see this spot on the prototype anyway.  The side opposite the lever is hidden behind the lineshaft on the action side.


And No, I wasn’t tempted to make all of this actually operational and have a working ash pan dump.

The one other detail needed was the rest which holds and locks the handle.

Now this was hard.

I cut some thin brass sheet.  About 2 mil.


I then made some folds.  My fist try was HUGE (bottom of the next shot).  The second try was better, bit STILL too large.


So I trimmed the tip and this was now acceptable.  I mounted it to the frame.


It was kind of cool for photos that the slot of the holder was open.


Now, after a week or two of continues handling, I found the little point of the latch would catch on things (including fingers) and get bent.  So I added just a tiny bit of solder to hold it to the lever.


« Last Edit: August 08, 2021, 08:55:29 PM by u18b »
Ron Bearden
CSX N scale Archivist
http://u18b.com

"All get what they want-- not all like what they get."  Aslan the Lion in the Chronicles of Narnia by C.S.Lewis.

u18b

  • Crew
  • *
  • Posts: 3709
  • Respect: +1955
    • My website
Re: The Overland/Wiseman brass Western Maryland Shay thread
« Reply #227 on: August 08, 2021, 05:07:27 PM »
+1
Superdetailing:     Chain

The second must-have detail for me on the left side was a chain.

Actually, there were thee possible details for this area. 

During the service years of the late 40s, there was probably a push pole.  They were dangerous, but railroads used them.    With a loco on one track, the pole could be used to push a car on the next track over.

The push pole was present when the Shay was stored at the B&O Museum in Baltimore.

During the Cass years, the push pole is gone and they sometimes store a firehose there (the tender is filled from a firehose from ground level sources- not a water tank).

(Since this model will represent Chaffee 1945-1953, the firehose was out.  I may still make a Cass version with one of my other Shays).

You also see the loco with a chain.

After experimentation, I didn’t have room for the push pole AND the chain (the chain is small- but it is overscale of course).

I therefore opted for the chain.   It may not be entirely prototypical for the late 40’s, but I wanted it.

I used some chain I’ve had for decades in my parts box.  It is Builders in Scale part #251, brass chain, 40 links per inch.   I don’t even know if you can still get this.

I drilled two small holes and mounted two L-shaped posts into the frame.

I then created and soldered a tiny hook at one end of the chain (very difficult).

I next installed the chain in the same draping fashion in many photos.  It is soldered in place on the ends, but drapes naturally by gravity in the middle.


This is the look I was hoping for.
Ron Bearden
CSX N scale Archivist
http://u18b.com

"All get what they want-- not all like what they get."  Aslan the Lion in the Chronicles of Narnia by C.S.Lewis.

u18b

  • Crew
  • *
  • Posts: 3709
  • Respect: +1955
    • My website
Re: The Overland/Wiseman brass Western Maryland Shay thread
« Reply #228 on: August 08, 2021, 05:14:17 PM »
+3
Superdetailing:   Number Boards

Some of these details are easy.  Some are hard- but necessary.

“Hard- but necessary” is the category I would place the number boards on the front headlight.

It’s a shame Overland did not model these because they are a real challenge.

Overland could be said to have produced a model in the As-Delivered state- since when Lima delivered this Shay, there was no air tank behind the cab steps and there were no number boards.

But Western Maryland added these right away.

A lot of thought went into this.   I had two options:  brass or styrene.    Styrene is a possible fall-back, but I want all brass if possible.

The problem with brass number boards is heat transference.  I thought that I could not remove the headlight and work on it because when I soldered it back onto the shell, the number boards solder would melt and fall off.

So I needed to do this ON the model.

First, the left side of the headlight casting has a raised access panel.  I had to carefully remove this with a tiny bit with my motor tool.  That was tricky.  (The headlight casting you see in the following pictures was an extra I had in the parts bag- shown for reference).


I then scratch-built the number boards.

I started with  1/16” brass rod- which was too big. 

I used a motor tool to flatten two opposite sides (these  would become the top and bottom of the number board).

I ground the tip to about a 45 degree angle.

I then flattened one of the perpendicular sides a little.   This would become the face of the number board.


I then cut the rod at a 90 degree angle to the 45 degree angle (as shown). 

My first attempt, I got confused and cut it the wrong way.  I had to start over.


The little pieces were then mounted with resistance soldering. 

I tinned the mounting surface, held the number board with the tweezers, got it hot and touched the headlight. 

I had to be cautious.  I could not get the headlight too hot or I would risk unsoldering the whole headlight from the boiler.

I’ll be honest with you, this was VERY hard.

I made three attempts to cut a board before I got two that were decent.

It then took about 10 or more attempts per side to solder the board into an acceptable position.

I would install a side- and it was too low.  Or the wrong angle, etc.

And after I got one side done well, I was worried it would come off when I did the other side.

But in the end, after about 20 soldering actions, I produced something believable and acceptable.


(I’m really glad this is over with).

« Last Edit: February 13, 2023, 12:29:45 AM by u18b »
Ron Bearden
CSX N scale Archivist
http://u18b.com

"All get what they want-- not all like what they get."  Aslan the Lion in the Chronicles of Narnia by C.S.Lewis.

Chris333

  • Crew
  • *
  • Posts: 18398
  • Respect: +5672
Re: The Overland/Wiseman brass Western Maryland Shay thread
« Reply #229 on: August 08, 2021, 05:36:08 PM »
+1
I can just imagine how small that headlight is.   :scared:

u18b

  • Crew
  • *
  • Posts: 3709
  • Respect: +1955
    • My website
Re: The Overland/Wiseman brass Western Maryland Shay thread
« Reply #230 on: August 08, 2021, 07:52:02 PM »
0
I can just imagine how small that headlight is.   :scared:

Yes it is.  I measured to outside diameter at 2.17 mm.
Ron Bearden
CSX N scale Archivist
http://u18b.com

"All get what they want-- not all like what they get."  Aslan the Lion in the Chronicles of Narnia by C.S.Lewis.

u18b

  • Crew
  • *
  • Posts: 3709
  • Respect: +1955
    • My website
Re: The Overland/Wiseman brass Western Maryland Shay thread
« Reply #231 on: August 08, 2021, 08:54:24 PM »
+1
Superdetailing:  Things I’m Skipping

I laid out the criteria I was using at the start of this section on superdetailing.

The criteria were:
Three foot rule,
Important in photos,
and Do-able.

With that in mind, here are some details I did NOT add- and the explanations.

– Pipes around the boxy cover in front of the cab.  I’ve already mentioned this was not do-able without removing it.

– I also mentioned the push pole.  Because the chain is over scale, I had to pick one or the other and chose the chain.  And besides a scale push pole would highlight that the chain is over scale.   The chain looks wonderful by itself.

– Open cab roof vent.  The cab is a hot place and like almost all steam locos, there’s a hatch which you almost always see open on this Shay.

This Shay has a hatch, but it is a square piece of brass soldered to the roof.  If I were to model this, I would need to remove the current hatch, cut a hole for the opening in the roof, create a frame below the hatch in the roof, create a new thinner hatch, and then mount it properly. 

I decided against this and worried such a detail might be too delicate anyway.

– Gear Caps.  Now this one was a tough decision.  The sample model in OMI’s ad has caps on the gear areas on all the trucks- except the one that goes behind the ladder.
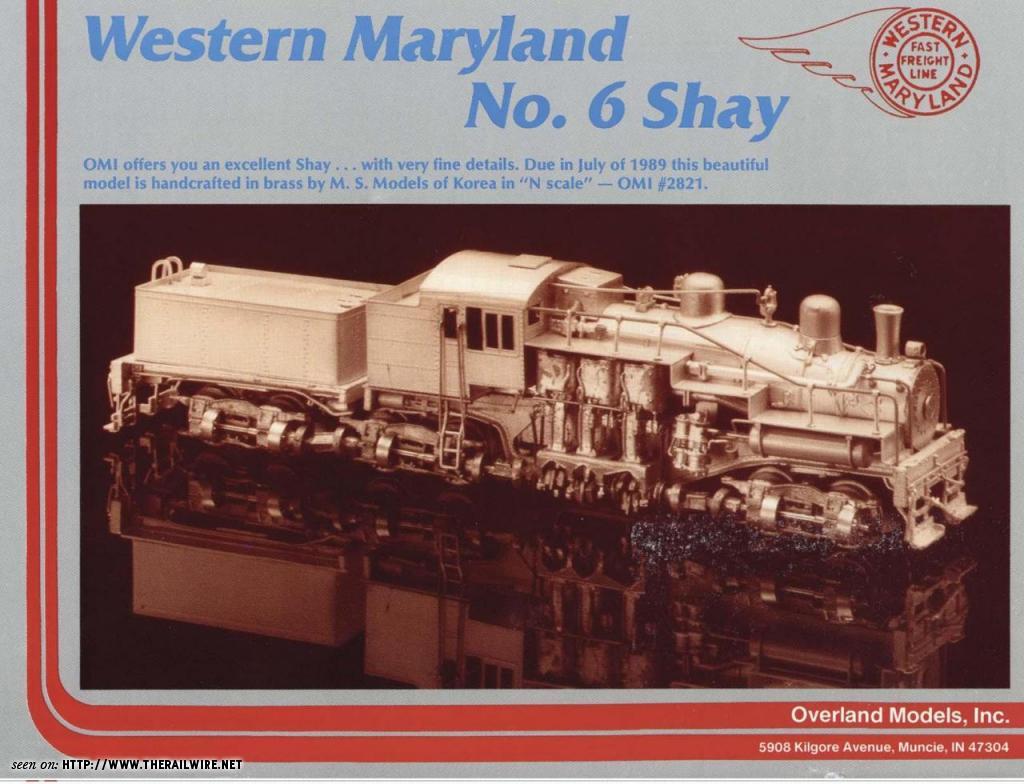


The prototype uses them too- though sometimes some of them are left off.  However, the spinning little pyramid gears on the lineshafts are ALWAYS covered (I assume for safety and to keep rocks and trash out).

Now, in my parts bag from a previous Shay creation, I actually had some of these gear caps.  I wouldn’t be surprised ifs OMI provided these in a supplemental parts bag originally.


So I thought long and hard about using these.

There are a few problems. 

First of all, there’s the question of where and how to mount them.  Each truck could have four- one on either side of each axle bearing.

Here are the four spots.


On the real Big Six, these caps are bolted to the frame- a luxury we don’t have.

On the truck frame casting, there are two raised flat places which are ideal   spots for soldering (see the green arrows).  No problem here.

But the other two spots have no such raised flat place (red arrows).  Soldering here would be a problem.  It could get messy, and the cap might not look straight when finished.

In fact, go back and look at the ad and you will see some of them crooked.

And then there’s the bigger problem of maintenance if I DO decide to install these.

Here is a cap simply set in place.


It does look nice, but if  this were soldered on…… how would I clean and maintain the lineshaft?

Fuzz and hair are the bane of our models in general- and a curse for this model in particular.  When someone loaned me his Shay for evaluation a while back, one of the things I did was spend time picking hair and fibers which had gotten all wrapped up in the spinning shafts, degrading performance.

In fact, look at this photo.  There are at least two fibers finding their way into this area.


If I were to install these caps, the look would be wonderful.  But my only recourse for cleaning would be complete disassembly of the truck so that I could get at these shafts from the back side.

These trucks have TINY screws (M1.0 or smaller) and everything is very delicate.  I really don’t want to be regularly taking them apart for cleaning.  The risk of something going wrong (and being un-fixable) is too great for me.

So no caps.


– Rear Tender Posts.  Barely at the three foot rule on the model, but clearly present in photos are two little posts which sit on the tender roof in the rear almost at the corners. They are flattened.    I have no idea what they do.

You can see them in this photo below.  They are actually pretty prominent.  Once again, if someone knows what these are, speak up.  I’m clueless.

http://scriptunasimages.smugmug.com/photos/332647863_4YmTq-M.jpg


They would be make-able.  I would take small brass rod and flatten one end.  The problem is mounting them.  It would be really hard to get a soldering iron tip way back there on the inside. 

Normally this would be installed in the construction phase with the holding the tender roof only, before the sides are added.

And even still on this model as I find it….
Many people wouldn’t even be able to do it anyway since there is a big lead weight sealing the hole in the middle of the tender body underside.

I’ll be removing that weight.  But even still, this detail is just too hard to solder.  So I’m leaving them off.

Ron Bearden
CSX N scale Archivist
http://u18b.com

"All get what they want-- not all like what they get."  Aslan the Lion in the Chronicles of Narnia by C.S.Lewis.

Chris333

  • Crew
  • *
  • Posts: 18398
  • Respect: +5672
Re: The Overland/Wiseman brass Western Maryland Shay thread
« Reply #232 on: August 09, 2021, 12:15:16 AM »
+1
I assume this is a builders photo, but the roof hatch is closed  ;)


u18b

  • Crew
  • *
  • Posts: 3709
  • Respect: +1955
    • My website
Re: The Overland/Wiseman brass Western Maryland Shay thread
« Reply #233 on: August 09, 2021, 02:15:09 AM »
0
Yes.   That's a builder's photo.
Ron Bearden
CSX N scale Archivist
http://u18b.com

"All get what they want-- not all like what they get."  Aslan the Lion in the Chronicles of Narnia by C.S.Lewis.

u18b

  • Crew
  • *
  • Posts: 3709
  • Respect: +1955
    • My website
Re: The Overland/Wiseman brass Western Maryland Shay thread
« Reply #234 on: August 09, 2021, 10:01:52 AM »
+4
Superdetailing: Sanding Control

A must-have detail is the sanding control rod on the roof.

The roof looks a little bare without it.


This runs from a lever on the sand dome through the front cab wall and into the cab area where the engineer can pull on the control rod.

(This detail MAY have been what the Korean creators were thinking about when they soldered a ridiculous wire to the bell.   See the ad posted above.)

I did not feel the need to drill a hole in the cab (a difficult task).  I just cut a thin rod to size and soldered it at two spots where this rod naturally lays: the sand dome up front and some piping in the back.


As long as the rod is tight against the cab, it looks fine.

This is a great addition.  Overland should have added this easy detail.
Ron Bearden
CSX N scale Archivist
http://u18b.com

"All get what they want-- not all like what they get."  Aslan the Lion in the Chronicles of Narnia by C.S.Lewis.

u18b

  • Crew
  • *
  • Posts: 3709
  • Respect: +1955
    • My website
Re: The Overland/Wiseman brass Western Maryland Shay thread
« Reply #235 on: August 09, 2021, 11:35:25 AM »
+1
Superdetailing: Rear Headlight 
Part 1


I know….. I said I wasn’t going to do this.   But ….

After reading a wonderful source of information on the Western Maryland Shay (Western Maryland Shay No. 6, Futej & Robin, eds) I made an important discovery.

This Shay spent a good deal of its time running backwards.  Yes, backwards.

Which means…. If I hope to use it in even a cursory prototypical fashion, I’m going to need to illuminate the rear light located on the tender.

A LOT of thought went into this.

I saw two options.

Option One:  the blue and yellow decoder wires would be run from the cab to an LED in the tender using fiber optic just like before.

This would require two more wires running between the cab and tender.  Would they be an obstruction?

Option Two:  Make the tender self-contained by installing a function decoder in the tender.   I’d have to run power from the tender truck to the decoder.  An LED would be mounted inside the tender and fiber optics would be used.

But I couldn’t pull the trigger on either option.

Mounting the LED would be hard.   In the nose of the boiler, with the smokebox door removed from the front, it is easy-peasy to work.  You can see what you’re doing.  It’s right there.  Use fiber optic, place the circuit  board underneath- bam- you’re done.

The tender is a different matter.  The circuit board would be mounted up-side-down from how I’m trying to work inside the tender (getting in from the bottom).  I wouldn’t even be able to see what I was doing.

I also have to admit that the fiber optics work- but it’s not perfect.  It takes some effort to get it to look just right because of the angle I’m working with.

Then, one night I was brainstorming.
I just wonder….. is it even possible to get an LED inside that headlight casting?

I use tiny LEDs in my brass Milwaukee Road EP-2 project, but the EP-2 headlight casting is huge compared to this.

Since I had an extra headlight casting, I decided to go for it.  Nothing would be lost until I had to drill something into the tender.  If I ruined a casting in the attempt, no big deal.

So I experimented with the taillight. 

This was a big job.

It’s going to take several posts.


Ron Bearden
CSX N scale Archivist
http://u18b.com

"All get what they want-- not all like what they get."  Aslan the Lion in the Chronicles of Narnia by C.S.Lewis.

peteski

  • Crew
  • *
  • Posts: 32965
  • Gender: Male
  • Honorary Resident Curmudgeon
  • Respect: +5344
    • Coming (not so) soon...
Re: The Overland/Wiseman brass Western Maryland Shay thread
« Reply #236 on: August 09, 2021, 01:51:30 PM »
+1
Ron, if the tender wheels pick up power from both rails, then you only need a single (yellow) wire from the decoder.  The "blue" can be generated inside the tender using just 2 diodes (or even a tiny SMD single chip dual diode).  I think that adding a function decoder to the tender is a bit of an ovekill.

I have posted this circuit on the Railwire multiple times.  :)


As for the LEDs, there are prewired 0201 SMD LEDs out there (or you can buy the LEDs and solder leads yourself). Their footprint is 0201 or 0.020" x 0.010"!
That might be small enough to fit inside the headlight cavity.
. . . 42 . . .

u18b

  • Crew
  • *
  • Posts: 3709
  • Respect: +1955
    • My website
Re: The Overland/Wiseman brass Western Maryland Shay thread
« Reply #237 on: August 09, 2021, 03:28:36 PM »
0
Pete,
Thank you.  Very helpful.   I don't read  across the boards, so I missed this.
I know there was a way to do this- I just didn't know how.

In the 90's, Digitrax and others would place an alternative wiring diagram in the decoder booklet.   I don't think they do it any more.

So I'll file this away.   I won't need it this time because the two wires coming from the cab were not an obstruction at all.

Thanks.
Ron Bearden
CSX N scale Archivist
http://u18b.com

"All get what they want-- not all like what they get."  Aslan the Lion in the Chronicles of Narnia by C.S.Lewis.

u18b

  • Crew
  • *
  • Posts: 3709
  • Respect: +1955
    • My website
Re: The Overland/Wiseman brass Western Maryland Shay thread
« Reply #238 on: August 09, 2021, 03:31:10 PM »
+4
Superdetailing: Rear Headlight 
Part 2


The first step was to get the lead weight out.  It’s held in place with solder which had to be scraped and scraped until I could get the weight out.


Here is the stock weight before removal.


I then heated the light casting and got it out of the tender.  There was a HUGE blob of solder holding it inside the tender and I used a motor tool to cut the blob down.


I then cut the mounting pin off the casting, just like before.


And drilled a hole for fiber optics, just like before.


I then started thinking about a tiny LED.

It might work if I oriented it up and down instead of side to side.   But it still might be too big.


And then I thought of another challenge….. IF I can get an LED in there, then light leak will be a HUGE problem on the bottom side.


That’s when I decided to possibly mount a tube through the tender and into the bottom of the casting.  I got the idea from the brass Kumata EP-2 electrics- 2000 run.

The limitations could be:
Is the tube too big for the casting?
Will wires run down inside the tube?
And most important, will an LED fit in that tube?

So I took a 1/16” brass tube and opened the inner hole.


When I could see that the LED could slide all the way down the tube, it was at this point that I thought all this was possible.

Ron Bearden
CSX N scale Archivist
http://u18b.com

"All get what they want-- not all like what they get."  Aslan the Lion in the Chronicles of Narnia by C.S.Lewis.

u18b

  • Crew
  • *
  • Posts: 3709
  • Respect: +1955
    • My website
Re: The Overland/Wiseman brass Western Maryland Shay thread
« Reply #239 on: August 09, 2021, 03:57:21 PM »
+3
Superdetailing: Rear Headlight 
Part 3


I drilled the light casting for the 1/16” tube.


I then enlarged the stock hole on top of the tender to 1/16”….


….And went all the way through to the bottom.
I was a bit off from center and had to adjust.   It did not matter since this side will all be hidden.


The tube still needs to be trimmed.


Here is a little test.  I think this will be better.  Of course the tube has to be trimmed and lowered.


Ron Bearden
CSX N scale Archivist
http://u18b.com

"All get what they want-- not all like what they get."  Aslan the Lion in the Chronicles of Narnia by C.S.Lewis.