Author Topic: Best Of The Overland/Wiseman brass Western Maryland Shay thread  (Read 40273 times)

0 Members and 2 Guests are viewing this topic.

Chris333

  • Crew
  • *
  • Posts: 18346
  • Respect: +5641
Re: The Overland/Wiseman brass Western Maryland Shay thread
« Reply #450 on: March 18, 2023, 05:37:27 AM »
+1
Went to the Midwest Narrow Gauge show yesterday and saw one of these Shays for sale.


EDITED to remove the mans phone number.

The guy had a $250 price on it. I told him about Ron rebuilding these and he might be interested, but really I had no idea or I would have bought it for him. The card is the guys info selling it.
« Last Edit: March 18, 2023, 08:53:37 PM by Chris333 »

u18b

  • Crew
  • *
  • Posts: 3699
  • Respect: +1952
    • My website
Re: The Overland/Wiseman brass Western Maryland Shay thread
« Reply #451 on: March 18, 2023, 10:42:54 AM »
0
This is a version 1... so it is less desirable....
but I'd like to get it to see if I can make this run without derailing.
« Last Edit: March 18, 2023, 04:27:11 PM by u18b »
Ron Bearden
CSX N scale Archivist
http://u18b.com

"All get what they want-- not all like what they get."  Aslan the Lion in the Chronicles of Narnia by C.S.Lewis.

Chris333

  • Crew
  • *
  • Posts: 18346
  • Respect: +5641
Re: The Overland/Wiseman brass Western Maryland Shay thread
« Reply #452 on: March 18, 2023, 11:46:12 AM »
0
Hey Ron. I'm at the show now. I just bought it for you. Will talk later.

u18b

  • Crew
  • *
  • Posts: 3699
  • Respect: +1952
    • My website
Re: The Overland/Wiseman brass Western Maryland Shay thread
« Reply #453 on: March 18, 2023, 11:49:08 AM »
0
Woohoo.  Thanks for thinking of me.
Ron Bearden
CSX N scale Archivist
http://u18b.com

"All get what they want-- not all like what they get."  Aslan the Lion in the Chronicles of Narnia by C.S.Lewis.

u18b

  • Crew
  • *
  • Posts: 3699
  • Respect: +1952
    • My website
Re: The Overland/Wiseman brass Western Maryland Shay thread
« Reply #454 on: March 18, 2023, 04:27:59 PM »
0
Since Chris bumped this thread to the top, this is a good time for an update.

First, I personally use this thread as a reference work myself.  So I often think…. How did I do xx?   It then becomes a problem searching thru 31 pages looking for xx.

So on page 1, I made an index with links to jump to procedures. the photos I’ve posted are located on the Railwire server which should help this thread be a reference for OMI Shay users for years to come.

More coming...
Ron Bearden
CSX N scale Archivist
http://u18b.com

"All get what they want-- not all like what they get."  Aslan the Lion in the Chronicles of Narnia by C.S.Lewis.

u18b

  • Crew
  • *
  • Posts: 3699
  • Respect: +1952
    • My website
Re: The Overland/Wiseman brass Western Maryland Shay thread
« Reply #455 on: March 18, 2023, 04:49:59 PM »
+1
Over many weeks, I spent a lot of time on the sound equipped Shay. 

I realize that I had made a LOT of improvements to the other Shay rebuilds – and so I turned my attention back to this one.

A little of this is boring (at first), but I want to document it.

SOLDER REINFORCING

I disassembled and performed all of the solder reinforcing- which this Shay desperately needed.   I’ve decided this is a crucial step if you own one to run (and not just a collector).


DRIVESHAFT

This Shay had the original zig-zaggy driveshaft.  I could tell from the bends that the driveshaft was in the early stages of failing- so I rebuilt it with a straight shaft as described earlier.  I’m convinced now more than ever that seeing connecting rods move up and down is cool, but sooner or later the driveshaft will fail.  Better to go ahead and replace it.


VALVE LIFTER ASSEMBLY

While I had the drive shaft out, I made two tweaks on the valve lifters assembly.

The stock bearing is often too tight with two lifters.  So I sanded the lower ends of the etched lifters to make them thinner.  Now two ride great.

Also, I had some rockers that were missing a pin.
So I drilled a tiny .0010” hole and then used .0008” brass wire to hold the lifter to the rocker.  I threaded the wire through and twisted it, then soldering so it would not come apart.


This was a good compromise.
Ron Bearden
CSX N scale Archivist
http://u18b.com

"All get what they want-- not all like what they get."  Aslan the Lion in the Chronicles of Narnia by C.S.Lewis.

u18b

  • Crew
  • *
  • Posts: 3699
  • Respect: +1952
    • My website
Re: The Overland/Wiseman brass Western Maryland Shay thread
« Reply #456 on: March 18, 2023, 04:53:09 PM »
+1
CYLINDER ASSEMBLY

I then went about the task of lowering the cylinder assembly so that the driveline looks all in a straight line.  Mine assembly was too high.  The cylinders must be removed and then the housing must be removed from the frame.  And then all soldered back.

This was my second Shay for doing this procedure and I will say… this is VERY hard.  It took me something like 5 or 6 (I lost track) attempts before I was satisfied.

First, it is hard to know how lined up the assembly is when there is no driveshaft and no trucks.  You have no visual reference.  So you get it where you think it looks good- only to discover it is not good when the trucks and driveshaft are added.

One time, I finally got the height right…. But did not have the holes for the perpendicular shaft (from up top) line up.  There was a bind- and so I had to start over.

Then, I got it all lined up so it LOOKED great … but the lower driveline worm was not tight up against the gear in the driveshaft.   So rather than start over, I decided the way to move the driveshaft closer to the worm was to move the end bearing plates.

So I filed the back edge of the bearing plates and resoldered.
You could also file the inside hole a bit.

Because there is still a little bit of play, when I installed the little driveshaft locking plates, I pressed the shaft and the plate toward the frame eliminating the play.

The end result was a good running Shay (using the new motor/worm configuration I developed on page 28).

DRIVELINE WOBBLE

But… there were a couple of terrible eccentric wobbles in the U-joints.   It was really ugly and detracting from the cool running effect of this loco.   This was because the fork pieces were not soldered onto their truck shafts perfectly square.  That means in the x-y-and z direction.  It’s easy to get 2 correct.  But hard to get all three correct.

It took many tweaks to get the forks as perfect as I was able. 
When I reassembled, the running wobble in the u-joints was MUCH improved.
Ron Bearden
CSX N scale Archivist
http://u18b.com

"All get what they want-- not all like what they get."  Aslan the Lion in the Chronicles of Narnia by C.S.Lewis.

u18b

  • Crew
  • *
  • Posts: 3699
  • Respect: +1952
    • My website
Re: The Overland/Wiseman brass Western Maryland Shay thread
« Reply #457 on: March 18, 2023, 05:05:35 PM »
0
FIREBOX/ASH PAN DECODER AREA

Upon reassembly my sound decoder died.
Not certain why, but my guess was the firebox/ash pan area was just so tight and there might be a sharp edge which pierced the Kapton tape.  I didn’t waste a lot of time trying to figure out what went wrong- but did decide I needed more room.

So I decided to completely remove the weight which I had already drastically trimmed.  With all the work I was doing on this Shay, it had already come loose.

As a comparison, I totally removed a stock weight from my scrap frame.


I was amazed the weight did not fill the ash pans because it was flat- and it was held in place by epoxy.  So I surmised, I could create a new weight filling the ash pans.  I might loose a few grams, but I will make a LOT more room for the decoder. 


Here is a comparison of a stock weight with the weight I carved.  Notice that I had actually removed almost the whole weight without knowing it.  I see in retrospect it is better to remove the whole thing.


Using my spare ash pan as a mold, I cleaned it up (removing the casting spru remnant). 


I then poured a CerroBend 158 weight.  I tried differing fill amounts, but found it best to  over-fill just slightly because of the high surface tension.  Otherwise, the corners would be too low.


Trimming up a bit, I filed the weight flat with the ashpan edge.


Here is a weight comparison. 
Stock ash pan weight = 8 g.
The weight I had ground down = 4g.
My new weight was 3 g. 

But with a loss of only 1 g, I now had MUCH more room for the decoder.   

Also, the decoder is protected from sharp edges.   This is definitely the best way to go in the future.   With the old weight removed, and a small ash pan weight added, a LokSound Micro v5 fits perfectly.


« Last Edit: March 19, 2023, 02:41:55 PM by u18b »
Ron Bearden
CSX N scale Archivist
http://u18b.com

"All get what they want-- not all like what they get."  Aslan the Lion in the Chronicles of Narnia by C.S.Lewis.

Chris333

  • Crew
  • *
  • Posts: 18346
  • Respect: +5641
Re: The Overland/Wiseman brass Western Maryland Shay thread
« Reply #458 on: March 18, 2023, 05:09:18 PM »
0
Ron, reading back one page 1 I can clearly see the difference between version 1 and 2, but how did you tell from my horrible photo?

Wonder if you can still send it back to Overland for a retrofit?  :D

u18b

  • Crew
  • *
  • Posts: 3699
  • Respect: +1952
    • My website
Re: The Overland/Wiseman brass Western Maryland Shay thread
« Reply #459 on: March 18, 2023, 05:18:39 PM »
+1
BOILER WEIGHT

Many pages ago, I suggested filling the entire boiler with low-temp liquid weight.  Well, I did it.

First I weighed my boiler/cab shell as a reference.  = 20 grams.

I used solder to seal any open holes or seams (mostly on the bottom near the motor).

We will need to be able to run wires to the LED headlight, so I used a brass tube with excess length.   I also had a small piece of PlayDoh as a dam because I had to leave room for the LED circuitry (and I didn’t want molten alloy to flow into the headlight casting!).


I dammed the nose end.   I remembered to insert the shell retaining screw so the alloy would flow around it and the hole would already be tapped.


I then inserted the brass tube inside the boiler and gently pushed it into the PlayDoh.
I also pinched the tube closed so no metal would accidentally go down the tube.


I then melted and poured the alloy.  I used CerroBend 158.  No need to go to the stove- all could be done on the workbench.  I simply touched my soldering iron and melted the alloy into a small ladle.  If the ladle cooled a bit, I could plunge the iron in and get it all hotter.   I then poured it into the boiler and filled it up.


Of course the result was a bit rough.
I then used a motor tool to clean everything up, cut off the tube ends even with the weight, and smoothed all sharp edges.


I ran a rod through the tube to make sure it was cleaned out and the inner burrs were removed.


When finished, the boiler now weighs 38 grams- which is a net increase of 18 g.  My previously handmade weight was only 7 g- so this is MUCH better and makes up for some lost weight in the removal of the firebox/ash pan weight and installing a sound decoder down there.
« Last Edit: March 19, 2023, 12:47:37 AM by u18b »
Ron Bearden
CSX N scale Archivist
http://u18b.com

"All get what they want-- not all like what they get."  Aslan the Lion in the Chronicles of Narnia by C.S.Lewis.

u18b

  • Crew
  • *
  • Posts: 3699
  • Respect: +1952
    • My website
Re: The Overland/Wiseman brass Western Maryland Shay thread
« Reply #460 on: March 18, 2023, 05:22:38 PM »
+1
HEADLIGHT

A micro SMD LED (0402) now easily moved thru this tube.


I created a circular circuit board in the nose space.  This primarily was for the resistor. 

I drilled a hole and tapped the weight so that the board would stay secure and not float around and cause a short

I then installed a TCS 2-pin micro plug on the other end for connecting to my circuit board over the motor.


Ron Bearden
CSX N scale Archivist
http://u18b.com

"All get what they want-- not all like what they get."  Aslan the Lion in the Chronicles of Narnia by C.S.Lewis.

u18b

  • Crew
  • *
  • Posts: 3699
  • Respect: +1952
    • My website
Re: The Overland/Wiseman brass Western Maryland Shay thread
« Reply #461 on: March 18, 2023, 05:30:19 PM »
+1
Ron, reading back one page 1 I can clearly see the difference between version 1 and 2, but how did you tell from my horrible photo?

Wonder if you can still send it back to Overland for a retrofit?  :D

Chris, good question.

My first hint was from the photo you posted above.

Since the shell was loose, you can see a weight in the coal bunker.  That weight is first version...... unless someone was a tinkerer and added a small weight there.  (I myself have done this).


So.... since you posted the phone number, I texted the seller requesting a photo of the underside.
That big gear is the foolproof evidence of version 1.


So I knew this was less valuable than a revised version.

And no.... I would not WANT to send it back to OMI.  They could not do a better job than me!   :trollface: :ashat: :D
« Last Edit: March 18, 2023, 05:32:08 PM by u18b »
Ron Bearden
CSX N scale Archivist
http://u18b.com

"All get what they want-- not all like what they get."  Aslan the Lion in the Chronicles of Narnia by C.S.Lewis.

u18b

  • Crew
  • *
  • Posts: 3699
  • Respect: +1952
    • My website
Re: The Overland/Wiseman brass Western Maryland Shay thread
« Reply #462 on: March 19, 2023, 06:16:04 PM »
+2
TENDER SOUND

I then turned my attention to the tender.   The end goal was to move the speaker from the crowded cab to the tender.  With the speaker in the cab, it is really hard to get the boiler shell on and off.

But in the tender, there’s an important weight in the middle  that fills the opening.   The weight would need to be replaced.

I removed the stock weight by scratching bits of lead from the edges.  It takes a lot of work, but I finally got it out.  It weighed 13 g.


I wanted to keep 13 g.  So instead of splitting the weight, I installed Tungsten cubes with a few slivers.   I taped the pieces together and glued them in place. I installed 6g per side = 12 g (the speaker weighed a gram, so the weight was retained). 


I then opened the hole in the base a bit wider for the speaker box I had previously made.   


I glued the box to the back of the tender circuit board.


In retrospect, the tender is a square enclosure and I could possibly have just mounted the speaker to the back of the board with no box.  The tender itself would become a resonance chamber.

At any rate, I cut traces for the TCS micro socket and LED resistor.


The board with speaker box was installed in the tender floor.


I drilled holes in the board to line up with the frame screws.  This would keep the board aligned properly.


I cut a notch in the frame so the LED wires were far away.


Here is a test fit.  I also trimmed the truck screw (not shone) shorter so there was no risk of it touching the circuit board.


I removed the excess traces.  Epoxied the corners of the micro socket for extra strength, and applied Kapton tape over all the board components.


« Last Edit: March 19, 2023, 06:17:59 PM by u18b »
Ron Bearden
CSX N scale Archivist
http://u18b.com

"All get what they want-- not all like what they get."  Aslan the Lion in the Chronicles of Narnia by C.S.Lewis.

u18b

  • Crew
  • *
  • Posts: 3699
  • Respect: +1952
    • My website
Re: The Overland/Wiseman brass Western Maryland Shay thread
« Reply #463 on: March 19, 2023, 07:22:12 PM »
+5
NANO INSTALL

When I began this project, I only had access to an ESU Micro v5.  But since I had made all these changes, I bought a v5 Nano with what appears to be called the revised v2 board.  This board makes the whole decoder thinner and shorter than the v1 with the NEXT 18 connector (you can tell the difference because the NEXT 18 board is small, but the V2 board runs the length of the decoder).


This was a great decision because the Nano is not a whole lot smaller than the Micro, but in THIS application, those millimeters make ALL the difference.

The Nano fit wonderfully and is currently the decoder of choice for me in this model.  In fact, it almost fits entirely inside the firebox.  (I’m counting on ESU to one day make one that WILL fit!).


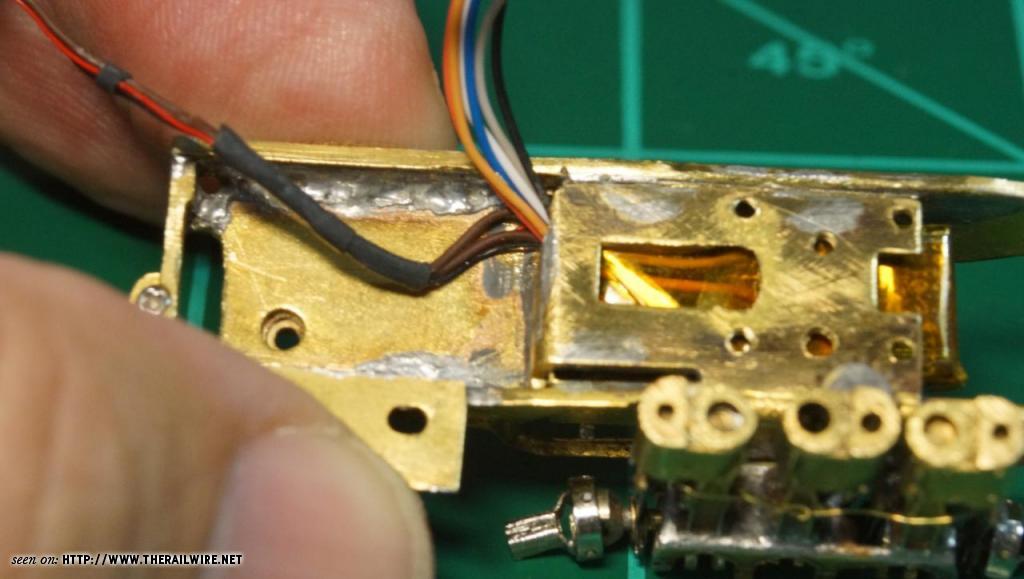
The first step was to remove unwanted function wires.   The Nano V5 v2 comes with a LOT.
I removed the purple, pink, green and mint-green wires.


I made a few other changes.

The yellow wire going to the tender was rather stiff- so I replaced it with a thinner wire (very thin excess wire from the LEDs).  I used black for negative.

I also needed another tap on the blue positive wire so I installed a thin wire (red for positive).  I'll paint it black later.

I bundled these with the speaker wires.

I then made a wiring harness with TCS micro-plugs.
6 prong plug goes to the board on top of the motor:  red, black, orange, gray, blue, white.

The other bundle to the tender received a TCS 4 pin microplug.


Since the loco was all disassembled, I did more prep work on it to make life easier and safer for the expensive decoder.

I opened up the rear end so the plug to the tender could fit.


I also opened up the main hole (rightward in this photo) in the frame for the 6-pin bundle.


Lastly, I opened up the edge where the wires slide down in order to minimize the risk of sharp metal cutting the wire sheathing as it slides.


Here is the tender bundle moving through.


Now the 6 pin bundle makes it way through. (opposite view)


All the wires through the larger hole.


Top view.  Notice the Nano is shorter than a V5 Micro.


Even though the Nano is shorter, there is still a risk the boiler shell will hit the decoder-- so I trimmed the boiler back a bit at the bottom.


Now the shell actually fits much better.   I had not realized the previous V5 Micro was causing a small obstruction.


I made one last change as a safety improvement.
With all of the wires coming up the side of the motor, there is a slight risk of the shell pinching a wire.


I took a Atlas or Kato pick-up strip and trimmed a piece, drilling a hole for the motor screw.


I then installed the harness protector which runs down the side of the motor.


Here is a high view.


Time for a test run.
WOW!   The sound is so much improved by getting the speaker away from the motor and crowded cab and moving it to the tender.

The volume is much louder.   I am very pleased.

In the future, I may add the keep alive module.  It will sit in the side of the cab where the speaker was formerly.  I’m not using one now.  More on that later.

So here is the brass Shay family to date- they are all different.

And one more is now on the way!  (thanks again Chris!)

Ron Bearden
CSX N scale Archivist
http://u18b.com

"All get what they want-- not all like what they get."  Aslan the Lion in the Chronicles of Narnia by C.S.Lewis.

reinhardtjh

  • Crew
  • *
  • Posts: 2999
  • Respect: +362
Re: The Overland/Wiseman brass Western Maryland Shay thread
« Reply #464 on: March 19, 2023, 11:28:27 PM »
0
Just as an FYI, the Nano comes with a new connector that is smaller and thinner than the Next18.  It's non-standard, meaning it has no NEM number or NMRA equivalent that I'm aware of. ESU calls it the e24 since it has 24 conductors.  There is a post in the Nano thread in DCC & Electonics that has the molex source.

Here's the link:  Re: Loksound 5 Nano
« Last Edit: March 19, 2023, 11:35:47 PM by reinhardtjh »
John H. Reinhardt
PRRT&HS #8909
C&O HS #11530
N-Trak #7566