Author Topic: New brass Milwaukee Bipolar EP-2 clinic- part 2  (Read 52148 times)

0 Members and 1 Guest are viewing this topic.

u18b

  • Crew
  • *
  • Posts: 3709
  • Respect: +1955
    • My website
Re: New brass EP-2 clinic- part 2
« Reply #180 on: August 11, 2016, 07:27:38 PM »
+1
Here is the B decoder with the yellow jumper wire to the proper yellow pad.  And the 4-prong plug has been installed.


Here is another side view.  The whole point is that we have not added to the thickness of the unit.


The decoder is now wrapped in Kapton tape-- with the LED socket left open for a plug.


Ready for the LED.


Here is an LED installed.  And it is now modular.


Ron Bearden
CSX N scale Archivist
http://u18b.com

"All get what they want-- not all like what they get."  Aslan the Lion in the Chronicles of Narnia by C.S.Lewis.

u18b

  • Crew
  • *
  • Posts: 3709
  • Respect: +1955
    • My website
Re: New brass EP-2 clinic- part 2
« Reply #181 on: August 12, 2016, 06:58:12 PM »
+2
Revisions, Revisions.

I'm making progress.  And still learning from mistakes.   
I'm recording all this for whoever is following, but also for myself since I refer back to these notes.

I did a pretty good job of getting the Corel Draw drawing "camera ready".
But I made two key mistakes.  Both are related to the needs of the Alps printer.

I knew that the minimum line thickness Alps can handle is .0017 inches.
What I did NOT know is that what ever small amount I use needs to be in INCREMENTS of  .0017".

Some of my lines were  .0021"-- not good.   SO I needed to go with either .0017 or .0034.

The next mistake I did was forget to export a visual file in bitmap form to see what it will look like.  I had done this early in the process, but forgot to do it at the end as a final check.

To do the export....
1.  Make all layers you want to export VISUAL, UNLOCKED,  And PRINTABLE.  See on the previous page where these icons are in the layers box on the right.  An eye symbol, a pencil symbol and a printer symbol.

2.  Then select (draw the cursor around) all objects you want to look at.

3.  Click the EXPORT button, or use CTR-E.

4.  Choose PNG file type, give it a name.  Make sure you CHECK the box for SELECTED ONLY (or you will do the whole drawing- not just what you want).  Click EXPORT.

5.  Box pops up.  Size:  1:1,  Choose Resolution- CUSTOM and 600 x 600 resolution.  UN-check anti-aliasing.  Leave rest.  Click OK.  Another little box about interlacing.  Do nothing, click OK.

Now look at the PNG file you just created.  This will give you an idea of what the printer will do.

Here is a critical part of my decal.


On the left side, the Text herald is in two experimental versions.  The bottom three have a pen width for the letter outline set at .0017".
The top one is set at .0034".  Both look OK, but I like the finer outline better.

We will see how it prints.

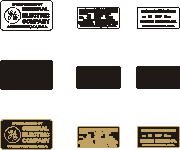
But I discovered a problem.   Look right at the builder's plates.

The GE logo plate turned out fine.  But the smaller plate with the model and serial number looks terrible.  WAY too much gold with just a couple of flecks of black.  No what I was wanting.

So I went back and deleted some of the info using fewer lines.   You can't read it anyway, so the overall effect and appearance is what we want.

So here is a test.

GE plate on the left.
Original smaller plate in the middle.
The simplified plate on the right.

At this resolution, the edited simplified plate looks better.
So that's what I'll go with.


« Last Edit: August 12, 2016, 07:03:04 PM by u18b »
Ron Bearden
CSX N scale Archivist
http://u18b.com

"All get what they want-- not all like what they get."  Aslan the Lion in the Chronicles of Narnia by C.S.Lewis.

peteski

  • Crew
  • *
  • Posts: 32958
  • Gender: Male
  • Honorary Resident Curmudgeon
  • Respect: +5343
    • Coming (not so) soon...
Re: New brass EP-2 clinic- part 2
« Reply #182 on: August 12, 2016, 08:17:15 PM »
+1
Just to clarify, the things Ron mentioned as required for printing on Alps printer are not really required. These are tricks and procedures I came up with for getting the best results out of my Alps printer. The 0.0017" (actually 1/600 of an inch or 0.001666666666.......") is the size of the smallest dot Alps can print. Think of it like a dot on a grid of 600 dots every inch in X and Y dimensions. Most computer printers work that way.

The dots can either be printed (ink deposited on paper) or left blank (there no other alternative).  When some program (like Corel Draw) sends a vector-based drawing to Alps, the print driver rasterizes the drawing into a 600dpi grid of pixels to be printed.  Even if you don't make things like letter outlines multiples of 0.0017", the rasterization engine will decide how to convert them into a array of dots.  Depending on how close the line thickness in the drawing is to the dot size, the rasterizer might round it up to the next dot or round down the difference making the line thinner. By designing the artwork to use outlines which are multiples of the printer's dot size you get a more accurate picture of what the printout will look like.

Same with exporting the vector-based artwork (no anti-aliasing) into a 600dpi PNG picture. That gives a fairly good "print preview".  I use this technique a lot when printing very small objects (like those builder's plates in N scale).  That way I know whether I should even bother putting all the detaisl into it, or will is just come out looking like a blob of ink.
. . . 42 . . .

u18b

  • Crew
  • *
  • Posts: 3709
  • Respect: +1955
    • My website
Re: New brass EP-2 clinic- part 2
« Reply #183 on: August 12, 2016, 08:18:40 PM »
+1
Revisions have been made.

Here is the "camera-ready" proof.


Hopefully, what I hold in my hands looks as good as this.
Ron Bearden
CSX N scale Archivist
http://u18b.com

"All get what they want-- not all like what they get."  Aslan the Lion in the Chronicles of Narnia by C.S.Lewis.

central.vermont

  • Crew
  • *
  • Posts: 2623
  • Gender: Male
  • Jon
  • Respect: +147
Re: New brass EP-2 clinic- part 2
« Reply #184 on: August 13, 2016, 07:47:59 AM »
0
Wow Ron, that looks great!!! :o

u18b

  • Crew
  • *
  • Posts: 3709
  • Respect: +1955
    • My website
Re: New brass EP-2 clinic- part 2
« Reply #185 on: August 16, 2016, 01:38:38 AM »
+1
Trying to get some painting done in prep for the decals arriving.

But DANG!!!!!

This scheme is hard to mask on this loco.
All the wonderful detail (like grabirons) is getting in the way of the tape.

After failure attempts, I finally just cut a thin strip.


And then add to it.


The right side was not that much trouble.


But the left side was hard again-- because of grabirons.


This is actually all I've done at present.
A lot more to go.

Ron
 

« Last Edit: August 16, 2016, 01:40:17 AM by u18b »
Ron Bearden
CSX N scale Archivist
http://u18b.com

"All get what they want-- not all like what they get."  Aslan the Lion in the Chronicles of Narnia by C.S.Lewis.

peteski

  • Crew
  • *
  • Posts: 32958
  • Gender: Male
  • Honorary Resident Curmudgeon
  • Respect: +5343
    • Coming (not so) soon...
Re: New brass EP-2 clinic- part 2
« Reply #186 on: August 16, 2016, 02:07:58 AM »
0
Ron,
Is that Tamiya masking tape? It seems too green to be Tamiya (the only tape I find good enough for precision masking). Well worth the price!

I would also cut a slit in the tape where it goes over the grab iron on the side. That will straighten the top edge (no more dip). Then take a small piece of tape to over the grab iron (or even use some liquid mask to cover the grab.
« Last Edit: August 16, 2016, 02:10:56 AM by peteski »
. . . 42 . . .

u18b

  • Crew
  • *
  • Posts: 3709
  • Respect: +1955
    • My website
Re: New brass EP-2 clinic- part 2
« Reply #187 on: August 16, 2016, 09:27:08 AM »
0
Hi Pete.

Not, it is masking tape.

I have some Tamiya, but it was not working well in this situation.
I would have to cut it.  But laying it down and cutting with a #11 blade, pulling it up, and applying (while handling a bit)... it lost some stickiness.

Cutting it with scissors was too hard on such a thin strip.

And on your other ideas, yes, I'm not done.

If I was done, then y'all wouldn't be able to see the challenges of this situation.
That's why I posted what I did.

Wanted everyone to see how challenging this was.   This scheme is going to be much more hard than the Railroad Fair- even with the challenges I had with it.

If this was a plastic model, you could just carefully go over those grabs.  But since they are free standing, they LOOK great, but they are a lot harder to deal with.

If I were to remove them (building stage- not now), then that would not work as well on a brass model- that is where plastic has an advantage due to the wall thickness.  On a plastic model, you have a relatively fat wall to hold the grabs once you put them in at the last step.

But on a brass model, the wall is thin, thin thin.  They would be loose, hard to glue (could not be soldered).

And in THIS model, there is no room for a trick.
A trick might be to remove the grabs during building.
Then glue a strip of 30 mil or 20 mil styrene on the inside.

Drill the holes for the grabs.

Then when all is painted, and the grabs are inserted, you have something substantial to hold the grabs and glue then to.

But in this model, that spot is where the decoder goes (in the nose) and there is honestly no room.
I doubt I even have 20 mil.

That's why when I made the extra socket for the LED in a recent post, I had to make sure I did not ADD to the thickness of the decoder assembly.

Ron Bearden
CSX N scale Archivist
http://u18b.com

"All get what they want-- not all like what they get."  Aslan the Lion in the Chronicles of Narnia by C.S.Lewis.

wazzou

  • Crew
  • *
  • Posts: 6729
  • #GoCougs
  • Respect: +1655
Re: New brass EP-2 clinic- part 2
« Reply #188 on: August 16, 2016, 11:44:48 AM »
0
Tamiya tape is also much thinner and flexible which allows it to be easily pressed into recesses.  It also has very straight edges. 
I'm sure you've noticed some of the waves on the taped edge on the front and the right side as well.
Bryan

Member of NPRHA, Modeling Committee Member
http://www.nprha.org/
Member of MRHA


peteski

  • Crew
  • *
  • Posts: 32958
  • Gender: Male
  • Honorary Resident Curmudgeon
  • Respect: +5343
    • Coming (not so) soon...
Re: New brass EP-2 clinic- part 2
« Reply #189 on: August 16, 2016, 03:09:26 PM »
0
I cut all my masking tape on a piece of sheet aluminum (which I clean thoroughly before using it. My tape doesn't seem to lose any stickiness.  I sometimes even put a piece of sacrificial tape down first, then on top of that the piece of tape I'll be cutting.  That way the piece on top will pull off the underlying tape surface easier than from the metal.

I'm really surprised that Tamiya tape did not work for you.

I'll go one step further than Bryan: I never use or trust the factory edge - I always cut a fresh  edge.
« Last Edit: August 16, 2016, 03:11:16 PM by peteski »
. . . 42 . . .

u18b

  • Crew
  • *
  • Posts: 3709
  • Respect: +1955
    • My website
Re: New brass EP-2 clinic- part 2
« Reply #190 on: August 16, 2016, 03:26:52 PM »
0
Just gave the Tamiya another try.  I made a couple of changes.

Spent the last hour and a half working on on Cab.
Cutting, piecing and masking.  Very tedious.

Took a lot of photos.

Going to paint the black today.
I'll post photos tonight probably.
Ron Bearden
CSX N scale Archivist
http://u18b.com

"All get what they want-- not all like what they get."  Aslan the Lion in the Chronicles of Narnia by C.S.Lewis.

Missaberoad

  • Crew
  • *
  • Posts: 3569
  • Gender: Male
  • Ryan in Alberta
  • Respect: +1170
Re: New brass EP-2 clinic- part 2
« Reply #191 on: August 16, 2016, 03:27:54 PM »
0
Pete, any reason why you use a piece of aluminum rather then glass?
The Railwire is not your personal army.  :trollface:

peteski

  • Crew
  • *
  • Posts: 32958
  • Gender: Male
  • Honorary Resident Curmudgeon
  • Respect: +5343
    • Coming (not so) soon...
Re: New brass EP-2 clinic- part 2
« Reply #192 on: August 16, 2016, 04:26:16 PM »
+1
Pete, any reason why you use a piece of aluminum rather then glass?

Yes, an important one: It is softer than either the steel blade or the glass (but  just as flat) so it doesn't dull the blade tip.

The piece of aluminum I'm using is a mouse pad from an ancient optical mouse (which needed a grid pattern printed on the aluminum pad). it is very flat, has rounded edges and a perfect size for a cutting surface.
« Last Edit: August 16, 2016, 04:28:09 PM by peteski »
. . . 42 . . .

dcutting

  • Crew
  • *
  • Posts: 359
  • Gender: Male
  • Respect: -57
Re: New brass EP-2 clinic- part 2
« Reply #193 on: August 16, 2016, 04:59:34 PM »
+1
Seems almost like since you are building several you should do something like this (9:30)...

David Cutting

Missaberoad

  • Crew
  • *
  • Posts: 3569
  • Gender: Male
  • Ryan in Alberta
  • Respect: +1170
Re: New brass EP-2 clinic- part 2
« Reply #194 on: August 16, 2016, 05:17:10 PM »
0
Yes, an important one: It is softer than either the steel blade or the glass (but  just as flat) so it doesn't dull the blade tip.

The piece of aluminum I'm using is a mouse pad from an ancient optical mouse (which needed a grid pattern printed on the aluminum pad). it is very flat, has rounded edges and a perfect size for a cutting surface.

Interesting, Thanks for the explanation!  :)
The Railwire is not your personal army.  :trollface: