Author Topic: Best Of New Brass EP-2 assembly & Mod clinic  (Read 107430 times)

0 Members and 2 Guests are viewing this topic.

u18b

  • Crew
  • *
  • Posts: 3709
  • Respect: +1955
    • My website
Re: New Brass EP-2 assembly & Mod clinic
« Reply #750 on: September 25, 2014, 10:29:45 PM »
0
Nice, but the complete circles of wheels are visible over the sideframes. Looks like the laser software only recognizes the outlines (not fill).  Looks like you'll have to do some trimming in your drawing.  :)

Yes, I saw that too.

I assumed that since the lady had to possibly mess with the grouping, that doing so might have changed something.

But if what you are guessing is correct (that my drawing was fine, the problem lies with the laser software), I'm not going to do anything about it.
It could be better, but it looks good.  It is not that big a deal to me to go back and make all those half-lines.

And remember that the plate will only be 4" across.
So it will be at least HALF the size of that photo.

The other minor flaw I saw is that the I in MILWAUKEE seems to be floating higher.
So I made double sure all the letters were
1.  Objects
2.  all on the same exact line.

Can't wait to see the final version.
« Last Edit: September 25, 2014, 10:31:30 PM by u18b »
Ron Bearden
CSX N scale Archivist
http://u18b.com

"All get what they want-- not all like what they get."  Aslan the Lion in the Chronicles of Narnia by C.S.Lewis.

TiVoPrince

  • Crew
  • *
  • Posts: 5156
  • Respect: +3
    • http://www.technologywrangler.com
Re: New Brass EP-2 assembly & Mod clinic
« Reply #751 on: September 26, 2014, 08:02:31 AM »
0
Possibly
everything was converted from your original hairline outline and solid fills. Moving to a heavier line could have been necessary to get results from the laser etching process. Converting the fill to none may have been necessary to prevent the laser from turning the truck sideframes into bright silver blocks based on a solid fill.

To me the wheel circles remind of an isometric view on a blueprint and are not distracting in that context...
Support fine modeling

davefoxx

  • Crew
  • *
  • Posts: 11675
  • Gender: Male
  • TRW Plaid Member
  • Respect: +6801
Re: New Brass EP-2 assembly & Mod clinic
« Reply #752 on: September 26, 2014, 08:21:33 AM »
0
To me the wheel circles remind of an isometric view on a blueprint and are not distracting in that context...

+1.  I like it, Ron.

Member: ACL/SAL Historical Society
Member: Wilmington & Western RR
A Proud HOer
BUY ALL THE TRAINS!

u18b

  • Crew
  • *
  • Posts: 3709
  • Respect: +1955
    • My website
Re: New Brass EP-2 assembly & Mod clinic
« Reply #753 on: September 26, 2014, 10:00:54 AM »
0
Possibly
everything was converted from your original hairline outline and solid fills. Moving to a heavier line could have been necessary to get results from the laser etching process. Converting the fill to none may have been necessary to prevent the laser from turning the truck sideframes into bright silver blocks based on a solid fill.

To me the wheel circles remind of an isometric view on a blueprint and are not distracting in that context...

I agree.  That's why I wasn't worried if no changes are made.

I see two possibilities.

1.  The laser software sees objects regardless of color.

2.  But my understanding was the laser etches what is black.

So here is what I'm hoping happened.

She tried my drawing as-is.  Lines too fine.
She selected the whole object.
Corel (like many programs) has left mouse button is Fill, right button is Outline.

If she ACCIDENTALLY filled- it would have messed up the drawing-- oops.
If she clicked the Undo button, all would be well....
But is she then made the Fill nothing..... than that would account for what you see.

I'm not going to press her.  It's not a big deal (especially since I have made her work harder than she should have because of my Font error.).

So I re-sent the file with the solids filled in white.

Hopefully- this will get it correct.  But if not.... like Tivo said, it sort of looks like a blueprint.

Either way looks good to me.

Ron Bearden
CSX N scale Archivist
http://u18b.com

"All get what they want-- not all like what they get."  Aslan the Lion in the Chronicles of Narnia by C.S.Lewis.

u18b

  • Crew
  • *
  • Posts: 3709
  • Respect: +1955
    • My website
Re: New Brass EP-2 assembly & Mod clinic
« Reply #754 on: September 27, 2014, 01:34:18 AM »
0
I had some more windows to install.  Turned out these were the hardest.
The ones that face forward were hard to see and space was tight.

For example here.....
The curve of the hood and the proximity to the roof make this one tricky.


I trimmer the glass so it would fit better.

Once all the glass was installed with clear coat, I then went back and added a little epoxy for added strength.

I then painted the weights.
Maybe it is overkill or a waste, but I have found in dealing with old locos that lead oxidises pretty badly.
Sealing the weights with clearcoat may not be necessary, but I am hoping that oxidation would be greatly reduced.

And you can see how I trimmed one end and then made room for the flywheels.


The weight had to be trimmed on one side at the end because of the plug I added to the wall.


Getting the weight in is a little tricky with that wire.


I added epoxy to the front edges but not where the flywheel would be.
Notice on the side, I epoxied the jumper wire to the side of the weight.
This restricts the movement of the wire at the socket (where I do not ever want it to break!).


Here is the other side.
You can see I ran the wire under the weight.


With the windows and the weight done, I could do the final assembly.

Now I finally get to use those frame extension/screw covers I invented.


Here is a close-up.


Ron Bearden
CSX N scale Archivist
http://u18b.com

"All get what they want-- not all like what they get."  Aslan the Lion in the Chronicles of Narnia by C.S.Lewis.

u18b

  • Crew
  • *
  • Posts: 3709
  • Respect: +1955
    • My website
Re: New Brass EP-2 assembly & Mod clinic
« Reply #755 on: September 27, 2014, 01:39:15 AM »
0
Yay!

It is a good feeling being this far.

All painted and assembled.

DCC still works.
slips a little with 13 passenger cars!

Left to do:

2 more wind deflectors
blacken wheels.
build catenary for photo modules.
Take a whole bunch of photos
Do the secret stuff I have planned.  :ashat:


Ron Bearden
CSX N scale Archivist
http://u18b.com

"All get what they want-- not all like what they get."  Aslan the Lion in the Chronicles of Narnia by C.S.Lewis.

bbussey

  • Crew
  • *
  • Posts: 8890
  • Gender: Male
  • Respect: +4713
    • www.bbussey.net
Re: New Brass EP-2 assembly & Mod clinic
« Reply #756 on: September 27, 2014, 08:33:39 AM »
0
Outstanding.
Bryan Busséy
NHRHTA #2246
NSE #1117
www.bbussey.net


Cajonpassfan

  • Crew
  • *
  • Posts: 5393
  • Respect: +1961
Re: New Brass EP-2 assembly & Mod clinic
« Reply #757 on: September 27, 2014, 01:16:01 PM »
0
+1! :o
Otto K.

u18b

  • Crew
  • *
  • Posts: 3709
  • Respect: +1955
    • My website
Re: New Brass EP-2 assembly & Mod clinic
« Reply #758 on: September 27, 2014, 07:38:43 PM »
0
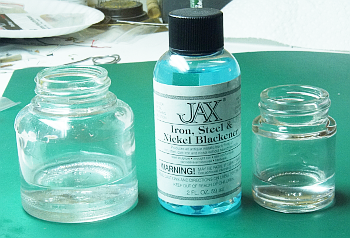
Had some free time today, so I began to experiment with Jax Blackener.

As I had thought, it is essentially Selenium Acid.

Here is the bottle in the middle.  I poured a little on the right.  And on the left is some dissolved baking soda to neutralize the acid.


I wanted to experiment before I did anything to my nice wheels.  So I dug in my parts box and found some old wheels to some 1960s locos.

I cleaned them up with acetone and a toothbrush.
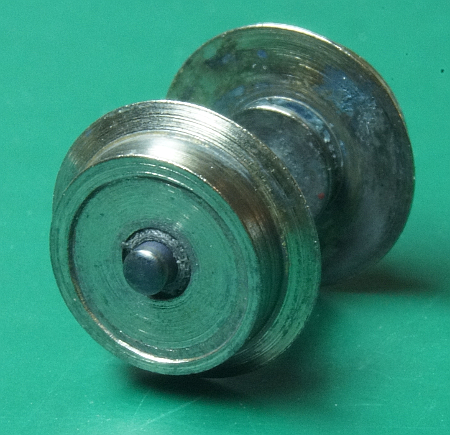
I then only used tweezers to pick them up.

Here was the first attempt.
Straight selenium acid right out of the bottle- I know others said dilute, but this was experimenting right?
No fizzing or bubbling or anything like that.
Took a good while 5 minutes or so before the acid worked on the nickel (or whatever it is).
Finally started turning black.

End result:
Splotchy (look at back wheel).
Had a black fuzzy covering that wiped off 85% (as you can see here- wiped off).


Here is the second one- of course it may have been made of different materials.
This one has a brass axle.
I diluted the acid ~50%.

WOW.  This stuff is all over and attacks brass immediately.  Turned VERY black.
Once again, the nickel chrome whatever took much longer.
This time I constantly swirled the acid in the fully covered wheelset.

Results were much more even and permanent.
This is after wiping- as before.
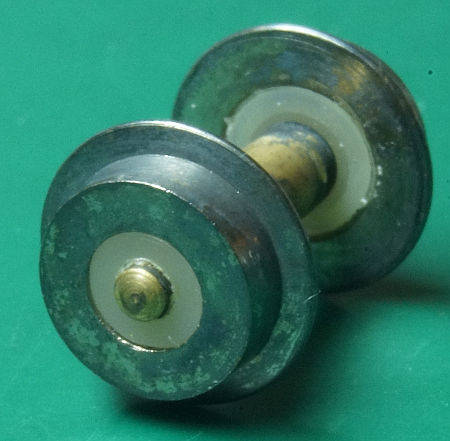


The blackened brass flaked. 
Also, that is still a bit splotchy.
I want better results than this.
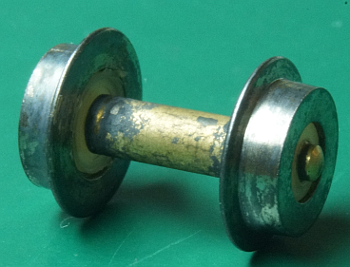


Here is my Kumata wheelset.  It is very nice- but very shiny!

The first thing I see is a BRASS gear in the center.
Directions say you can brush on, but my best results before was in immersion and constant swirling.
That will mean that gear will be black and flaky making a lot of gunk in the drive train.
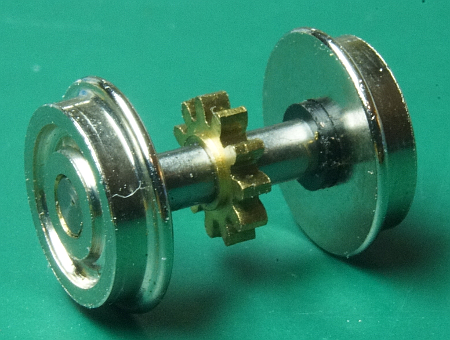


So I'm thinking about a couple of things.

First, I'm going to leave my Railroad Fair loco alone for now.
Since I also have the Ready To Run cigar EP-2, I decided to experiment on that.
In fact, that's what I have done in some of this project.
This was my test bed to try out ideas.
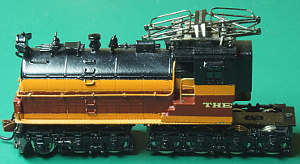


I debated whether to use my NWSL Puller to remove just the wheels (leaving the axles and gear alone).
But that is a LOT of work- and I still have to gently beat the wheels back on.  I predict that process would damage the blackening- thus unproductive.

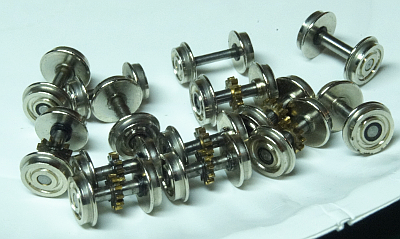
So maybe, I'll blacken the wheels and then run them in the RTR for a while to wear the blackening off the gears and THEN place them in the Railroad Fair loco.

So I pulled all of the wheels out of it.  That's a lot of axle for one loco (14!).
Washed with Dawn and hot water with a toothbrush.


That's as far as I got...... but here is what I'm thinking (brainstorming time).

I think the problem with blackening is the VERY slick nickel surface.

I think when I get some free time this week, I may take a wheelset and use the Air Eraser on it (and I'll go easy).
That will place a rough surface on it.
Of course I'll focus on the outside surface and try to stay away from the tread, axle and gear.
In fact, I may make a jig (a brass or styrene plate with a perfect matching hole in it so the grit only goes on the outside surface).

With an etched surface, I would think the blackening would be darker and more permanent.

Ideas and comments welcome.


« Last Edit: September 27, 2014, 07:41:33 PM by u18b »
Ron Bearden
CSX N scale Archivist
http://u18b.com

"All get what they want-- not all like what they get."  Aslan the Lion in the Chronicles of Narnia by C.S.Lewis.

glakedylan

  • Crew
  • *
  • Posts: 1481
  • Gender: Male
  • Give Respect. Expect Respect.
  • Respect: +234
    • Justice Kindness Humbleness —Micah 6.8
Re: New Brass EP-2 assembly & Mod clinic
« Reply #759 on: September 27, 2014, 07:52:56 PM »
0
this is a wonderful thread that shows your skilled and gifted work
thanks for sharing

kindest regards
Gary
PRRT&HS #9304 | PHILLY CHAPTER #2384

u18b

  • Crew
  • *
  • Posts: 3709
  • Respect: +1955
    • My website
Re: New Brass EP-2 assembly & Mod clinic
« Reply #760 on: September 27, 2014, 11:50:02 PM »
0
More experimentation.

End result...... DANG!!!. As in wow.  Incredibly good. Amazing.  Or in the Deep South ..... Dad gum!
(keep reading).

I took one those 60's wheels I had Blackened a little
Took the worst side and etched it with air eraser.
Took maybe 30 seconds.
Cleaned.


Left the other side alone.


Acid watered down a bit more than 50%.  So let's guess 40/60.


Started looking pretty dark after only 30 seconds.
Dropped in baking soda water.
Rinsed dried.
Actually, not as dark as it appeared.
Lesson- looks darker in the acid.


Here is the other side.


So I dropped it back into the selenium acid.
This is after 2 more minutes.


And the other side.


After vigorously wiping with a rag, this was the un-etched side.  Still pretty good.


And this is the air erased etched side.  Clearly, the tone is much smoother and consistent.


The results were so good, I threw caution to the wind.
Here is a stock Kumata wheelset.


I air erased the outside surface AND the tread and flange.  Both sides.
Cleaned up.
Dropped in acid.
swirled constantly.
Hey this is getting darker faster.
After only one minute 30 seconds, I pulled it out.
Dropped it in baking soda water.
Rinsed, dried.

Wow.  Clearly this metal is different from the 60s wheelset.


And actually, at 1.5 minutes, the brass gear does not look bad.


After cleaning vigorously with a wash cloth, this is how it looks with all the fluff off.


I think y'all convinced me this was a good thing.

« Last Edit: September 28, 2014, 02:30:51 PM by u18b »
Ron Bearden
CSX N scale Archivist
http://u18b.com

"All get what they want-- not all like what they get."  Aslan the Lion in the Chronicles of Narnia by C.S.Lewis.

nickelplate759

  • Crew
  • *
  • Posts: 3335
  • Respect: +1038
Re: New Brass EP-2 assembly & Mod clinic
« Reply #761 on: September 28, 2014, 10:27:55 AM »
0
Just a thought - when you put the wheelset in the acid bath, could you protect the gear with something like petroleum jelly (after testing to see how the jelly reacts with the acid, of course)?

George
George
NKPH&TS #3628

I'm sorry Dave, I'm afraid I can't do that.

peteski

  • Crew
  • *
  • Posts: 32948
  • Gender: Male
  • Honorary Resident Curmudgeon
  • Respect: +5338
    • Coming (not so) soon...
Re: New Brass EP-2 assembly & Mod clinic
« Reply #762 on: September 28, 2014, 02:59:03 PM »
0
Just a thought - when you put the wheelset in the acid bath, could you protect the gear with something like petroleum jelly (after testing to see how the jelly reacts with the acid, of course)?

George

From my experience that does in fact work just as you describe it.

Ron, that looks great!  As usual, you acheive excellent results.
. . . 42 . . .

u18b

  • Crew
  • *
  • Posts: 3709
  • Respect: +1955
    • My website
Re: New Brass EP-2 assembly & Mod clinic
« Reply #763 on: September 28, 2014, 05:42:34 PM »
0
Since one was a success.  Time to do all.

Prep.

All wheels washed hot water, Dawn detergent, and toothbrush) and dried.
All wheels etched with air eraser.
All wheels washed again.

Going to do 2 batches of 7 wheelsets each (instead of 14).

Acid, syringe for measuring (I want the results to be the same in both batches), and cup for blackening.


Wheels ready to be dumped in.


Cup of water and baking soda to neutralize the acid and stop the blackening process.


Hot tap water for diluting the acid.


I did two full syringes of acid.


Rinsed the syringe thoroughly.
Added two and a half of the hot water to the acid cup.


Getting ready.  Stop watch.  Ready to dump wheels into pot.

Go.


Once wheels are dumped in, swirl gently constantly.


I stopped at 1 minute 10 seconds (EDIT- I think 1 min 25 would be better)

Added lots of water to thin the acid quickly, then dumped the water.
Then dumped the wheels into the baking soda water.  Let them sit for a few minutes.


Rinse thoroughly to get baking soda off.


I then washed again with detergent and toothbrush to get the excess black off.


Last step was to dry and then take a washcloth and vigorously wipe each clean.
This was end result.


I then installed them into the RTR test bed loco to wear any other junk off wheels and gears.
Running for a little while.

« Last Edit: September 28, 2014, 05:46:26 PM by u18b »
Ron Bearden
CSX N scale Archivist
http://u18b.com

"All get what they want-- not all like what they get."  Aslan the Lion in the Chronicles of Narnia by C.S.Lewis.

u18b

  • Crew
  • *
  • Posts: 3709
  • Respect: +1955
    • My website
Re: New Brass EP-2 assembly & Mod clinic
« Reply #764 on: September 28, 2014, 05:48:26 PM »
0
By the way....

Do I need to sand the tread down for electrical contact?

No.  The blackening conducts electricity.

Set my electrical meter to continuity measure.

Probes touch wheel and rail---- beeeep.


Good to go.


Ron Bearden
CSX N scale Archivist
http://u18b.com

"All get what they want-- not all like what they get."  Aslan the Lion in the Chronicles of Narnia by C.S.Lewis.