Author Topic: Tehachapi, BC  (Read 399756 times)

0 Members and 1 Guest are viewing this topic.

LIRR

  • Crew
  • *
  • Posts: 1285
  • Respect: +1804
Re: Tehachapi, BC
« Reply #990 on: June 05, 2015, 01:58:08 PM »
0
agreed....great work. but the plywood gives away the scale...

GaryHinshaw

  • Global Moderator
  • Crew
  • *
  • Posts: 6346
  • Respect: +1869
Re: Tehachapi, BC
« Reply #991 on: June 05, 2015, 07:59:27 PM »
0
Thanks for the comments gents.  It's true that the rail is oversize, but it is more oversize in width than in height.  That and the oversize Pandrol clips make the track look a bit chunky, but it still looks pretty good in person.  Ed, I do not remove the weathering from the rail head.  I find it to be plenty conductve, and keeping it minimizes the effect of the wide railhead.

LIRR, there is nothing like 10 scale feet of bedrock (plywood) to make a firm foundation for N scale trains!  In the Vortex I'm using 1/4" baltic birch plywood for maximum finger clearance, and while I like it ok, I still prefer 3/4" everywhere else.

I was preparing to send car17 a PM with some ballasting notes, but I thought I would just post it here instead, so you all can see how compulsive I am. ;)  Ballasting the concrete tie mainline is a 3-pass operation (for me):

1. Paint the Pandrol clips.  I use Rail Tie Brown (or similar), a #0 detail brush and a magnifier.  It takes a steady hand and a properly loaded brush, but with those ingredients it goes pretty quickly: 30-40 min per foot.  (Maybe that is not quick...)

2. First coat of ballast.  I pour a ridge of ballast between the rails and quickly smooth it out with a 1/2" flat sable brush.  I then more carefully tamp the ballast down to the level of the tie tops.  I form the shoulders in a similar way, first tamping along the outside of the rail down to the tie tops, then forming a decent shoulder with the brush held perpendicular to the track line.  I wet it with rubbing alcohol (70% is fine) and drizzle matte medium.  Contrary to conventional wisdom, I then tamp any loose ballast back in place with the tip of a toothpick.  This is a pretty tedious step, but I find this step to be especially important to keep the ballast looking well tamped along the rail base and near the clips.  If you wait to scrub it clean after drying, the paint on the clips can flake off.  This is the longest and most tedious step: ~90 min per foot.   :facepalm:

3. Second coat of ballast.  This is when I form the characteristic ridge of ballast between the rails: I spread a thin layer of ballast between the rails then I hold the brush perpendicular to the track line and gently brush the layer away from each rail base towards the middle.  (If you try to do this all at once in step 2, you will excavate a lot of ballast from between the ties and it will look like sh&t - I found that getting this ridge to look right required 2 passes.)   I also touch up any bare or rough spots in the shoulders during this step.  Wet & glue as before and clean off any stray bits with a toothpick.  This pass goes much faster: ~30 min per foot.

For weathering I apply Bragdon powders to the ballast.  Between the rails I use a blend of Soot and Weathered Brown applied using a largish round brush using big strokes.  Make sure there is not a big clump of powder in one part of your brush or you can get splotchiness in the effect.  I also apply straight Weathered Brown right along the rail base with a narrower brush.  In the photo above the effect is pretty subtle, but it looks more obvious in person, especially under good light.   Here's a stretch of double track showing before & after weathering:


When I start doing full scenery I will come back and revisit the track weathering and maybe apply flange grease and other such effects where appropriate.   The reason I do the ballast before scenery is because it is much easier for me to shape it how I like it without scenery getting in the way.

-gfh


svedblen

  • Crew
  • *
  • Posts: 644
  • Gender: Male
  • Respect: +349
    • Three Yards Yard - beware - it is H0 - No, now it's O
Re: Tehachapi, BC
« Reply #992 on: June 06, 2015, 08:46:09 AM »
0
Pandrol clips painted to date: 31,920  :facepalm:
Pandrol clips still to paint: 40,800 :RUEffinKiddingMe:

That´s dedication! Keep going  :)
Lennart

Kevin C

  • Crew
  • *
  • Posts: 121
  • Gender: Male
  • Respect: +13
Re: Tehachapi, BC
« Reply #993 on: June 06, 2015, 11:45:43 PM »
0
The process may be time consuming but the results are awesome. I am hoping that one day I will get the opportunity to visit you to see your layout in person.

Kevin

tom mann

  • Administrator
  • Crew
  • *****
  • Posts: 10917
  • Representing The Railwire on The Railwire
  • Respect: +1014
    • http://www.chicagoswitching.com
Re: Tehachapi, BC
« Reply #994 on: June 07, 2015, 01:26:23 PM »
0
Gary's ballasting work on the Hinshaw Valley is difficult to match. 

Bendtracker1

  • Crew
  • *
  • Posts: 1466
  • Remember The Rock!
  • Respect: +1398
    • The Little Rock Line
Re: Tehachapi, BC
« Reply #995 on: June 07, 2015, 03:14:06 PM »
0
Ummm, I'd say it looks pretty obvious in the picture, gorgeous work Gary....

  In the photo above the effect is pretty subtle, but it looks more obvious in person, especially under good light.   Here's a stretch of double track showing before & after weathering:


LIRR

  • Crew
  • *
  • Posts: 1285
  • Respect: +1804
Re: Tehachapi, BC
« Reply #996 on: June 07, 2015, 04:54:06 PM »
0
Agreed Gary....I use 1/2  birch plywood for roadbed on top of 3/4 birch plywood sub roadbed

GaryHinshaw

  • Global Moderator
  • Crew
  • *
  • Posts: 6346
  • Respect: +1869
Re: Tehachapi, BC
« Reply #997 on: August 17, 2015, 08:05:25 AM »
0
2015 - The Year of the Vortex.

Brace yourselves for a novella here.  There is a reason I haven't posted much in the last several months, and it's not because I haven't been working on the layout, but rather because all of the pictures would have looked hideous, like this:


(the Vortex under consruction, with every tool and supply in the arsenal strewn about), or this:


(the "shoo-fly" that used to close the upper deck; without it, running trains has been severely hampered).  Rewind to the beginning of 2015, when I had made the supporting benchwork for the Vortex and had started the second loop:


This is a good time to remind you that the Vortex serves many functions, and is the result of trying to stuff 10 pounds of sh#t into a 5 pound bag.  Its main function is a helix that serves as south staging (Mojave), but it also has two independent mainline loops that run concentrically outside the main helix (the combination is called the Vortex).  The loop pictured above contains one inner track -- the bottom of Mojave staging -- and a double-track outer loop that connects Bakersfield -- north staging -- to Edison, the first town on the way to the pass.  Because this mainline section will remain visible I wanted to ballast & weather it like the rest of the mainline before I built more helix turns over it.  Given that this segment comprises ~20 feet of mainline (times 2 tracks) and that my pace for ballasting & weathering is about 3 hours per foot, you can do the math and see how many hobby hours went into finishing this loop…   Here are a few shots taken when that was done:


The front side of the loop has a #10 mainline crossover (roughly corresponding to Magundon the prototype), while the back side has "Control Point Charlie":


a crossover that connects east (Mojave staging) to west (the main line to Bakersfield).  This crossover will only be used for continuous running and/or re-staging. 

Up to this point the roadbed could be supported with simple risers, but the remaining loops would require more conventional helix supports.  I settled on a design that employed pairs of 1x3 risers with 1x1 cleats for supporting cross-members (see above).  One of the challenges was figuring out how to secure the tops of the 1x3's to the pre-existing Loop benchwork above.  Each one required a different solution; here are some examples:
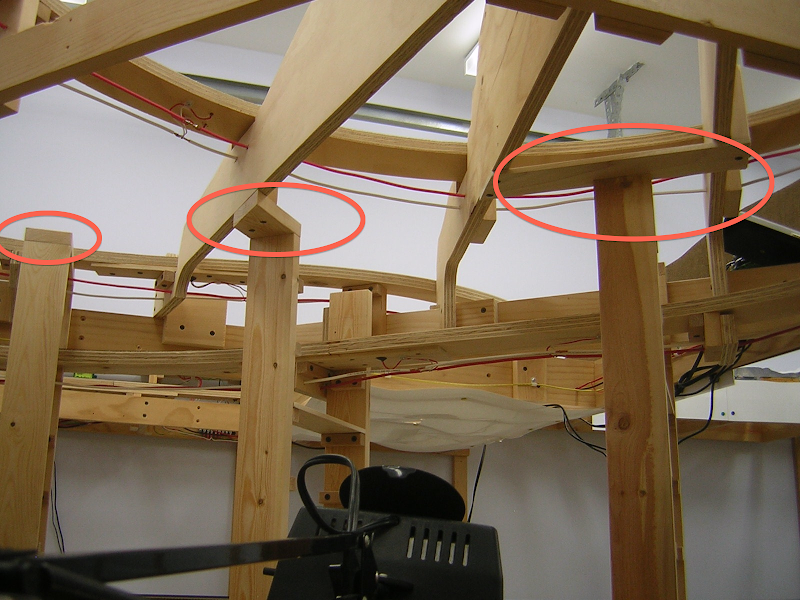


One of the best decisions I made in this build was to have the remaining loops of roadbed cut from 1/4" Baltic birch plywood on a CNC router.  I was able to make a simple line drawing in xtrakcad, export it to pdf, email it to a local maker shop, and pick up the parts a few days later:
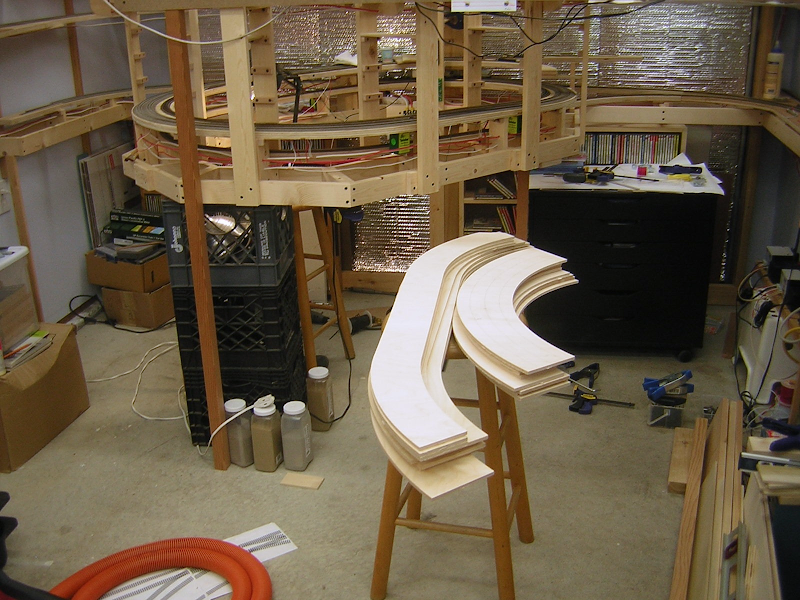


And they all fit perfectly!  The next few loops went pretty swiftly, though there was plenty of crawling into and out of the helix, and crouching while inside of it - quite taxing on an aging body!  Here is a shot midway up the climb:


In the background you can see freshly glued track being weighted down while in the foreground I am soldering two sections of Peco flex together and adding feeders to them.  What fun it was to snake semi-rigid 6-foot sections of track into the helix without breaking off the feeders, but I was determined  to have all curved track joints be pre-soldered.  The results are worth it though.

At this point we are into June and I was still on track to get the helix operational in time for a few practice ops sessions so I could host a session or two in "Vanrail 2015", our semi-annual invitational ops event taking place next month.   Sadly it was about this time that I learned that my father's 8 year battle with melanoma had entered stage IV and I had to leave for California immediately to place him into hospice care.  For better or worse, dad died less than a week later, on June 28 and I have spent most of the last month in California helping my brother take care of his affairs, so my plans to host a Vanrail session this year have evaporated.

Fast forward to August and the Vortex is now operational.  Here are some detail shots:


This shows the construction with the Baltic birch roadbed: the rise is 3 1/4" per turn (2.0%) and the finger clearance is 3" which is enough to rectify derailments.   The lower 3 turns are triple track:
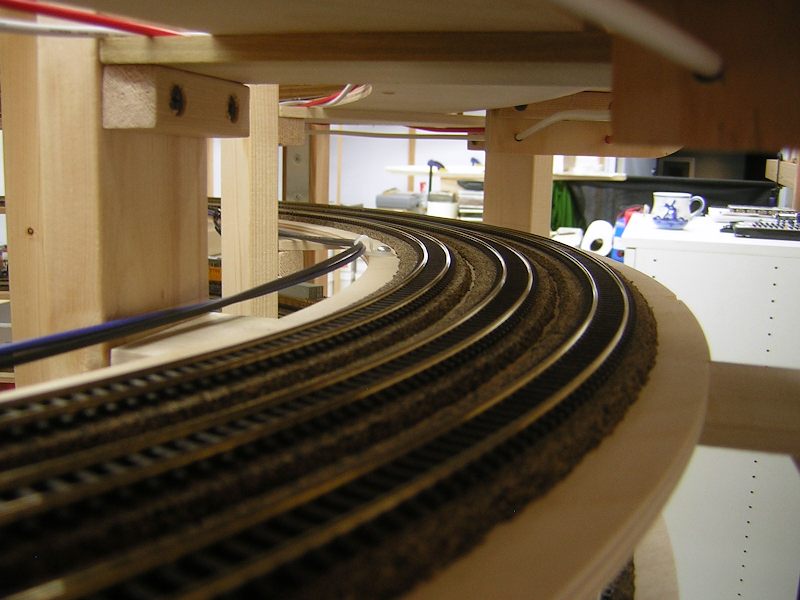


The two inner tracks can stage 2 long northbound (originating) trains each while the outer track holds southbound (terminating) trains.  The two upper loops are double track to clear the pre-existing mainline loop that connects the lower deck mainline (still to be constructed) with the upper deck, the ballasted track in this shot:
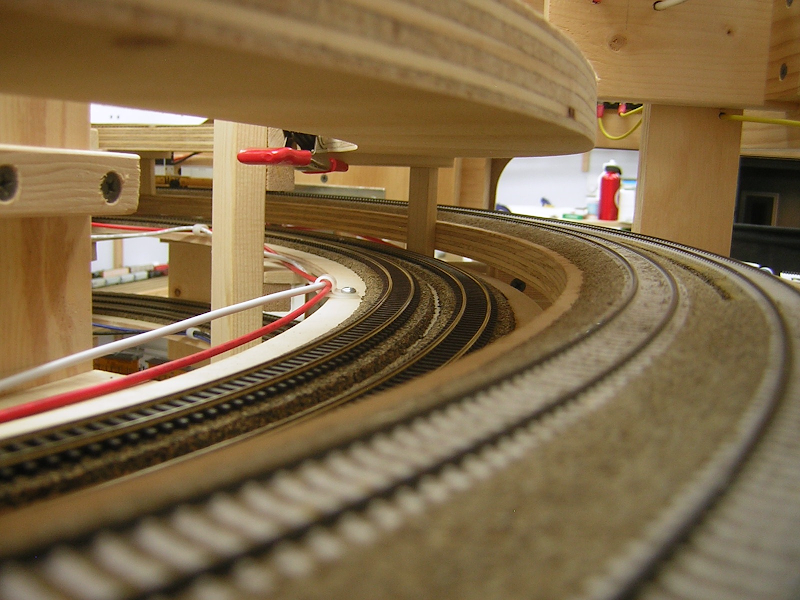


The double track portion of the helix can stage two more northbound trains for a total of 6.

Here is an arial view showing how the top of the helix connects to the upper deck mainline: the tracks at the far left connect to the helix just below the edge of the photo, and to the east slope main along the top of the photo:


The section on the left is separated from the Loop scene by a photo backdrop so as to not detract from it.  Next is a bird's-eye view of the helix:


This gives a good depiction of how I pictured it in my head when I was planning the layout (with staging stacked under the Loop).  It's really gratifying to see it in 3-d now!

Here is the view of the terminal manager's "pit" where staging will be managed:


and the view from in the pit:


Here is the Bakersfield-Edison mainline taking one turn in the Vortex to gain elevation:


The track on the far left connects Bakerfield staging with the storage yard below.  Ballasting track is the only real "modeling" I have done in the past year, but I do rather enjoy it:   :facepalm:


On the other side of the Vortex you can see the two connections to the storage yard:


The foreground track connects to the bottom of the staging helix while the background track connects to Bakersfield, as pictured above.  This should provide a pretty flexible staging scheme.

In other developments, I added a booster for extra power, and several circuit breakers for fault isolation:


Still to come is a permanent shelf for these items.  I also wired up the storage yard ladder for DCC route control with two DS64 stationary decoders:


Finally, we arrive at Friday Aug 14, the day before my first session in over a year:


What a mess!!  Every horizontal surface in the room is cluttered with tools and supplies.  Here we are 24 hours later, Saturday Aug 15 just one hour before guests arrive:


This last shot sums up the concept of the Loop shelf and the Vortex pretty nicely:


The brings to a close the most technically challenging part of the layout build and I'm really glad to have the bulk of it behind me!  I'll post some shots from Saturday's ops session on Monday.  In the meantime, when I was down in California sorting through photos, I came across this Polaroid from 40 years ago showing how I learned woodworking from my dad while building decks with him:


Rest in peace dad.

Smike

  • Crew
  • *
  • Posts: 819
  • Respect: +196
Re: Tehachapi, BC
« Reply #998 on: August 17, 2015, 09:01:37 AM »
0
Excellent work Gary! To refreshing to see a big update on the Tehachapi, BC, it makes one feel eveything is still going well in the world  :)

What is the plan with the ballested outter tracks on the vortext? I assume with the time it takes to ballest this the Gary way that you plan on making that part senic?

davefoxx

  • Crew
  • *
  • Posts: 11675
  • Gender: Male
  • TRW Plaid Member
  • Respect: +6802
Re: Tehachapi, BC
« Reply #999 on: August 17, 2015, 09:04:18 AM »
0
Gary,

No one does benchwork construction or finished trackwork nearly as nicely as you.  Kudos!

DFF

Member: ACL/SAL Historical Society
Member: Wilmington & Western RR
A Proud HOer
BUY ALL THE TRAINS!

C855B

  • Crew
  • *
  • Posts: 10872
  • Respect: +2420
Re: Tehachapi, BC
« Reply #1000 on: August 17, 2015, 09:13:49 AM »
0
Condolences for your loss, Gary. Clearly you can take comfort in the skills your dad taught you; I spent most of my adult life unlearning much of my dad's well-meaning but hamfisted wisdom. Fortunately he had talented friends.

Frankly, I am exhausted just reading and looking at what you have been working on. How do expect me to get anything done today, I'm tired already! ;)  That's a major bit of engineering - well planned and well-executed. Three hours per foot? Please don't tell me things like that before I've started laying track. Yes, I realize that's what it takes to make concrete ties look right... but... still. :scared: I'm just happy that concrete ties weren't vogue in 1970.

Of course you know I fully sympathize with "the mess" - it seems like half the job of building the GC&W HQ is corralling clutter.

Thanks for the update! We've certainly missed following along.
...mike

http://www.gibboncozadandwestern.com

Note: Images linked in my postings are on an HTTP server, not HTTPS. Enable "mixed content" in your browser to view.

There are over 1000 images on this server. Not changing anytime soon.

Philip H

  • Crew
  • *
  • Posts: 8910
  • Gender: Male
  • Respect: +1655
    • Layout Progress Blog
Re: Tehachapi, BC
« Reply #1001 on: August 17, 2015, 09:22:46 AM »
0
Gary,

No one does benchwork construction or finished trackwork nearly as nicely as you.  Kudos!

DFF

I agree.  Must be the scientist in you finding a way out.

And I see you learned wood working the same way I did - hand the old man the saw, run his tape lines for him, eventually get to make simple cuts etc.  My dad once made me rehang a wooden gate I had built because he wanted it to swing out to the right, and I did it swinging out to the left.  Made a big impression on me.  The gifts your dad clearly gave you are priceless, and I join everyone here in wishing him a peaceful rest.

And now I have to go clean my train room . . . . .  :facepalm:
Philip H.
Chief Everything Officer
Baton Rouge Southern RR - Mount Rainier Division.


Cajonpassfan

  • Crew
  • *
  • Posts: 5393
  • Respect: +1961
Re: Tehachapi, BC
« Reply #1002 on: August 17, 2015, 10:45:58 AM »
0
Gary, your ballast is simply stunning, wow. I can understand the 3hrs/ft scenario.
But excuse me, who ballasts track in a helix???
Otto K.

Kevin C

  • Crew
  • *
  • Posts: 121
  • Gender: Male
  • Respect: +13
Re: Tehachapi, BC
« Reply #1003 on: August 17, 2015, 02:10:42 PM »
0
Gary.

I think we should run a competition to see who's layout room gets into a bigger mess while we are busy with construction. My room looks exactly the same with every inch of layout surface covered with materials and tools. At least an occasion comes around every so often which gives us no option but to tidy up and get things back in order.

Jokes aside, the progress you are making is amazing. I am glad you also found a contact to get your wood cut using CNC machinery, mine was the laser. It just saves so much time and the accuracy is the best part. Your benchwork is so neat.

I look forward to your updates. Keep them coming.

Kevin


ednadolski

  • Crew
  • *
  • Posts: 4813
  • Respect: +1757
Re: Tehachapi, BC
« Reply #1004 on: August 17, 2015, 02:25:26 PM »
0
Impressive job of engineering and implementation on all this Gary!   Hope you don't mind, just had a few random questions that come to mind:

 - How long does it take for a train to climb the helix/vortex at typical speed?

 - What's the average number of hours per week that you spend on layout construction?

 - The photo backdrop behind the Loop looks great, esp. the multi-layer effect.  Did you print that all out on some kind of heavy paper or cardstock?  is it all on one sheet, or did you combine multiple pages?


Thanks for posting all this - it's really a treat to follow along!

Cheers,
Ed