The question is to Bob Gilmore but anyone's observations are welcome. Bob I see only one isolation gap ....

... in your turnout (beautiful turnout by the way) and wonder if you filled one in on the other side of the frog or if you are treating the closure rails as part of the frog as far as wiring the frog for polarity? I'm interested in this as ....
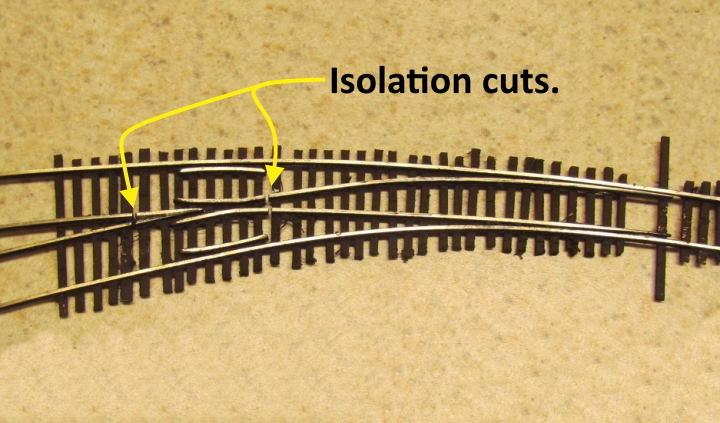
... I've been making two isolation cuts close to the frog as I learned via Fast Tracks instructions. I like the looks of yours better and the only negative I can see with having the closure rails wired with the frog area might be if a wheel touches the open point going through the turnout causing a short. I don't think my turnouts have been built to the same standards as yours and I possibly could have wheel contact in that area at times.
Thanks for any input,
Sumner
ALL of my turnouts since I started making them back in the late 1970's in N-scale were designed to be electrically "friendly"...meaning that the closure rails are the same polarity as the adjacent stock rails.
However, when I first started building them, I would often have a "long frog" since I was switching current with the under-the-subroadbed Tortoises since my Ntrak modules were DC.
For a while, after being on the operating crew of Lee Nicholas's HO-scale Utah Colorado Western model railroad and seeing that many of Lee's turnouts had "dead frogs" and everything ran smoothly through them, a few of my #6 turnouts also did not have powered frogs (even though they had unconnected green insulated 22AWG power leads soldered to their frogs) in order to simplify my rat's nest of DC wiring. These turnouts had frogs that were as short as I could make them.
After I bit the bullet, ripped out all of my overly-complicated DC wiring and installed new DCC wiring, I wanted both electrical current and DCC signals to be reliably present on each and every piece of powered rail on my layout, so all three of the dead frog turnouts had their frogs properly wired up to their Tortoises, and all of my newer construction turnouts had/have nice, as-short-as-possible, live frogs.
You might notice that most of my turnouts have clearances between the closure rail toes and the adjacent stock rails that are noticeably smaller than NMRA recommendations for a much more prototypical look. This also requires that both stock rails and closure point rails are the same polarity, because shorting would definitely happen here on most of my turnouts if they weren't.
I started rolling my own turnouts long before there was a Fast Tracks, so my first ones were proportioned following NMRA recommended practices. Later, I acquired prototype turnout drawings (UP) and now my turnouts are proportioned according to UP prototype information and these proportions are especially evident at the frog, the guardrails and at the closure point rails.
Photo (1) - Frog isolation gaps and frog construction: Photo (2) - Proto87Stores Closure Rail Heel Hinges:
In the last group of six turnouts I constructed for my center siding at Emory/Devils Slide layout sections, I used Proto87Stores Tri-Planed Closure Point Rails, which are prototypically planed on the stock rail side so that there is no need to file away the stock rails to clear closure points rails. This adds ten bucks each to the cost of my turnouts, but until I learn how to do this myself, I think it's worth the price because of the subtle, yet noticeable improvement in my turnouts' appearance.
Photo (3) - Proto87Stores Tri-Planed Closure Rails & my own throw bar hinges for Code 55 turnouts:
I like to build groups of turnouts in monolithic units for some reason. I like the long seamless stock rails and smoothness this produces and since I build my turnouts upon paper templates (no jigs or fixtures) I think it's easy to do. I also strip Rail Craft/ME ties off of leftover flex pieces and insert these into the monolithic units in the process of building them. I like to keep as many spikeheads visible as possible. As you can see, I use a LOT of PCB ties since I have an almost endless supply of them (I bought out Rail Craft's stock of PCB tie strips when they got out of the hand-made turnout business). It's probably overkill, but since my layout is portable, I would rather do overkill than have broken turnouts because of the stresses of breaking down, transportation and setting up.
Photo (4) - Monolithic group of turnouts for Emory/Devils Slide Center Siding layout sections (#4 Wye and two #8 turnouts) still taped to computer printed paper template:
I build my turnouts to clearances that are tight enough that my NMRA gauge (or "gage") just barely squeeks through them...high interference. This makes the turnouts look good and run very smooth, but requires that all of my rolling stock and motive power have perfectly gauged wheelsets. So, when I buy anything new to run on my layout, I always check the gauge before putting them on the layout, assuming that they are incorrectly gauged, and I am about 99% correct on every engine I've ever acquired...the exceptions being my Kato FEF's and my son's brass GS-2's by LIK.
Cheerio!
Bob Gilmore


